Model 421509 Version 1.1 09/04
4
Operation
There are three operation modes—Normal, Shift, and Setup mode
Normal Mode
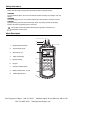
This is the default mode. The operating functions for normal mode are printed on the face
of each button in white. The following functions can only be used in Normal Mode.
Power Button
The Power key turns the thermometer ON or OFF. When entering data in Setup Mode, the
power off function is disabled.
[Limits] Button
The Limits function will alert the user when a measurement exceeds a specified limit. To
set the limit values, refer to the limits function in the Setup Mode. Press the [Limits] button
to activate the Limits function ("LIMIT" will be displayed on the LCD). When the measured
temperature on the main display is higher than the High Limit (or lower than the Low Limit),
the alarm beeper emits a tone and "Hi" “or “Lo” is displayed. Note: The tones for High and
Low Alarms are different; the High Alarm tone is pulsed while the Low Alarm tone is
continuous. Note: When reading over 2000°F using a K or J thermocouple, the reading
should be multiplied by 10. (example: 2100°F x 10 = 21000). To exit the Limits function,
press the [Limits] button. In this mode, the automatic power-off feature is disabled along
with the following keys: REL, HOLD, & MIN MAX.
Backlight Button
Press the backlight button to toggle the backlighting on and off. The backlight will switch-off
automatically after 60 seconds to conserve battery life.
SAVE/READ Button
The Read data function is used for reading saved data. It works in conjunction with the
Save function in the Shift Mode.
1. Press the SAVE/READ button to activate the read data function. The word READ will
be displayed on the LCD.
2. Press the “SECOND” button until the # sign is displayed in the bottom left display.
The location of the read pointer within the saved data table will be displayed.
3. Press the “▲3” or “▼6” button to display the next data location.
Press the “▲2” or “▼5” button to increment the data location by ten.
4. Press the overlay “ESC” button to deactivate the read data function.
LOG/READ Button
The read log function is used for reading logged data. It works in conjunction with the Log
function in Shift Mode.
1. Press the LOG/READ button to activate the read log function. The word READ will be
displayed in the lower right display.
2. Press the overlay “SECOND” button to rotate through the following display menus:
T1, T2, GRP, and #. T1 and T2 displays the T1 or T2 saved value. GRP displays the
current group number and # displays the current location of the read pointer within a
selected group.
3. The arrow buttons on the overlay are used for scrolling through the saved data.
Press the “▲3” or “▼6” buttons to display the next data location or group.
Press the “
▲2” or “▼5” buttons to increment to the next data or group location by
ten. To navigate around the logged data and groups, press the overlay “SECOND”
button until “GRP” appears in the display. Select the group using the arrow buttons,
then press the “SECOND” button again until the “#” sign is displayed. The location of
the read pointer will be displayed. Use the arrow keys to scroll through the data.
4. Press the overlay “ESC” button to deactivate the read log data function.