


2 Converting Wyse VX0LE to
ThinOS
This chapter provides the step-by-step instructions you need to convert supported Wyse
VX0LE cloud clients to ThinOS.
Depending on the Wyse product you want to use, complete one of the following:
• "Procedures: Using Wyse Simple Imager"
• "Procedures: Using Wyse Device Manager"
Procedures: Using Wyse Simple Imager
Step 1: Install Wyse Simple Imager 2.0.2
Install Wyse Simple Imager 2.0.2 (contained on the Conversion Software Assembly
DVD-ROM) using the instructions in "Installing Wyse Simple Imager 2.0.2."
Step 2: Copy the 1V12 Folder and 1V12.i2d File (on the DVD-ROM) to Correct Locations
1. Open the VX0LE 128MB ThinOS Conversion Images folder on the Conversion
Software Assembly DVD-ROM.
2. Open the WSI VX0LE 128MB ThinOS Conversion folder (contained in the VX0LE
128MB ThinOS Conversion Images folder).
3. Copy the 1V12 folder (contained in the WSI VX0LE 128MB ThinOS Conversion folder)
to C:\Inetpub\ftproot\Rapport\Tools\sa (this is a folder created by WSI during
installation when using the default installation settings; see "Step 3: Install Wyse
Simple Imager"). Note that this 1V12 folder will overwrite the existing 1V12 folder
created during the installation.
4. Copy the 1V12.i2d file (contained in the WSI VX0LE 128MB ThinOS Conversion
folder) to any folder on the machine to which you installed WSI (be sure the folder is
accessible by WSI).
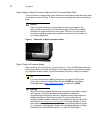
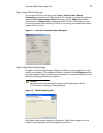
Step 3: Use Wyse Simple Imager to Convert Each Cloud Client
Use the following guidelines on each cloud client you want to convert:
1. Connect the cloud client (to be imaged) to the router with DHCP running that is
attached to the machine on which Wyse Simple Imager is installed. Be sure the cloud
client is shut down.
Caution
Ensure all software firewalls and antivirus services are stopped.
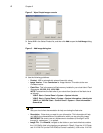
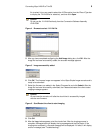
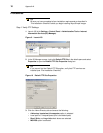
2. Launch the Wyse Simple Imager console (double-click the Wyse Simple Imager icon).