


VXI Technology, Inc.
24 CT-100B Installation
RACK SLIDE INSTALLATION (20” AND 24”)
The 20” and 24” slide hardware kits (Options 63 and 64, respectively) provide standard flanges to
mount the slides into standard EIA relay racks. It should be noted that the slide flanges in the
front should be installed behind the rack’s front panel mounting rails. This will allow the rack
mounting ears to sit flush with the front of the rack. It should also be noted that although the
hardware provided in this kit will provide all the necessary components to successfully install the
CT-100B into a rack, there are many variations in how EIA relay racks are designed and
additional adapter hardware may be required to install the chassis. Please refer to the relay rack
manufacture’s catalog for additional options.
This procedure provides instructions for installing the 20” or 24” slide kits. Note that the 20” and
24” slide kits are identical except for the length of the slide units. A 20” slide kit is used when the
chassis is flush mounted and a 24” slide kit is used when the chassis is recess mounted.
REQUIRED TOOLS
1. #2 Phillips Screwdriver
2. 1/8" Flat Blade Screwdriver
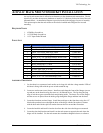
PARTS LIST
QTY ITEM VTI P/N
2 Slide, Rack Mount, Steel, 20” 37-0054-020
- or -
2 Slide, Rack Mount, Steel, 24” 37-0054-024
1 Hardware Kit, Rack Mount Slide, Steel 37-0055-000
6 Screw, 8-32 x 3/8” Pan Head Phillips, Sems Zinc 37-0073-037
6 Screw, 8-32 x 1/4” Pan Head Phillips, Steel/Zinc 37-0074-025
4 Screw, 8-32 x 3/8”, F/H Undercut Phillips, Zinc 37-0115-037
2 Bracket, Slide, Front 41-0108-000
1 Bracket, Slide, Top Side 41-0131-000
1 Bracket, Slide, Bottom 41-0132-000
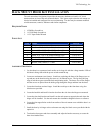
ASSEMBLY INSTRUCTIONS
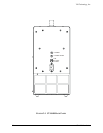
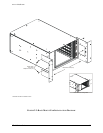
1. Lay the chassis on a protected work surface on its long side with the voltage monitor LEDs of
the chassis facing front with the power switch toward the top.
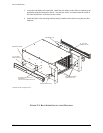
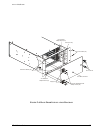
2. If the rack mount ears were installed flush, remove the rack mount ears and install the front
slide bracket to them as shown in the assembly drawing using a flat head screw driver. If the
rack mount ears were installed recessed, simply install the slide brackets onto the ears as
shown on the following page.
3. Reinstall the rack mount ears (if necessary).
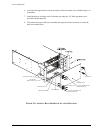
4. Install the top and bottom slide brackets using 1/4” Phillips pan head screws. Note that the
slide mounting holes should be oriented below the centerline of the chassis.