


7
TOPCOM BPM Wrist 7500
ENGLISH
9 Settings
9.1 Time & date adjustment
In stand-by:
•Press the MODE button, the month will blink on the
display.
•Press the UP or DOWN button to change the month.
•Press the MODE button to confirm the month. The day
will blink on the display.
• Change the day, hours and minutes as described above,
using the UP or DOWN button to change and the MODE
button to confirm every setting.
After setting the minutes, the device is ready to use.
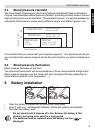
9.2 Self-management function
The monitor allows you to pre-set your personalized values of blood pressure which
should be recommended or decided by your physician or medical professional.
If the Systolic or Diastolic rate of the measurement is greater than your pre-set
personalized level, the digit of the result on the screen will flash to alert.
Besides, either the Systolic or Diastolic rate of the measurement is equal to or less than
your pre-set personalized levels, or you don’t set the personalized levels, the smiling
face icon will appear and flash on screen after each measurement.
3 different personal levels can be set. The levels are related to the memory zone (see
chapter 14)
To set your personal blood pressure levels:
After setting the minutes, the setting of personal Blood pressure level limits is not active.
(- -) is displayed.
•Press the MODE button, the Systolis pressure limit is flashing.
•Press the UP or DOWN button to set your personal systolic pressure limit.
•Press the MODE button to confirm. The diastolic pressure level is flashing.
•Press the UP or DOWN button to set your personal diastolic pressure limit.
•Press the MODE button to confirm.
Repeat previous steps for setting the levels for memory zone 2 and 3.
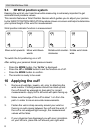
After setting you personal blood pressure level, the 3 positioning system can be (de-)
activated.