


7. Remove weight and depress Zero switch. Wait for a
display reading of “0.” Again add known weight to
platform. If reading is correct, no further adjustments
are necessary. If reading is incorrect, repeat steps 6
and 6 until correct reading is obtained.
TROUBLESHOOTING
The following guide will help you to solve
common problems:
CARE AND MAINTENANCE
Proper care and cleaning of all Tanita Corporation scales
and accessories is essential to ensure a long life of
accurate and effective operation. In addition to routine
cleaning, include a regular check of all structural
apparatus to ensure stability.
Cleaning
Disconnect battery charger from scale before cleaning.
1. All external surfaces can be wiped clean with a damp
cloth. Mild soap and water solution may be used. Wipe
unit dry with a clean, soft cloth.
2. DO NOT immerse control panel box into cleaning or
other liquid solutions.
3. DO NOT use isopropyl alcohol or other solutions to
clean surface of control panel box.
4. Check the overall appearance of the whole scale for
any obvious damage, wear and tear. Inspect the AC
cord and adapter for cord cracking or fraying or for
broken or bent prongs.
Calibration
Note: Your scale has been accurately calibrated at the
factory. However, there is always a possibility that the
calibration changed due to jarring during shipping. The
following procedure should be followed to check and/or
correct any error in calibration.
1. Depress On/Off switch on scale and wait for a display
of “0.”
2. Place an accurately known weight on the platform.
3. If display is other than known weight, then the scale is
out of calibration.
4. Remove the 4 screws nearest the face switch panel (2
on each side — near the aluminum trim). Slightly
loosen the remaining 4 screws (2 on each side), but
do not remove. Lift off the top portion of the head.
Be careful, since it is attached to the bottom
portion with a ribbon cable. Looking at the bottom
front of the head (underneath), you will see 2 small
adjustment screws. The left metal screw (VR2) is for
coarse adjustments; it adjusts for large errors. The right
plastic screw (VR1) is for fine adjustments; it adjusts
small errors.
5. Turn the metal coarse calibration screw (VR2) in small
increments, CLOCKWISE to increase weight or
COUNTERCLOCKWISE to decrease weight. In most
cases, this is the only adjustment needed.
6. If necessary, make adjustments with the right plastic
screw (fine adjustment). CLOCKWISE to decrease
weight; COUNTERCLOCKWISE to increase weight.
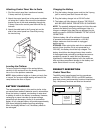
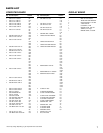
PROBLEM
Incorrect patient
weight readings
Display flashes “Lo-b”
Patient weight readings
consistently too high
or too low
SOLUTION
A. Platform too low and hitting platform feet or
carpet. Increase platform height. See “Leveling
the Platform” on page 3.
B. Person, other than person being weighed,
touching or leaning on scale handlebar.
C. Weight of wheelchair or chair not taken into
account. See “Operating Instructions” on page 4.
D. Platform not level. See “Leveling the Platform”
on page 3.
Recharge battery. See “Charging the Battery”
on page 3.
Check scale calibration and calibrate if necessary.
See “Calibration” on page 6.
6