


20
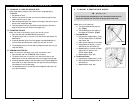
C. CLIMBING A CURB OR SINGLE STEP
Follow these steps to help the rider climb a curb or single step going
FORWARD:
1. Stay behind the chair.
2. Face the curb and tilt the chair up on the rear wheels so that the front
casters clear the curb or step.
3. Move forward, placing the front casters on the upper level as soon as you
are sure they are past the edge.
4. Continue forward until the rear wheels contact the face of the curb or
step. Lift and roll the rear wheels to the upper level.
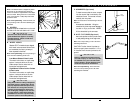
D. CLIMBING STAIRS
Note: Use at least two attendants to move a chair and rider up stairs.
1. Move the chair and rider BACKWARD up the stairs.
2. The person at the rear is in control. He or she tilts the chair back to its
balance point.
3. A second attendant at the front firmly grasps a non-detachable part of
the front frame and lifts the chair up and over one stair at a time.
4. The attendants move to the next stair up. Repeat for each stair, until you
reach the landing.
E. DESCENDING STAIRS
Note: Use at least two attendants to move a chair and rider down stairs.
1. Move the chair and rider FORWARD down the stairs.
2. The person at the rear is in control. He or she tilts the chair to the
balance point of the rear wheels and rolls it to the edge of the top step.
3. A second attendant stands on the third step from the top and grasps the
chair frame. He or she lowers the chair one step at a time by letting the
rear wheels roll over the stair edge.
4. The attendants move to the next stair down. Repeat for each stair, until
you reach the landing.
VII. TIPS FOR ATTENDANTS
21
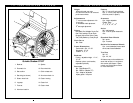
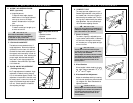
A. TO MOUNT & REMOVE REAR WHEELS
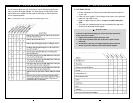
VIII. CHAIR BASICS
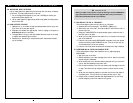
Do not use this chair UNLESS you are sure both quick-release axles are
locked. An unlocked axle may come off during use and cause a fall.
Note: Axle is not locked until:
a. The quick-release button pops out
fully. (Fig.A)
b. The ball bearings are fully visible on
the outside of the sleeve. (Fig.A)
1. To Install Wheel:
a. Depress quick-release button (1) fully.
This will release tension on ball bear-
ings at other end.
b. Insert axle through hub of rear wheel.
c. Keep pressure on button (1) as you
slide axle (2) into axle sleeve (3).
d. Release button to lock axle in sleeve.
Adjust axle if it does not lock.
(Follow steps at p. 22)
e. Repeat steps on other side.
2. To Remove Wheel:
a. Depress quick-release button (1) fully.
b. Remove wheel by sliding axle out of
axle sleeve (2).
c. Repeat steps on other side.
▲
!
WARNING!
1. Quick-release
3
2
Figure A