Exhaust
Velocity
1.
The exhaust velocity is the rate of gradual pressure drop from the
pressure applied manually using the rubber bulb.
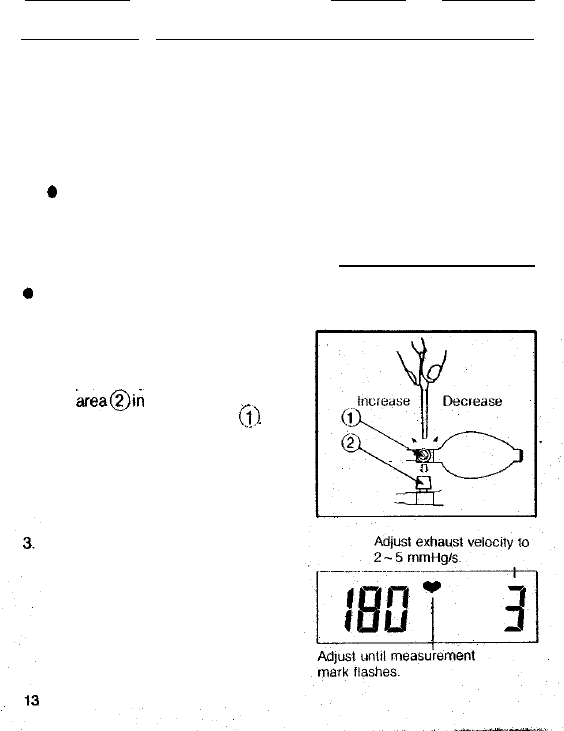
2. The exhaust condition is displayed in the right portion of the
display from the time of pressurization until the measurement
mark starts flashing.
3. This unit is adjusted so that the exhaust velocity is l -5mm Hg/s
at 150 mmHg.
0 Note that if this exhaust velocity is not proper, correct
measurements are not possible.
Exhaust Velocity Adjustment
proximately
60mmHg
above your
suspected systolic pressure. Hold
the
area@in
the figure, and insert
a screwdriver into groove
61
2. If the exhaust velocity is too fast,
turn to the left and if it is too slow,
turn to the right so that the value
shown in the right portion of the
display is in the range
2
5mm-
0 Perform this adjustment procedure if the exhaust velocity is not
within the proper range as described above.
1. Apply the arm cuff to the left arm
and
pressurize
to the
pressure
ap-
Hg/s.
When the adjustment is com-
pleted, reduce the pressure and re-
check. If the adjustment is not pro-
per after one try, repeat
several
times.
l Exhaust velocity will differ
slightly depending upon the size
of the
arm
and the method of
windlng the cuff.


