


11Replacing the Air Filter
English
2 Rinse thoroughly, hang, and allow to dry.
3 Before next use, reassemble the mask and headgear.
4 Reconnect the air tubing.
Monthly
• Clean the exterior of the S8 Series II with a damp cloth and mild liquid soap.
• Check the air filter for holes and blockage by dirt. Replace it every six months, or
more often in a dusty environment.
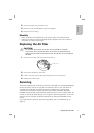
Replacing the Air Filter
!
CAUTION
• Do not wash the air filter. The air filter is not washable or reusable.
• The air filter cover protects the device in the event of accidental liquid
spillage onto the device. Ensure the air filter and air filter cover are fitted at
all times.
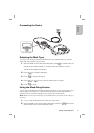
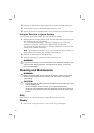
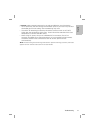
1 Remove the air filter cover at the back of the device.
2 Remove and discard the old air filter.
3 Insert a new filter with the blue tinted side facing out from the device.
4 Replace the air filter cover.
Servicing
This product (S8 AutoSet II; S8 Elite II) should be inspected by an authorized ResMed
service centre five years from the date of manufacture. Prior to this, the device is
intended to provide safe and reliable operation provided that it is operated and
maintained in accordance with the instructions provided by ResMed. Applicable
ResMed warranty details are provided with the device at the time of original supply. Of
course, as with all electrical devices, if any irregularity becomes apparent, you should
exercise caution and have the device inspected by an authorized ResMed service
centre.
If you feel that your device is not performing properly, see “Troubleshooting” on
page 13.
Air filter cover