


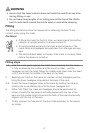

2
Explanation: CPAP and bilevel devices are intended to be used
with special masks (or connectors) which have vent holes to allow
continuous flow of air out of the mask. When the device is turned on
and functioning properly, new air from the device flushes the exhaled
air out through the mask vent holes. However, when the device is not
operating, insufficient fresh air will be provided through the mask,
and the exhaled air may be rebreathed. Rebreathing of exhaled air
for longer than several minutes can, in some circumstances, lead to
suffocation. This applies to most models of CPAP or bilevel devices.
• This mask should only be used with CPAP or bilevel devices
recommended by a physician or respiratory therapist.
• Using a mask may cause tooth, gum or jaw soreness or aggravate an
existing dental condition. If symptoms occur, consult your physician
or dentist.
• Remove and dispose of all packaging before using the mask.
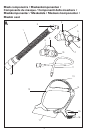
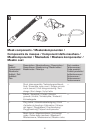
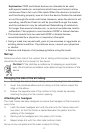
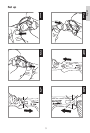
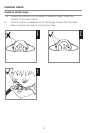
Set up
Determine which side of the cushion the air tubing will be located. Ideally this
should be the side that is closest to the device.
Pixi Hint! If the child has a preference for sleeping on a particular
side, this should be considered when determining the location of the
device.
Changing the side of the air tubing
1. To change the side of the air tubing, remove the plug from the cushion.
2. Insert the combined elbow and air tubing until the cushion meets the
ridge on the elbow.
3. Ensure the opposite side of the cushion is fully closed by securely
inserting the plug into the cushion opening.
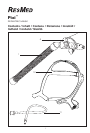
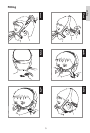
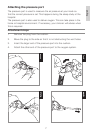
Attaching the headgear
The mask frame has been designed to ensure the headgear is fitted correctly
every time.
4. Latch the lower headgear arm with the star onto the frame node with
two stars, so that the frame is nested between the plastic and the
padding of the headgear.
5. Gently pull the headgear arm into place until it clicks.
6. Repeat steps 4-5 with the other side (without stars).
Set up is now complete and the mask is ready for fitting.