


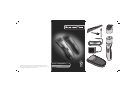

(MB-30, MB-40)
When your rechargeable Beard & Mustache Trimmer reaches the end of its useful life, the batteries
must be removed from the shaver and recycled or disposed of properly in accordance with your
local and state requirements.
•
The following procedure should be followed for battery removal:
- Make sure your trimmer is unplugged from any outlets so you don’t risk an electrical shock.
- Remove the trimmer guard as instructed in the Trimmer Guard Attachment section.
- Using a small Phillips head screwdriver, remove the two screws from the front of the unit.
- Remove the two screws from the back of the unit, near the bottom.
-
Using a small, flat-blade screwdriver, pry off the clip under the cutter at the top of the unit.
- Pull or gently pry the trimmer halves apart, exposing the batteries. (Fig.O)
- Lift the rubber side panels from their cradles and put them aside.
BATTERY REMOVAL
Remington believes that you will be delighted with this Precision
®
Beard and Moustache Trimmer.
In the unlikely event that you are dissatisfied, Remington will refund the original purchase price
of the product including any costs incurred in returning your trimmer to us. Please see conditions
below.
Your trimmer should be sent to your national Remington office. For details, please refer to the
International Service Centre list at the back of the instruction manual.
Conditions
1. The offer is valid for products returned within 30 days of the purchase date.
2. The product must be returned with all components and in its original packaging.
3. The original purchase receipt must be supplied. A copy will not be accepted.
4. Proof of postage will not be accepted as proof of receipt. Remington is not liable for the
loss of product in transit to us.
5. Remington will reply to you within 28 days of receipt of your shaver.
This trimmer is guaranteed against defects under normal use for two years from the original date
of purchase. If your product fails to perform satisfactorily due to a defect in materials or workmanship
within this period it will be repaired or replaced free of charge. Simply take or mail your appliance,
with your proof of purchase, to your nearest Remington Service Centre.
Exclusions
The cutters are consumable parts and are excluded from this guarantee, as are defects that result
from misuse or abuse of your trimmer.
Please retain your proof of purchase. UK Only: This guarantee does not affect your statutory rights.
For further information and advice please contact our Customer Services Department.
Remington Consumer Products Limited, Watermans House, Watermans Court, Kingsbury Crescent,
The Causeway, Staines, Middlesex, TW18 3BA. Consumer Helpline: 0800 212 438
SERVICE AND WARRANTY
TROUBLESHOOTING
TROUBLESHOOTING (MB-30 & MB-40)
The trimmer does not work when turned on:
•
Trimmer must be charged for a full 14-16 hours- MB-30 & MB-40.
•
Contact an authorized Remington Service Center regarding battery replacement
(see back of this leaflet for the nearest location).
Trimmer cutters do not move:
•
The cutting unit may be dirty and clogged.
•
Clean and lubricate the unit as directed in Cleaning & Maintenance section.
Trimmer does not hold charge:
•
Fully discharge battery by running trimmer until it stops; then follow recharging instructions
(see section on To Charge/Recharge). If time between recharging cycles does not increase,
battery may need replacing. Contact an authorized Remington Service Center (see back of
this leaflet for the nearest location).
TROUBLESHOOTING (MB-10)
The trimmer does not work when turned on:
•
Be certain batteries have been properly installed. Trimmer will not operate unless batteries
are correctly positioned.
•
If battery power has been depleted, replace with 2 “AA” alkaline batteries (see Battery section).
•
Contact an authorized Remington Service Center regarding battery replacement
(see back of this leaflet for the nearest location).
Trimmer cutters do not move:
•
The cutting unit may be dirty and clogged. Clean the unit as directed in To Clean and
Maintain section.
PAGE #5PAGE #52
PAGE #51PAGE #6
- Pull or pry batteries from PC board. (Fig.P)
- Twist batteries to break wires. Wires may also be cut.
CAUTION:
! THESE NICKEL-CADMIUM BATTERIES MUST BE RECYCLED OR DISPOSED OF IN
ACCORDANCE WITH STATE AND LOCAL REGULATIONS.
- Do not burn or mutilate, as they may burst or release toxic materials.
- Do not short-circuit, as it may cause burns.
Aparar a barba
Antes de começar, penteie os pêlos na direcção em que crescem para que fiquem o mais
salientes possível e virados na mesma direcção.
BARBEAR E APARAR
Para ajustar, faça rodar a “Zoom Wheel” ("Roda para Zoom") como na Fig. B.
Comece a aparar numa das posições mais compridas (#8 ou #9 para evitar que o pêlo fique
acidentalmente demasiado curto). À medida que se vai familiarizando com as posições, poderá
então escolher a posição de comprimento desejada.
Acessório de Protecção do Aparador
Retire o acessório de protecção se quiser definir os contornos dos pêlos como as patilhas,
aparar os pêlos da nuca, ou se quiser limpar o conjunto de corte.
Para retirar:
•
Certifique-se de que o aparador está desligado (na posição OFF). Retire conforme indicado
na Fig. C.
Para repor:
•
Certifique-se de que o aparador está desligado (na posição OFF).
•
Segure no aparador com uma mão e, certificando-se de que a roda “Zoom” se mantém a
mesma posição, faça deslizar a protecção sobre a parte de cima do aparador até ouvir um
"clique" indicando que está colocado correctamente.
Nota:
!
O acessório de protecção só pode ser colocado sobre o aparador de uma única forma; se
não encaixar correctamente, retire e vire-o.
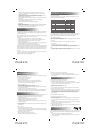
1
2
3
4
5
6
7
8
9
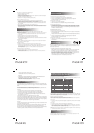
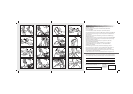
HAIR LENGTH
SETTING
Stubble or cropped look
Short
Medium
Long
HAIR DESCRIPTION
1.5mm
2.5mm
4mm
5.5mm
7mm
9mm
11mm
14mm
18mm
0.06”
0.1”
0.16”
0.22”
0.28”
0.35”
0.43”
0.55”
0.71”
NOTA: a protecção deverá estar colocada no aparador para que possa utilizar o acessório
para seleccionar o comprimento dos pêlos.
O acessório para escolher o comprimento dos pêlos e a protecção irão possibilitar um corte
preciso, tendo nove posições de corte ajustáveis:
ACESSÓRIO PARA SELECIONAR COMPRIMENTO
DOS PÊLOS E PROTECÇÃO AMOVÍVEL
CUIDAR DO SEU APARADOR
Limpar e Cuidar do seu Aparador
As lâminas do seu aparador são de aço endurecido de elevada qualidade e estão
permanentemente lubrificadas. Limpe as lâminas apenas com uma escova macia, tal como a
fornecida com o aparelho.
•
Limpe o aparador com regularidade certificando-se assim de que funcionará durante
muito tempo.
•
Desligue o adaptador da tomada eléctrica (MB-30 & MB-40).
•
Não faça pressão nem coloque objectos rijos sobre as lâminas.
•
Não utilize produtos líquidos de limpeza nas lâminas, nem produtos químicos fortes ou corrosivos
no corpo principal do aparelho.
Semanalmente
•
Retire o acessório de protecção e abane ou sopre para retirar os pêlos acumulados do
aparelho como indicado na Fig. M.
Aparador principal
•
Aceda à parte inferior do conjunto de lâminas, como indicado na Fig. N.
•
Sopre para retirar quaisquer pêlos acumulados. Utilizando a escova fornecida retire os
resíduos de pêlos dos dentes das lâminas e bolsa de pêlos. Não coloque o conjunto de
corte sob água para o enxaguar, nem utilize produtos de limpeza que poderiam
retirar o lubrificante.
Aparador Miniatura (apenas MB-40)
•
Levante o aparador miniatura de forma a que esteja funcional.
•
Utilizando a escova, retire quaisquer pêlos das lâminas e da zona onde o aparador se
encontra quando retraído.
Para aparar o comprimento da barba (Fig. D)
•
Coloque o acessório de protecção.
•
Desligue o aparador (OFF).
•
Determine a quantidade de pêlo que deseja cortar e posicione o acessório de selecção
de comprimento convenientemente.
•
Ligue (ON) o aparelho e comece a aparar.
•
Quando terminar, desligue o botão do aparador (OFF).
Aparar os cabelos da nuca (Fig. L)
•
Irá precisar de um espelho de mão se quiser efectuar esta operação sozinho.
•
Retire o acessório para seleccionar o comprimento dos cabelos.
•
Utilize os dedos para levantar os cabelos da nuca. O seu dedo indicador deverá tapar as
raízes dos cabelos que está a levantar de forma a impedir que os corte acidentalmente
com o aparador.
•
Com a outra mão, utilize o aparador como indicado na Fig. L.
•
Repita este procedimento em toda a zona da nuca. Certifique-se de que desloca o aparador
lentamente ao efectuar esta operação e de que mantém as raízes dos cabelos da nuca
afastadas do aparador.