


2
3
1
6
L
R
6
1
9
V
4
15
5
6
7
9
8
11
10
174 g.
12
13
13
14
16
17
1
1
2
m
HR 2388/9
HR 2388/89
English
Important
• Please read the instructions and look at the illustrations before you use
the appliance.
• Make sure that there is nothing on the weighing plate when the appliance
is not in use.
• Do not allow water (or any other liquid) to enter the appliance.
• Always place the appliance on a solid, smooth and horizontal surface
when you use it.
• A microwave oven which is switched on, may cause interference, which
may lead to unreliable weighing results.
Place the scales at a safe distance of at least 1.5 metres from a
microwave oven which is switched on or use the scales when the
microwave is switched off.
Battery
The scales work on a 9-volt battery (not included). We advise you to use a Philips
6LR 61 Alkaline battery on account of its long life and environmental friendliness.
Fitting the battery
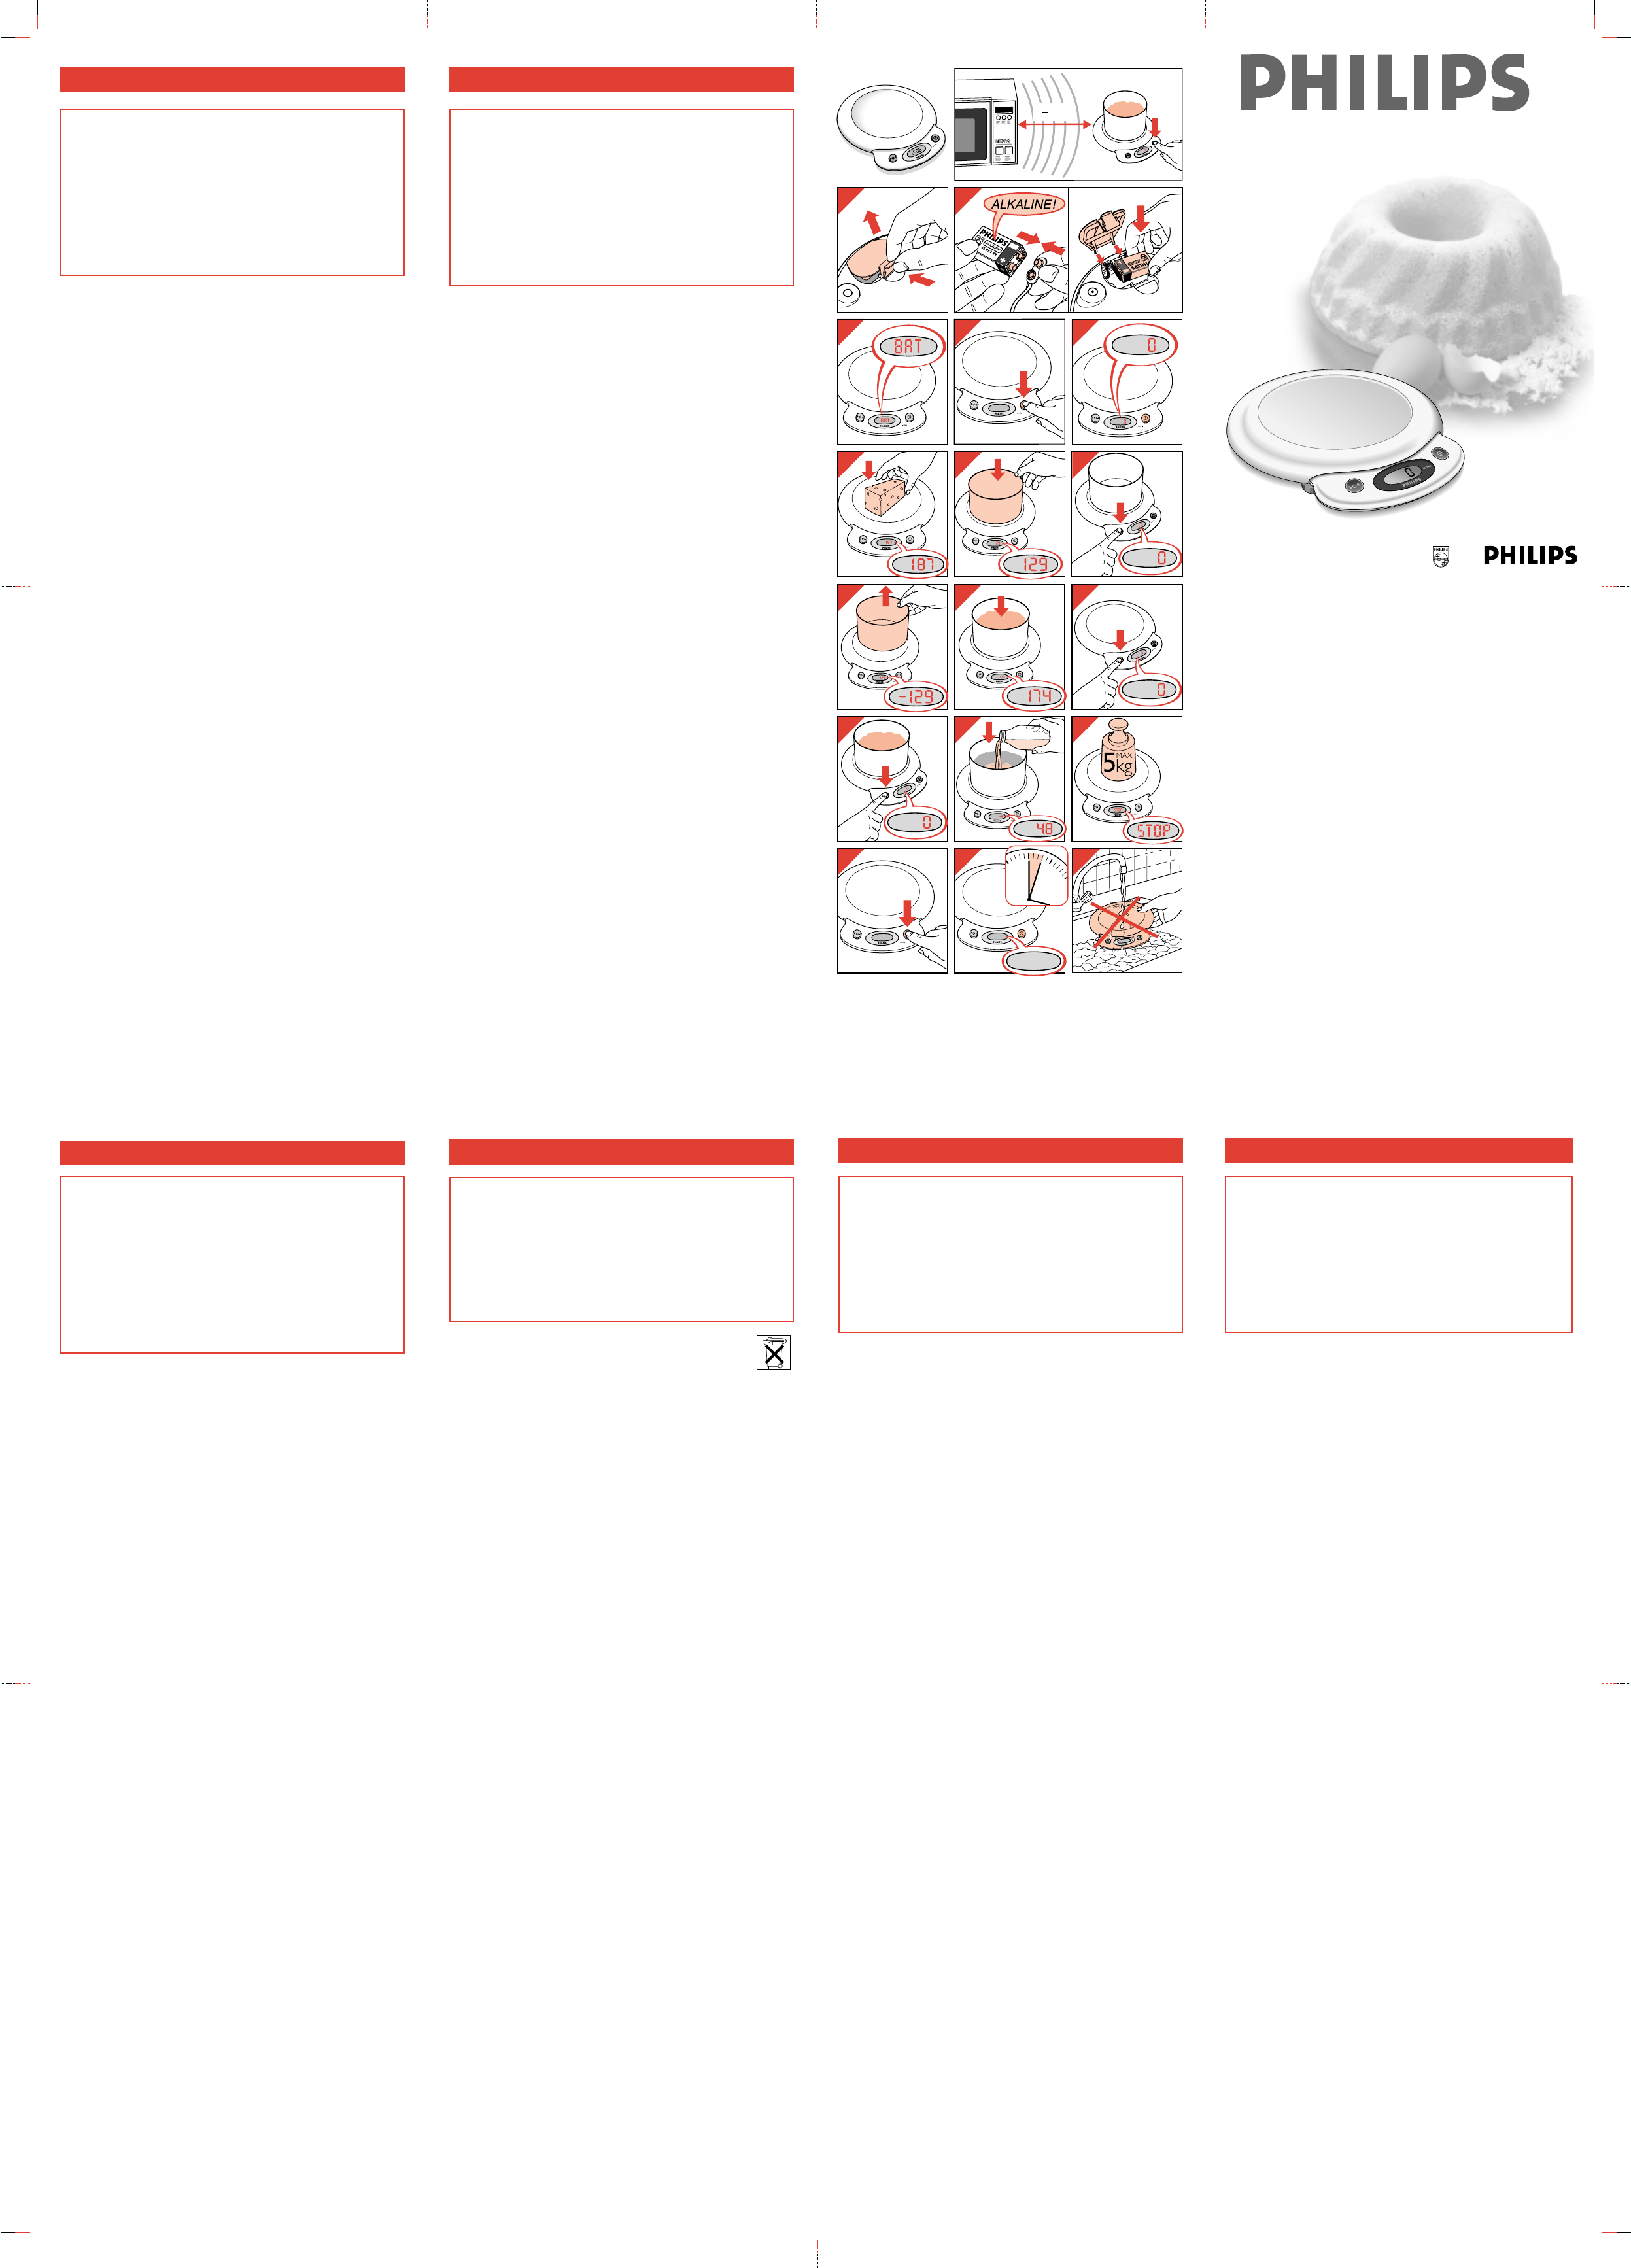
- Open the battery compartment (fig. 1).
- Fit the battery in the battery holder (fig. 2).
- Close the battery compartment.
Battery replacement
- If the BAT indication appears on the display briefly when you switch on the
appliance, the battery is low but still has a reserve capacity. If BAT is displayed
continuously (fig. 3), the battery must be replaced.
• Batteries contain substances which may pollute the environment.
Keep the old battery separate from normal household waste and dispose of it at
an officially assigned collection point.
• It is not advisable to use a rechargeable battery in this appliance.
Weighing and using the "Reset" function 3
The scales indicate weight with a division of 1 gram (d = 1 g).
- Press button I to switch the scales on (fig. 4).
- After 1 - 2 seconds the appliance is ready for use (fig. 5).
Directly on the weighing plate
- Place the ingredient(s) to be weighed directly on the weighing plate (fig. 6). The
weight will be displayed immediately.
In a bowl or container
- Put the empty bowl (or container) on the weighing plate (fig. 7). The display will
show the weight of the bowl.
- Press button 3 (fig. 8). The display will read 0 again.
- Remove the bowl from the weighing plate. The display will now show the weight of
the bowl with a minus sign (-) in front (fig. 9).
- The appliance will automatically subtract the weight of the bowl from each
ingredient that is weighed (fig. 10).
• The appliance will keep on doing so until you set the display back to 0 by pressing
button 3 while the weighing plate is empty (fig. 11).
Adding ingredients
If you wish to add ingredients (e.g. 48 g) to a known quantity (e.g. 174 g), you can
save yourself some calculating by first pressing button 3 before adding a new
ingredient. This will set the display back to 0 again (fig. 12) and the display will then
show how much of the new ingredient you are adding (fig. 13).
Please note: If the weighing plate has been overloaded (more than 5 kilograms),
STOP will become visible on the display (fig. 14).
Switching off
- Press button I to switch the scales off (fig. 15).
• If the appliance has not been used for more than 3 minutes, it will switch off
automatically to save the battery (fig. 16).
Full memory backup
This appliance has 'full memory backup': if the appliance has not been used for
more than 3 minutes, it will switch off automatically. If you have left the ingredient(s)
you have just weighed on the weighing plate, the previously shown weight will be
displayed again when you press button I.
Cleaning
You can clean the appliance with a damp cloth and, if necessary, some detergent.
Do not use abrasives, scourers, alcohol, etc. Never immerse the scales in water or
rinse them under the tap (fig. 17)!
Storage
Make sure that there is nothing on the weighing plate when the appliance is not in
use.
Nederlands
Belangrijk
• Bekijk de illustraties en lees de gebruiksaanwijzing voordat u het
apparaat in gebruik neemt.
• Laat niets op de weegplaat liggen als u de weegschaal niet gebruikt.
• Zorg ervoor dat er geen water (of andere vloeistof) in het apparaat komt.
• Zet de weegschaal voor gebruik op een stevig, vlak, horizontaal blad.
• Een ingeschakelde magnetron kan interferentie veroorzaken, waardoor
de weegresultaten onbetrouwbaar worden.
Plaats de weegschaal op een veilige afstand van minstens 1
1
/
2
meter
van de magnetron, of gebruik de weegschaal wanneer de magnetron is
uitgeschakeld.
Batterij
De weegschaal werkt op een 9 Volts batterij (niet bijgeleverd). Wegens
zijn lange levensduur en milieuvriendelijke eigenschappen adviseren wij u
een Philips 6LR 61 Alkaline batterij te gebruiken.
Batterij plaatsen
- Open de batterijruimte (fig. 1).
- Plaats de batterij (fig. 2).
- Sluit de batterijruimte.
Batterij vervangen
- Wanneer na het inschakelen BAT tijdelijk in het venster verschijnt, betekent dit dat
de batterij bijna leeg is. De batterij heeft echter nog wel een reservecapaciteit.
Wanneer BAT voortdurend zichtbaar is (fig. 3), dan moet de batterij worden
vervangen.
• Batterijen bevatten stoffen die schadelijk kunnen zijn voor het milieu. Zorgt u
ervoor dat de oude batterij niet in het normale huisvuil terechtkomt, maar
ingeleverd wordt op een door de overheid daartoe aangewezen plaats.
• Het gebruik van een oplaadbare batterij in dit apparaat wordt afgeraden.
Hoe u weegt en de “Reset” functie 3 gebruikt
Het apparaat weegt in stappen van 1 gram (d = 1 g).
- Druk op knop I om de weegschaal in te schakelen (fig. 4).
- Na 1 - 2 seconden is de weegschaal klaar voor gebruik (fig. 5).
Direct op de weegplaat
- Plaats het/de te wegen ingrediënt(en) op de weegplaat (fig. 6).
U kunt het gewicht meteen aflezen.
In een kom of bak
- Zet de lege kom (of bak) op de weegplaat (fig. 7). Het gewicht van de kom wordt
nu aangegeven.
- Druk op knop 3 (fig. 8). In het venster wordt weer 0 zichtbaar.
- Neem de kom van de weegplaat. Het venster geeft weer het gewicht van de kom
aan, maar nu voorafgegaan door - (“Min”-teken) (fig. 9).
- Vervolgens trekt de weegschaal bij elke weging het gewicht van de kom
automatisch van het totale gewicht af (fig. 10).
• De weegschaal blijft dit doen, totdat u de aanduiding bij onbelaste weegplaat met
behulp van knop 3 weer op 0 heeft gebracht (fig. 11).
Ingrediënten toevoegen
Als u aan ingrediënten met een reeds bekend gewicht (bijvoorbeeld: 174 g) nog
ingrediënten wilt toevoegen (bijvoorbeeld: 48 g), dan kan het u rekenwerk besparen
als u vóór het toevoegen even op knop 3 drukt (fig. 12). In het venster wordt dan
eerst weer 0 zichtbaar.
Vervolgens wordt aangegeven hoeveel gewicht u toevoegt (fig. 13).
Let op: Indien de weegplaat te zwaar is belast (meer dan
5 kilogram), schakelt het apparaat zichzelf uit. In het venster wordt dan STOP
zichtbaar (fig. 14).
Uitschakelen
- Druk op knop I om de weegschaal uit te schakelen (fig. 15).
• Als u de weegschaal langer dan 3 minuten niet heeft gebruikt, schakelt deze
zichzelf uit om de batterij te sparen (fig. 16).
“Full memory back-up” (geheugenfunctie)
Dit apparaat is uitgerust met een geheugenfunctie: wanneer het apparaat langer
dan 3 minuten niet gebruikt is, zal het automatisch uitschakelen. Als het gewogen
voorwerp op de weegplaat is blijven staan, dan zal het laatst geregistreerde gewicht
opnieuw worden weergegeven wanneer u op knop I drukt.
Schoonmaken
U kunt de weegschaal schoonmaken met een vochtige doek, desgewenst met wat
schoonmaakmiddel.
Gebruik geen schuurmiddelen, pannensponzen, alcohol, etc.
Dompel het apparaat nooit in water! Spoel het ook niet af (fig. 17).
Opbergen
Laat niets op de weegplaat liggen als u de weegschaal niet gebruikt.
Français
IMPORTANT
• Avant d'utiliser l'appareil, lisez soigneusement les instructions en vous
référant aux illustrations.
• Veillez à ne rien poser sur le plateau de la balance lorsque celle-ci n'est
pas utilisée.
• Veillez à ne pas faire pénétrer d'eau (ou tout autre liquide) à l'intérieur de
l'appareil.
• L'appareil doit être toujours utilisé sur une surface plane, rigide et
horizontale.
• Un four à micro-ondes fonctionnant à proximité de la balance peut causer
des interférences susceptibles de fausser le résultat de la pesée.
Placez la balance à une distance minimum de 1,5 mètres d'un four à
micro-ondes en fonctionnement, sinon utilisez la balance lorsque le four
à micro-ondes est arrêté.
Pile
La balance fonctionne avec une pile de 9 volts (non fournie). Nous vous conseillons
d'utiliser une pile alcaline Philips 6LR 61 pour sa longue durée de vie et son
respect de l'environnement.
Mise en place de la pile
- Ouvrez le compartiment à pile (fig. 1).
- Mettez en place la pile (fig.2).
- Fermez le compartiment à pile.
Remplacement de la pile
- Si l’indication BAT s’affiche brièvement lors de la mise en marche cela vous
indique que la pile devra être remplacée sous peu. Il vous reste un peu de réserve
pour faire encore quelques pesées. La pile doit être remplacée dès que l'indication
BAT s'affiche en permanence (fig.3).
• Les piles contiennent des substances pouvant polluer l'environnement.
Veillez à séparer la pile usée des déchets ménagers ordinaires : déposez-la dans
un endroit prévu à cet effet par les pouvoirs publics.
• Il est déconseillé d'utiliser une pile rechargeable pour ce type d'appareil.
Pesée et fonction "Reset" 3
Le poids est indiqué avec une marge d'erreur de 1 grammes ( d = 1g ).
- Appuyez sur le bouton I pour la mise en marche (fig.4).
- La balance est prête à l'emploi 1-2 secondes après cette opération: le chiffre 0
apparaît (fig.5).
Pesée directe
- Placez l'ingrédient ou les ingrédients à peser directement sur le plateau de la
balance (fig. 6). La pesée est donnée immédiatement.
Pesée dans un bol ou un récipient
- Placez le bol (ou le récipient) vide sur le plateau de la balance (fig. 7). Lisez le
poids du bol.
- Appuyez sur le bouton 3 (fig. 8). Le chiffre 0 réapparaît.
- Retirez le bol du plateau. Le poids du bol s'affiche de nouveau, mais cette fois
précédé du signe " - " (moins) (fig. 9).
- L'appareil ôtera automatiquement le poids du bol à chaque nouvelle pesée
(fig. 10).
• L'appareil continuera d'effectuer cette opération tant que l'affichage n'aura pas été
remis à 0 en appuyant de nouveau sur le bouton 3 lorsque le plateau est vide
(fig. 11).
Pour ajouter des ingrédients
Si vous souhaitez ajouter des ingrédients (par ex. 48 g) à une quantité connue
(par ex. 174 g), vous éviterez de faire des calculs en appuyant d'abord sur le bouton
3. Le chiffre 0 s'affichera de nouveau (fig. 12). L'écran affiche alors le poids de
l'ingrédient que vous ajoutez (fig.13).
Remarque : si le plateau de la balance est surchargé (plus de 3 kilogrammes), le
message STOP s'affiche (fig. 14).
Pour arrêter l'appareil
- Appuyez sur le bouton I pour arrêter l'appareil (fig. 15).
• Si vous n'avez pas utilisé l'appareil depuis plus de trois minutes, celui-ci s'arrêtera
automatiquement pour éviter d'user la pile (fig. 16).
Mémoire
L'appareil dispose d'une mémoire : si vous n'avez pas utilisé l'appareil depuis plus
de trois minutes, il s'arrête automatiquement. Si vous avez laissé sur la balance les
ingrédients que vous venez de peser, le poids qui était affiché précédemment
s'affiche de nouveau lorsque vous appuyez sur le bouton I.
Nettoyage
Pour nettoyer l'appareil, utilisez un chiffon humide contenant éventuellement un peu
de liquide vaisselle.
N'utilisez pas de produits abrasifs, de tampons métalliques, d'alcool etc. Ne plongez
jamais l'appareil dans l'eau. Ne le rincez pas (fig. 17) !
Rangement
Assurez-vous que rien ne repose sur le plateau de la balance lorsqu'elle n'est pas
utilisée.
Deutsch
Wichtig
• Lesen Sie die Gebrauchsanweisung sorgfältig durch, und sehen Sie sich
dabei die Abbildungen an, bevor Sie das Gerät zum ersten Mal benutzen.
• Stellen Sie sicher, daß nichts auf der Waage abgestellt wird, wenn sie
nicht in Gebrauch ist.
• Achten Sie darauf, daß kein Wasser oder andere Flüssigkeiten in das
Gerät gelangen.
• Stellen Sie die Waage bei Gebrauch stets auf eine feste, glatte und
waagerechte Oberfläche.
• Wenn in der Nähe ein Mikrowellengerät in Betrieb ist, kann das zu
falschen Meßergebnissen führen.
Stellen Sie die Waage mindestens 1,5 Meter entfernt von dem
Mikrowellengerät auf, oder benutzen Sie die Waage nur, wenn das
Mikrowellengerät nicht in Betrieb ist.
Batterie
Das Gerät arbeitet mit einer 9-Volt-Blockbatterie. Sie ist im Lieferumfang nicht
enthalten. Wir empfehlen die Verwendung von Philips 6LR 61 Alkaline Batterien,
wegen ihrer langen Nutzungsdauer und ihrer Umweltverträglichkeit.
Einsetzen der Batterie
- Öffnen Sie das Batteriefach (Abb. 1).
- Setzen Sie die Batterie ein (Abb. 2).
- Schließen Sie das Batteriefach.
Batteriewechsel
- Wenn nach dem Einschalten der Waage auf der Anzeige für einen Moment die
Buchstaben BAT erscheinen, enthält die Batterie nur noch wenig Energie.
Spätestens wenn BAT kontinuierlich angezeigt wird (Abb. 3), muß die Batterie
ausgewechselt werden.
• Batterien enthalten Substanzen, welche die Umwelt gefährden können. Bitte,
sorgen Sie dafür, daß die Batterien nicht in den normalen Hausmüll gelangen.
Geben Sie sie bei einer offiziellen Sammelstelle ab.
• Die Verwendung aufladbarer Akkus in diesem Gerät ist nicht zu empfehlen.
Wiegen und die "Reset"-Funktion 3
Das Gewicht wird mit der Genauigkeit von einem Gramm angezeigt.
- Drücken Sie den Schalter I, um das Gerät einzuschalten (Abb. 4).
- Nach 1 bis 2 Sekunden ist das Gerät fertig zum Wiegen (Abb. 5).
Wiegen ohne Gefäß
- Stellen oder legen Sie das zu wiegende Gut direkt auf die Waage (Abb. 6). Sie
können das Gewicht sofort ablesen.
Wiegen mit Gefäß
- Stellen Sie das leere Gefäß auf die Waage (Abb. 7). Das Gewicht des Gefäßes
wird angezeigt.
- Drücken Sie den Schalter 3 (Abb. 8). Es wird wieder die Null ("0") angezeigt.
- Nehmen Sie das Gefäß von der Waage. Das Gewicht des Gefäßes wird jetzt mit
einem Minuszeichen ("-") davor angezeigt (Abb. 9).
- Anschließend wird beim Wiegen immer das Gewicht des Inhalts ohne das Gewicht
dieses Gefäßes angezeigt (Abb. 10).
• Diese Einstellung bleibt erhalten, bis Sie bei leerer Waage erneut den Schalter 3
drücken. Es wird dann wieder die Null ("0") angezeigt (Abb. 11).
Zutaten hinzufügen
Wenn Sie eine bestimmte Menge (z.B. 48 g) zu einer bereits ausgewogenen Menge
(z.B. 174 g) hinzufügen wollen, können Sie sich das Kopfrechnen ersparen.
Drücken Sie, bevor Sie die neuen Zutaten hinzufügen, einfach den Schalter 3
(Abb. 12), dann wird statt des vorigen Wertes (z.B. 174 g) wieder die Null ("0")
angezeigt. Sie können jetzt das Gewicht der hinzugefügten Menge in Gramm
ablesen (Abb. 13).
Hinweis: Wenn das Gewicht 5000 g überschreitet, wird “STOP” angezeigt
(Abb. 14).
Ausschalten
- Drücken Sie den Schalter I, um das Gerät auszuschalten (Abb. 15).
• Wenn das Gerät länger als 3 Minuten nicht verwendet wurde, schaltet es sich zur
Schonung der Batterie automatisch aus (Abb. 16).
Speicherfunktion
Wenn dieses Gerät nach ca. 3 Minuten automatisch ausgeschaltet wurde und die
zuletzt ausgewogenen Zutaten noch auf der Waagschale sind, wird das zuletzt
ausgewogene Gewicht wieder angezeigt, sobald Sie den Schalter I drücken.
Reinigung
Sie können das Gerät mit einem angefeuchteten Tuch abwischen, auf das Sie bei
Bedarf etwas Spülmittel aufgetragen haben. Verwenden Sie zum Reinigen keine
Scheuermittel, Haushaltsschwämme oder Lösungsmittel wie Benzin oder Azeton.
Tauchen Sie es niemals in Wasser. Spülen Sie es auch nicht unter fließendem
Wasser ab (Abb. 17).
Aufbewahrung
• Achten Sie darauf, daß nichts auf der Waage abgestellt wird, wenn sie nicht in
Gebrauch ist.
Italiano
IMPORTANTE
• Prima di usare l'apparecchio, leggete attentamente le istruzioni per l'uso
e osservate le illustrazioni.
• Controllate che non ci sia nulla sul piatto della bilancia quando questa
non viene utilizzata.
• Fate in modo che nell’apparecchio non entri dell’acqua (o altro liquido).
• Durante l’utilizzo, appoggiate l’apparecchio su una superficie ben stabile
e perfettamente orizzontale.
• Le eventuali interferenze causate da un forno a microonde in funzione
possono determinare risultati poco attendibili.
Posizionate la bilancia a una distanza di almeno 1,5 m. da un forno a
microonde in funzione oppure utilizzatela soltanto con il forno spento.
BATTERIA
La bilancia funziona con una batteria a 9 volt (non inclusa). Vi consigliamo di
utilizzare una batteria Philips 6LR 61 Alcalina, ecologica e di lunga durata.
COME INSERIRE LE BATTERIE
- Aprite lo scomparto delle batterie (fig. 1).
- Inserite le batterie nel porta-batterie (fig. 2).
- Chiudete lo scomparto delle batterie.
SOSTITUZIONE DELLE BATTERIE
- Nel caso compaia brevemente l’indicazione BAT sul display quando accendete
l’apparecchio, la batteria risulterà poco carica ma ancora funzionante. Nel caso
l’indicazione di BAT fosse continua (fig. 3), la batteria dovrà essere sostituita.
• Le batterie contengono sostanze che possono inquinare l’ambiente. Quando
dovrete gettare le batterie usate, assicuratevi che vengano separate dai normali
rifiuti e depositate presso un centro di raccolta differenziato.
• Si consiglia di non utilizzare batterie ricaricabili con questo apparecchio.
FUNZIONE DI PESATURA E DI “RESET” 3
La bilancia indica il peso con suddivisioni di 1 gr. (d = 1 g.)
- Premete il pulsante I per accendere la bilancia (fig. 4).
- Dopo 1-2 secondi, l’apparecchio è pronto per l’uso (fig. 5).
PESARE DIRETTAMENTE SUL PIATTO DELLA BILANCIA
- Mettete gli ingredienti da pesare direttamente sul piatto della bilancia (fig. 6). Il
peso verrà indicato immediatamente.
PESARE UTILIZZANDO UNA CIOTOLA O UN RECIPIENTE
- Mettete la ciotola (o il recipiente) sul piatto della bilancia (fig. 7). Il display
indicherà il peso della ciotola.
- Premete il pulsante 3 (fig. 8) per rimettere a zero il display.
- Togliete la ciotola dal piatto della bilancia. Il display indicherà il peso della ciotola
preceduto dal segno “meno” (“-”) (fig. 9).
- L’apparecchio sottrarrà automaticamente il peso della ciotola da ciascun
ingrediente che verrà pesato (fig. 10).
• L’apparecchio continuerà a pesare in questo modo fino a quando non rimetterete il
display in posizione 0 premendo il pulsante 3 con il piatto vuoto (fig. 11).
COME AGGIUNGERE GLI INGREDIENTI
Se volete aggiungere una data quantità (ad esempio 48 gr.) ad una quantità nota
(es. 174 gr.), potrete evitare fastidiosi calcoli premendo il pulsante 3 prima di
aggiungere un nuovo ingrediente. In questo modo il display verrà rimesso a 0
(fig. 12) e indicherà la quantità del nuovo ingrediente che state aggiungendo
(fig. 13).
Nota: nel caso in cui il piatto della bilancia venga sovraccaricato (più di 5 kg.), sul
display apparirà la scritta STOP (fig. 14).
COME SPEGNERE L’APPARECCHIO
- Premete il pulsante I per spegnere la bilancia (fig. 15).
• Nel caso l’apparecchio non venga utilizzato per più di 3 minuti, si spegnerà
automaticamente per risparmiare le batterie (fig. 16).
MEMORIA DI BACKUP
L’apparecchio è provvisto di un sistema di “memoria di backup” che lo spegne
automaticamente nel caso in cui rimanga inutilizzato per più di 3 minuti. Se avete
lasciato sul piatto della bilancia gli ingredienti appena pesati, il loro peso verrà
indicato non appena verrà premuto nuovamente il tasto I.
PULIZIA
Per pulire l’apparecchio, potrete usare un panno umido aggiungendo, se
necessario, anche un po’ di detergente.
Non usate spugnette abrasive, alcool ecc. Non immergete la bilancia nell’acqua e
non risciacquatela sotto il rubinetto (fig. 17).
COME RIPORRE L’APPARECCHIO
Controllate di non lasciare nulla sul piatto della bilancia quando non viene utilizzata.
Español
Importante
• Antes de usar el aparato, lean esta instrucciones y mire las ilustraciones.
• Asegúrense de que no haya nada sobre la superficie de pesaje cuando el
aparato no se esté usando.
• No permitan que el agua (o algún otro líquido) penetre en el aparato.
• Cuando usen el aparato, colóquenlo siempre sobre una superficie
horizontal, lisa y sólida.
• Un horno microondas en funcionamiento, puede causar interferencias de
modo tal que los resultados del pesaje se tornen inexactos.
Coloquen la Balanza a una distancia de seguridad de, al menos, 1'5
metros del horno microondas en funcionamiento o usen la Balanza
cuando el horno microondas no esté en funcionamiento.
Pila
La Balanza funciona con una pila de 9 V (no incluida).
Les aconsejamos usar una pila alcalina Philips 6LR 61 debido a su larga vida y a
que no ataca al Medio Ambiente.
Colocación de la pila
- Abran el compartimiento de la pila (fig. 1).
- Coloquen la pila en el soporte de la pila (fig. 2).
- Cierren el compartimiento de la pila.
Sustitución de la pila
- Si la indicación BAT aparece brevemente en la pantalla al poner en marcha el
aparato, la pila está baja pero todavía tiene una reserva de capacidad.
Si la indicación BAT aparece continuamente en la pantalla (fig. 3), la pila debe ser
sustituida.
• Las pilas contienen sustancias que pueden polucionar el Medio Ambiente.
Asegúrense de que la pila gastada se separa de la normal basura doméstica y de
que se deposita en un lugar oficialmente designado para ello.
• No es aconsejable usar una pila recargable en este aparato.
Pesaje y uso de la función Rearme 3
La Balanza indica I el peso con una división de 1 gramo (d = 1 g).
- Presionen el botón para poner en marcha la Balanza (fig.4).
- Después de 1 - 2 segundos, el aparato estará listo para el uso (fig. 5).
Directamente sobre la superficie de pesaje
- Coloquen el(los) ingrediente(s) a ser pesado(s) directamente sobre la superficie de
pesaje (fig. 6). Podrán leer el peso directamente.
En un recipiente o vasija
- Coloquen el vacío recipiente (o vasija) sobre la superficie de pesaje (fig. 7). La
pantalla les mostrará el peso del recipiente.
- Presionen el botón 3 (fig. 8). En la pantalla volverá a aparecer el 0.
- Quiten el recipiente de la superficie de pesaje. En la pantalla volverán a ver el peso
del recipiente, pero ahora con un - (signo "Menos") delante (fig. 9).
- El aparato restará automáticamente el peso del recipiente de cada ingrediente que
se esté pesando (fig. 10).
• El aparato seguirá haciéndolo así hasta que vuelvan a ajustar 0 en la pantalla
mediante el presionado del botón 3 mientras la superficie de pesaje esté vacía
(fig. 11).
Añadido de ingredientes
Si desean añadir ingredientes (por ejemplo, 48 g) a una cantidad conocida (por
ejemplo, 174 g), pueden evitarse los cálculos si presionan primero el botón 3 antes
de añadir un nuevo ingrediente. En la pantalla aparecerá, de nuevo, el 0 (fig. 12) y,
entonces,la pantalla les irá mostrando cuanto están añadiendo del nuevo ingrediente
(fig. 13).
Nota : Si la superficie de pesaje ha sido sobrecargada (más de 5 kg), en la pantalla
aparecerá STOP (fig. 14).
Paro
- Presionen el botón I para parar la Balanza (fig. 15).
• Después de 3 minutos de no usar el aparato, este se desconectará
automáticamente para ahorrar la pila (fig. 16).
Recuperación de toda la memoria
Este aparato está provisto de un "recuperador de toda la memoria". Después de 3
minutos de no usar el aparato, este se desconectará automáticamente. Si han
quitado el(los) ingrediente(s) que acaban de pesar sobre la superficie de pesado, el
peso que anteriormente estaba en la pantalla volverá a aparecer cuando presionen
el botón I.
Limpieza
Pueden limpiar el aparato con un paño húmedo y, si se requiere, un poco de
detergente.
No usen abrasivos, desengrasadores, alcohol, etc.
¡ No sumerjan nunca la Balanza en agua ni la enjuaguen bajo el grifo (fig. 17) !.
Almacenamiento
Asegúrense de que no haya nada sobre la superficie de pesaje cuando el aparato no
esté usándose.
4203 064 09662
;