


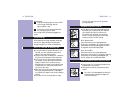


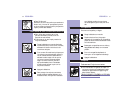

Make sure that the two pointy edges of the comb
fit into the recesses.
7 Repeat the process for the other two sets
of cutters and combs.
8 Replace the frame.
C
9 Press down and turn wheel clockwise until
it locks into place.
10 Replace the Razor Head Assembly back on
razor.
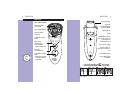
Once A Month:Razor Heads
For optimum performance, razor cutters and
combs should be cleaned in a degreasing liquid
(e.g. Norelco Razor Cleaner,model RC1776, or
rubbing alcohol ) and lubricated, with Norelco
Razor Lubricant, model AL80, or one drop of
mineral oil (in the center of the head).This helps
prevent wear of the shaving heads.
After Each Use:Trimmer
1 Turn razor OFF.
2 Push Trimmer Slide Switch up to pop up
Trimmer.
C
3 Clean Trimmer with the brush every time
you use it.
ENGLISH 17ENGLISH16
Once A month:Razor Heads
Do not mix up the cutters and combs as the
shaving performance may be adversely affected
for several weeks before optimal shaving
performance is restored.
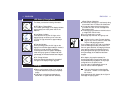
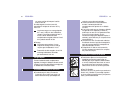
1 Turn razor OFF, remove the charging plug
from the outlet and cord from the razor.
C
2 Press the razor head release button, open
and lift off the razor head assembly.
C
3 Turn the center wheel counterclockwise,
and remove the retaining frame.
4 Remove and clean one set of cutters and
combs at a time.
C
5 Separate the cutter from the comb and
rinse clean under hot water.
Do not clean more than one cutter and comb at
a time, since they are all matching sets. If you
accidentally interchange the cutters and combs, it
could take several weeks before optimal shaving
performance is restored.
C
6 Replace the set back into the Razor Head
Assembly so that the 'wings' on the comb
fit within the brackets located towards the
center of the assembly.
◗ The set will only fit into the Razor Head
Assembly if the 'wings' are between the
brackets.
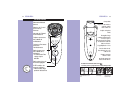
2
1