


ENGLISHENGLISH 1514
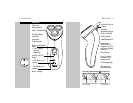
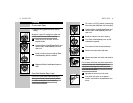
1 Turn razor to Off (O) position, remove plug
from outlet and disconnect cord from razor.
C 2 Press the Razor Head Release Button and
remove Razor Head Assembly from the
razor unit.
C 3 Brush the inside of the razor housing.
4 Turn Razor Head Assembly over so that
underside is exposed.
C 5 Turn wheel of frame counterclockwise.
6 Remove the frame and brush clean.
C 7 Remove and clean one cutter and comb at
a time.
Do not clean more than one cutter and comb at
a time, since they are all matching sets. If you
accidentally interchange the cutters and combs, it
could take several weeks before optimal shaving
performance is restored.
8 Separate the cutter from the comb.
C 9 Only brush the cutter in an upward
motion. Use the short bristled side of the
brush.
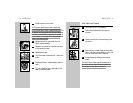
3 Replace razor head assembly.Cleaning
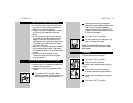
Once a week: Razor
◗ Regularcleaning guarantees better shaving
results.
Always turn razor off, unplug from outlet and
remove cord from razor before cleaning.
C 1 Clean the top of the razor with the
supplied brush.
C 2 Press the Razor Head Release Button and
remove Razor Head Assembly from the
razor unit.
C 3 Brush out hairs from the inside of Razor
Head Assembly and hair chamber.
C 4 Replace the RazorHeadAssembly back on
razor.
Every Two Months: Razor Head
Do not mix up the cutters and combs as the
shaving performance may be adversely affected
for several weeks before optimal shaving
performance is restored.