


Connecting the TV | Initial Setup
7
y
l
l
m
e
e
t
e
”
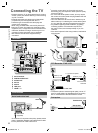
AV / Game equipment
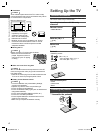
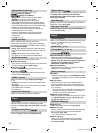
■ Using HDMI terminal
TV
HDMI cable
Equipment
You can also make similar connection via HDMI 2.
■ Using COMPONENT terminals
AV1
IN
AUDIO
VIDEO
COMPONENT
RL
P
R
/C
R
P
B
/C
B
Y/VIDEO
Equipment
Audio cable
Component
video cable
TV
■ Using COMPOSITE terminals
AV1
IN
AUDIO
VIDEO
RL
Y/VIDEO
Equipment
Audio cable
Video cable
TV
You can also make similar connections via AV2 IN.
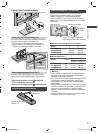
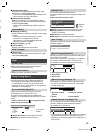
Speaker system
(ARC)
HDMI cable
Amplifier with
speaker system
TV
Use HDMI 2 for connecting an amplifier that has ARC
(Audio Return Channel) function.
As for an amplifier without ARC function, use DIGITAL
AUDIO OUT or AUDIO OUT.
To enjoy the sound from the external equipment in
multi-channel sound (e.g. Dolby Digital 5.1ch), connect
the equipment to the amplifier. For the connections,
read the manuals of the equipment and amplifier.
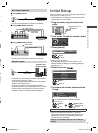
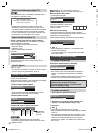
Initial Setup
When you first turn on the TV, a series of steps will pop-
up to guide you to setup your TV.
These steps are not necessary if the setup has been
completed by your local dealer.
1 Plug the mains plug into the socket
outlet
AC 220 - 240 V,
50/60 Hz
2 Turn on the TV with the remote control
3 Select [Home]
Please select your viewing environment.
Home Shop
OK
Confirm
Select
[Shop] is for shop display.
To change the viewing environment later on, you
need to initialise all settings by accessing [Shipping
Condition] (p. 15).
4 Select your area
New South Wales / Australian Capital Territory
Victoria
Queensland
South Australia
Western Australia
Northern Territory
Tasmania
Select State / Territory
OK
Confirm
Select
5 Tick the mode to tune, then start Auto
Tuning
TV Signal Selection
Digital TV
Analogue TV
Start Auto Tuning
: tune (search for the available channels)
: skip tuning
OK
Tick
Select
OK
Confirm
Select [Start
Auto Tuning]
Auto Tuning starts
Auto Tuning searches and stores TV channels.
The stored channels and sorted channel order vary
depending on the area, broadcasting system and
conditions of signal reception.
Setup is now complete and your TV is ready for
viewing.
XM_EM6AZ.indd 7XM_EM6AZ.indd 7 2/1/2013 2:13:54 PM2/1/2013 2:13:54 PM