


English
5
Disposal of used batteries should be carried out in accordance
with the national regulations for the disposal of batteries.
As the batteries may leak and damage the main unit, please
note the following points:
• Remove the batteries from this unit when you are not going
to use it for a long period of time (approximately three
months or more).
• Replace the worn batteries with new ones immediately.
• Do not use manganese and alkaline batteries together.
• Do not use new and worn batteries together.
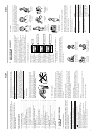
3.3 Setting the personal data before taking a measurement
Step 1: Push the O/ I button.
All the display segments turn on
Step 2: Push the Set button to enter the
setting mode.
Step 3: Setting height (range: 100.0 cm
to 199.5 cm).
1. The height value 160.0 cm flashes
and HEIGHT is indicated.
2. Push the ▼/▲ button to set the height
value. The height value increases by
increments of 0.5 cm each time the
▲ button is pressed or decreases
each time the ▼ button is pressed. By pushing the button for
more than 1 second, the height values change at a faster
rate.
3. Push the Set button to set the height value. The display
changes to the weight setting screen.
Step 4: Setting weight (range: 10.0 kg to 199.8 kg).
1. The weight value 60 kg flashes and
WEIGHT is indicated.
2. Push the ▼/▲ button to change the
weight value. The weight value
increments by 0.2 kg each time the
▲ button is pressed or decreases each time the ▼ button is
pressed. By holding the button for more than 1 second, the
weight values change at a faster rate.
3. Push the Set button to set the weight value. The display
changes to the age setting screen.
Step 5: Setting age (range: 18 to 70 years old).
1. The age value 40 flashes and the
AGE is indicated.
2. Push the ▼/▲ button to change the
age. The age values change by 1 year.
By holding the button for more than
1 second, the age values change at a faster rate.
3. Push the Set button to set the age value. The display
changes to the gender setting screen.
Step 6: Setting gender (male/ female).
1. The gender male flashes and
MALE is indicated.
2. Push the ▼/▲ button to change the
gender. The display of male or female
flashes alternately.
3. Push the Set button to set the gender.
Now all the set items are stored, is displayed.
Step 7
Continue with the next paragraph: to carry out the measure-
ment, paragraph 3.4.
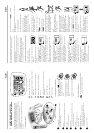
3.4 To take a measurement
Step1: Stand with both feet slightly apart.
Step 2: Hold the grip electrodes.
Wrap your middle finger around the
groove of the handle. Place the palm of
your hand on the top and the bottom
electrodes. Put your thumbs up, resting
on top of the unit.
Step 3: Hold your arms straight out, at a
90 degree angle to your body. Do not
move during the measurement.
Step 4: Confirm the ready to measure
display.
The indicator turns on.
Step 5: Push the START button.
The display turns on.
Step 6: Immediately after having pushed
the Start button, hold the electrodes
correctly with both hands as shown on
the right. The unit automatically detects
that it is held and starts measuring.
Step 7:
During measuring, the display shown to
the right turns on and the arrows rotate
from LOW to TOO HIGH.
As soon as measurement is finished the
FAT% is displayed on the left display,
while indicating the interpretation of
this value (NORMAL >> TOO HIGH) on
the right display. After approx. 5
seconds, both displays change to BMI
(Body Mass Index).
Every 5 seconds, the displays change
from FAT% to BMI and vice-versa.
You can start another measurement
when the indicator turns on.
For an explanation how to interpret the
measurement results in detail, please
refer to chapter 4.
Step 8: Push the O/I button to turn the
power off.
If you do not push the O/I button, the
unit will turn off automatically,
approximately three minutes after
displaying the measurement results.
BODY FAT MONITOR BF306
BODY FAT MONITOR BF306
BODY FAT MONITOR BF306
3. OPERATION AND USAGE OF THE
OMRON BF306 BODY FAT MONITOR
In this chapter a thorough description will be given about
the usage of the OMRON BF 306 Body Fat Monitor. First a
description of the main unit will be given followed by an
instruction to insert the batteries. Please note that paragraph
3.3, 3.4 and 3.5 are about the setting and taking the
measurement.
This chapter will be closed with a paragraph about changing
the values.
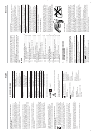
3.1. Description of the unit
Grip electrodes
Extremely weak electric current is applied from here
during the measurement
Display
Displays the set value and the measurement results
O/I button
Turns the power on and off
Start button
Push the button and take the measurement posture,
then the measurement starts
Set button
Stores the memory number (1-9)
and personal data
Up/Down ( ▲ / ▼ ) button
Increases/decreases the values of personal data
including height, weight, age and gender, as well as
the personal memory number.
Battery cover (rear)
Display of height / weight / age mode
Display of the values of body fat percentage / height /
weight / age
Display of ready before and after a measurement
Graphical interpretation of fat% and BMI value
Euro Asia
Low battery display (when this mark flashes, replace
the batteries)
Display of BMI values
Display of personal memory number
Display of gender
3.2 Battery insertion and replacement
1. While pressing the mark on
the battery cover on the back of the
unit with your finger, slide off
the cover in the direction of the
arrow.
2. Insert two AAA batteries with the
polarities in correct alignment,
as indicated in the battery compart-
ment.
3. Slide and securely close the battery
cover.
Battery life and replacement
When the battery replacement symbol flashes,
replace both batteries with new ones.
English
4
1
1
2
3
4
5
6
7
2
3
4
5
6
7
1
2
3
4
5
6
7
8
9
BODY FAT MONITOR BF306
1
2
3
4
5
6
7
8
9