


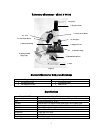
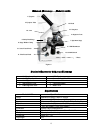

6
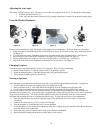
Setting Up Your Microscope
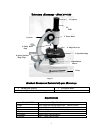
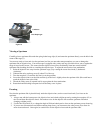
1. Take the Styrofoam container out of the cardboard carton.
2. Remove the tape from the Styrofoam container holding the two sections together.
3. Carefully remove the microscope and other parts from the container and set them on a table, desk, or other flat
surface.
4. Remove the plastic bag covering the microscope.
5. Remove the protective paper from the stage (5).
6. Remove the plastic cap from the eyepiece tube (2).
7. Insert the 10x eyepiece in the eyepiece tube (2).
8. Remove the three objective lenses (4) from their containers. Unscrew the container lids from the threaded portion
of the objective lenses.
9. Thread the end of the 4mm objective lens into one of the holes on the nosepiece (12) until finger tight. It may be
necessary to lower the stage (5) by turning the coarse focus knob (3).
10. Now turn the nosepiece to the next opening and thread each of the remaining objective lenses into the remaining
holes.
You are now ready to use your microscope!
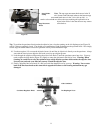
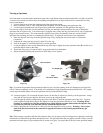
Microscope Operation
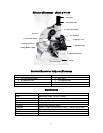
Using the Illuminator Mirror
Your microscope has a built-in plano-concave illumination mirror which allows you to illuminate the specimen from the
bottom by reflecting an external light source (indirect sunlight, room light, lamp, etc.) to the stage. The mirror has a flat
side (you can easily see your reflection on the flat surface) and a concave side. The concave side will concentrate more
light onto the specimen than the flat side. To illuminate a specimen:
1. If it is daylight, tilt the mirror (6) and reflect indirect sunlight through the bottom of the stage (5).
Warning: Never
use the mirror to focus direct sunlight through the microscope as this can be very harmful and may damage your
eyes.
2. If viewing at night or indoors, away from sunlight, you can use a nearby desk lamp, table lamp, or other light source
to reflect light onto a specimen.
To control the amount of light reflecting onto the specimen:
1. Use the concave side of the mirror to focus more light on the slide. The concave side will concentrate more light onto
your specimen but will focus a smaller beam of light, making it more sensitive to adjust.
2 If you are unable to adjust the mirror enough to properly illuminate the specimen, you can also tilt the arm (10)
backward to change the position of the mirror.
3. The amount of light can also be controlled by rotating the five-aperture size disc diaphragm (see figure 2a) underneath
the specimen stage (5).
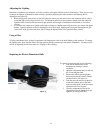
Adjusting the Arm Angle
The normal viewing position is at 0°. However, you can view at any angle from 0° to 60°. To change the viewing angle:
1. With one hand hold the base (7).
2. Then, with your other hand, tilt the arm (10) by pulling it backward or forward to the desired viewing angle.