


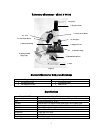
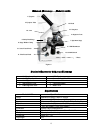

4
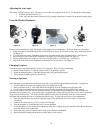
Setting Up Your Microscope
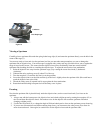
1. Take the Styrofoam container out of the cardboard carton.
2. Remove the tape from the Styrofoam container holding the two sections together.
3. Carefully remove the microscope and other parts and set them on a table, desk, or other flat surface.
4. Remove the plastic bag covering the microscope.
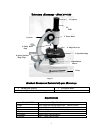
5. Remove the protective paper from the stage (5).
6. Remove the plastic cap from the eyepiece tube (2).
7. Insert the 10x eyepiece in the eyepiece tube (2). Your microscope is now ready to use!
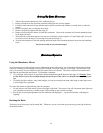
Microscope Operation
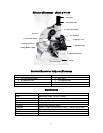
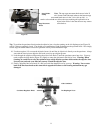
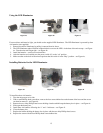
Using the Illuminator Mirror
Your microscope has a built-in plano-concave illumination mirror which allows you to illuminate the specimen from the
bottom by reflecting an external light source (indirect sunlight, room light, lamp, etc.) to the stage. The mirror has a flat
side (you can easily see your reflection on the flat surface) and a concave side. The concave side will concentrate more
light onto the specimen than the flat side. To illuminate a specimen:
1. If it is daylight, tilt the mirror (6) and reflect indirect sunlight through the bottom of the stage (5).
Warning: Never
use the mirror to focus direct sunlight through the microscope as this can be very harmful and may damage your
eyes.
2. If viewing at night or indoors, away from sunlight, you can use a nearby desk lamp, table lamp, or other light source
to reflect light onto a specimen.
To control the amount of light reflecting onto the specimen:
1. Use the concave side of the mirror to focus more light on the slide. The concave side will concentrate more light onto
your specimen but will focus a smaller beam of light, making it more sensitive to adjust.
2 If you are unable to adjust the mirror enough to properly illuminate the specimen, you can also tilt the arm (10)
backwards to change the position of the mirror.
Adjusting the Arm Angle
The normal viewing position is at 0°. However, you can view at any angle from 0° to 45°. To change the viewing angle:
1. With one hand hold the base (7).
2. Then, with your other hand, tilt the arm (10) by pulling it backward or forward to the desired viewing angle.
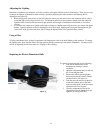
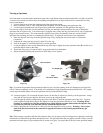
Viewing a Specimen
Carefully place a specimen slide under the spring loaded stage clips (8) and center the specimen directly over the hole in the
center of the stage (5).
You are now ready to focus and view the specimen, but first you must take some precautions so as not to damage the
specimen slide or objective lens. Your microscope is equipped with a safety rack stop (9) which allows you to regulate the
range of travel on the focuser. This assures that the objective lens will not accidentally come into contact with the
specimen slide, breaking the slide or scratching the objective lens. To adjust the travel on the focus mechanism:
1. Raise the objective lens away from the specimen stage (5) by rotating the focus knob (3) backwards (clockwise).
2. Unthread the safety rack stop screw (9) about 2/3 of the way.
3. Lower the objective lens over the slide until the tip of the lens is slightly above the specimen slide. (Be careful not to
touch the objective lens to the slide).
4. Thread the safety screw (9) upward until it stops against the focus mechanism.
5. Rotate the knurled locking nut upward to lock the safety screw in place.
6. Now, turn the focus knob (3) until the specimen comes into sharp focus.