


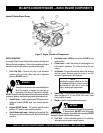


PAGE 22 —MC-62P/S CONCRETE MIXERS — PARTS & OPERATION MANUAL — REV. #5 (09/13/04)
CAUTION:CAUTION:
CAUTION:CAUTION:
CAUTION:
DO NOT attempt to operate the mixer until
the Safety, General Information and
Inspection sections have been read and
understood.
Initial Start-up Instructions (Electric Motor)
Starting
1. Before starting, make sure mixer is positioned on a secure
flat surface to prevent rolling.
2. Use an extension cord (see Table 5) of adequate current
carrying capacity, insert the electric motor's power plug into
one end of the extension cord.
3.
NEVER!
use a
worn
or
frayed
extension cord.
4.
NEVER!
operate mixer with V-belt cover removed.
6. Plug the other end of the extension cord into either a 115 or
230 VAC power source (look at position of voltage selector
switch). Remember to read the nameplate to determine the
motor's input voltage requirement.
DANGERDANGER
DANGERDANGER
DANGER
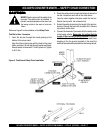
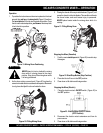
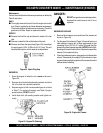
NEVER!
touch the power cord (Figure 16)
with
wet hands
or while
standing in water
when it is connected to a power source. The
possibly exists of electrical shock
(electrocution) even death.
NEVER!
spray
water directly on the electric motor.
Figure 16. Extension Cord (Wet Hands)
WARNING:WARNING:
WARNING:WARNING:
WARNING:
ALWAYS read the label on the electric motor
before applying power. The label will indicate
the correct power requirements for the motor.
Remember the use of an incorrect input
voltage will severely damage the electric
motor.
To prevent personnel from tripping over
the extension cord, position the
extension cord so that it lays flat and is
not curled underneath the mixer.
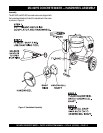
MC-62P/S CONCRETE MIXER — INITIAL START-UP (ELECTRIC MOTOR)
Starting the Electric Motor
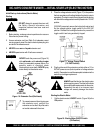
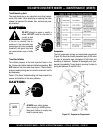
1. Set the electric motor's ON/OFF switch (Figure 18) to the
ON position.
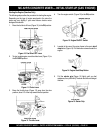
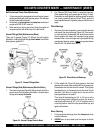
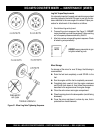
5. Place the voltage selector switch (Figure 17) in the position
that is in accordance with voltage listed on the electric motor's
nameplate. The electric motor's are shipped from the factory
with the with the voltage selector switch placed in the 115 VAC
position.
If 230 VAC is required, remove the locking bolt and nut and
flip the voltage selector toggle switch to the 230 VAC
position. Reinstall the locking bolt and nut to prevent the
toggle switch from being accidently tripped.
NOTE
Figure 17. Voltage Change Switch
(115 VAC Position)
Figure 18. Electric Motor ON/OFF Switch
(ON Position)