


3
8. Repeat STEPS 5-7 for the remaining hinge and pin.
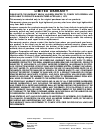
9. Install flap by aligning hinge mounting hole with mount-
ing hole in the side of the seat (FIGURE 10).
10. Insert screw through hinge mounting hole and mount-
ing hole in the side of the seat (FIGURE 10).
11. Install washer and self locking nut on screw. Torque
to 10-15 in./lbs (FIGURE 10).
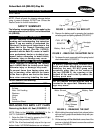
Circlip
Hinge
Pin
Screwdriver
Circlips
FIGURE 9 - INSTALLING HINGE
DETAIL A
Flap (bottom side)
Recess
Pin
Circlip
Pin
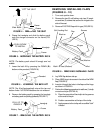
2. Remove the battery pack by grasping the handgrip
on battery pack and pulling upwards (FIGURE 12).
FIGURE 11 - RAISING THE BATH LIFT
Pendant
Up
FIGURE 12 - REMOVING THE BATTERY PACK
PULL UP TO
REMOVE
é
Battery
Pack
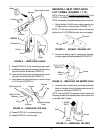
Frame
Groove
Frame
FIGURE 13 - INSTALLING THE SEAT
Slide
Block
Groove
Seat
LOWER
SEAT
12. Repeat STEPS 9-11 on remaining hinge.
13. Repeat STEPS 4-12 for other flap.
REINSTALL SEAT ONTO BATH
LIFT FRAME (FIGURES 11-13)
NOTE: Refer to the GENERAL WARNINGS in the
SAFETY SUMMARY of this Instruction Sheet.
NOTE: If necessary, reinstall the battery pack on the frame.
1. Raise the bath Lift all the way up by pressing the
UP (é) button on the pendant (FIGURE 11).
NOTE: The lift will automatically stop at the top and
bottom limits if UP/DOWN buttons are not released.
FIGURE 10 - INSTALLING THE FLAP
3. Lower the seat onto the frame, ensuring that the slide
block on the back of the chair slides down the two (2)
grooves on the frame (FIGURE 13).
NOTE: The seat MUST be lowered onto the frame until
the spring loaded chair release button locks in place and
an audible "click" is heard.
Flap
Screws
Bath Lift Seat
(Bottom)
Hinges
Nut
Washer
Hinge Mounting
Hole
Mounting Hole