


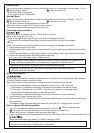
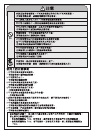

1. Turn "OFF" the switch to remove the cap and head holder. (Fig.17)
Press the head holder removal button (1) to remove the head holder in the arrow (2) direction.
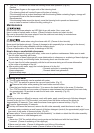
2. Detach the foil-cutter assembly. (Fig.28)
Slide the foil-cutter assembly detaching knob to the right (1),pick up and pull both ends of
the foil-cutter assembly straight upward (2) to detach it.
Never pull it diagonally, otherwise, it may not be detached.
3. Press the lower part of the head holder removal button to attach a new foil-cutter assembly. (Fig.29)
Caution
Floating of the foil-cutter assembly will result in failure.
The foil-cutter assembly cannot be connected in a state where it is facing back to front.
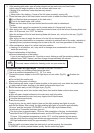
4. Confirm the attachment of the foil-cutter assembly. (Fig.30)
Pick up and lightly pull both ends, and if the assembly cannot be removed, it is properly attached.
5. Press the lower part of the head holder removal button to attach the head holder. (Fig.21)
Align the front face of the head holder to the switch side for attachment.
Caution : The head holder cannot be connected in a state where it is facing back to front.
Alignment mark( ) Alignment mark( )
Alignment mark
Align the alignment marks ( ) and ( ) of the foil-cutter assembly and main body.
Push down the both ends of the foil-cutter assembly until it clicks.
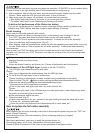
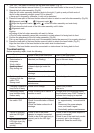
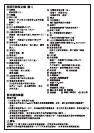
Troubleshooting
Before requesting repair, check the following:
Symptom Check point Remedy
- Hot blade surface
- Deterioration in
sharpness
- Weak rotation
- Small number of operating times
- Stop during use
Check to see if the outer-inner
blade assembly is securely
attached (not floating).
Push in the outer-cutter
assembly until it clicks allowing no
gap to the main body.
Check for heavy accumulation
of beard clippings inside the
blade.
Check the blade surface for oil
shortage.
Periodically perform maintenance.
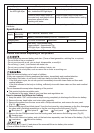
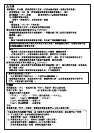
- Scattering of beard
clippings with the
switch “ON”
- Strong smell
Check for accumulation of beard
clippings.
Periodically perform maintenance.
Check for insufficient
maintenance.
- Charging completion
lamp turns off early
Check for full charge. There is no problem.
Use as is.
- Remaining battery
level indicator lamp
flashes early
Check for being not in use for 3
months or more.
Charge when the remaining battery
level indicator lamp “EMP” flashes to
indicate that charging is required.
- No movement with
the switch “ON”
Check for being out of charge.
Check for accumulation of beard
clippings.
Check the blade surface for oil
shortage.
- Turn “OFF” the switch, and charge
for approximately 1 minute before
use.
- Disconnect the power adaptor
once, and insert it again.
- Periodically perform maintenance.
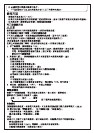
- Failure of charging
with the LED light
dryer
Check to see if the power
adaptor is properly connected.
Check to see if the main body is
properly set to the LED light
dryer.
Check to see if the power adaptor is
properly connected.
Check to see if the main body socket
is properly set in the charging
connector. Reset the main body.
- No movement of the
LED light dryer (dry
switch flashing
quickly)