


APOLLO 60 HP SUPPLIED-AIR RESPIRATOR
Page 11
8.4.3 If the acoustical foam on the inside of the helmet
becomes soiled, it can be wiped with a damp cloth or pulled
off and replaced.
8.5 Inner Lens
8.5.1 Inner lenses should be replaced when dirty or
scratched; however mild detergent and water can be used
to clean the inner lens. Volatile solutions such as alcohol,
gasoline or ammonia must not be used to clean this lens.
Allow the lens to air dry; cloth and towels can scratch the
lens surface.
9.0 SERVICE MAINTENANCE
! CAUTION
Clean the respirator of dust and media before
maintenance. All maintenance must be done in a
clean environment away from dust and media.
Doing so will help prevent ingress of dust and
contaminants.
9.1 Replacing Inner Lens
9.1.1 Unlatch and open the window frame.
9.1.2 Working from inside the helmet, pull up the win-
dow gasket lip and push the gasket and lens out the front
of the window opening.
9.1.3 Remove the old lens from the gasket and replace
with new lens.
9.1.4 Place the new lens and gasket over the window
opening. From the inside of the helmet, work the gasket lip
back onto the helmet.
9.1.5 Smooth out wrinkles in the gasket on the inside of
the helmet.
9.1.6 To maximize the wear life of the inner lens do not
remove the last perforated outer lens. (See Section 9.2)
The respirator must never be used without the inner lens
in place.
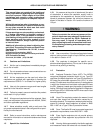
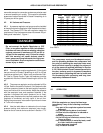
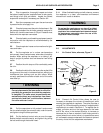
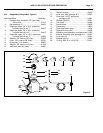
9.2 Replacing Perforated Outer Lenses, Figure 4
9.2.1 Up to five outer lenses can be installed at one time.
For maximum visibility, install only enough lenses to last
during a work period.
9.2.2 Preparing lenses in the following manner will
permit lenses to be pulled off easily by a user wearing
heavy gloves.
9.2.3 Place up to five lenses on a clean flat surface. Fold
up the tab of each lens except the first and last, so that the
tab of each lens is against the back of the one over it.
9.2.4 Unlatch and open the window frame and remove
all remnants of old lenses.
9.2.5 Pick up the stack of prepared lenses. They will be
installed with the straight side toward the top of the helmet,
and the pull tabs toward the hinged end of the window
frame. See Figure 4.
9.2.6 Drop only the top lens tab through the window
frame opening at the window frame hinge end. The tab of
the bottom lens (inside lens) should not go through the
window frame opening. Placing the lenses in this manner
will prevent unintentional removal of the last perforated
lens and prolong the life of the inner lens. Allow all the
lenses to drop in place between the locating lugs on the
window frame. The lens perforations should line up close
to the window frame opening when the frame is closed and
latched.
9.3 Suspension
9.3.1 To replace and adjust suspension, see Section
6.2.
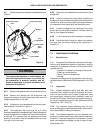
9.4 Outer Cape
9.4.1 When the cape becomes soiled or requires re-
placement, it can easily be removed as follows.
Figure 4.
Locating Tabs
Window Frame
Inner Lens Gasket
Hinge
Perforated Outer Lens
Lens Pull Tab
Inner Lens
Lens Replacement