


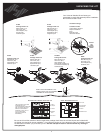
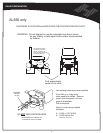
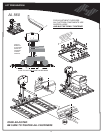

OR
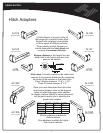
Attach Lift to Hitch Post or Swing Away
SWING AWAY
HITCH
ADAPTER
Measure from
Hitch Bar to ground
In order to determine how to assemble the Hitch Post and Hitch Adapter, the distance from the
bottom of the hitch to the ground must be measured.
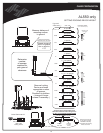
Determine which set of holes to use to bolt
together the Hitch Post and Hitch Adapter. Use the 1/2” x
3-1/2” bolts and nuts provided and tighten.
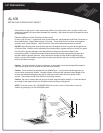
Once you have determined the proper adjustment for the Hitch Post or Swing Away
and have attached it to the Hitch Adapter, insert the adapter into the hitch receiver
and attach it using the 1/2" x 3-1/2" bolt, , Pinch Bolt Tube and lock nut.
NOTE: Pinch Bolt Tube is added to the Class 3 reciever
bolt to prevent the lift from moving side to side
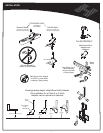
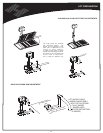
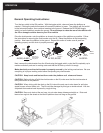
Extremely Important Note:
Valuable Installation Hint! (Using Caution), Once the lift is placed behind the vehicle, plug the
power cord into the harness that you have installed on the vehicle. Turn the key on an
d use the
toggle DOWN switch to raise the motor box. Continue to power the lift until the mounting holes in the
lift are even with the top hole in the Hitch Post. Attach the lift to the post using the supplied 1/2” bolt
with lock nut and washers. Using this method will allow you to attach the lift without physically having
to lift the unit and hold it while the bolt is inserted.
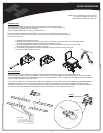
Route the lift power cord down the lift away from its moving parts and potential pinch points. The
cord should follow along the post and be secured with zip ties provided to allow the lift to operate
without disconnecting the power cord.
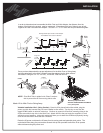
Drawings below depict a Class 3 Hitch Adapter
The installation for a Class 2 is identical
5-13"
13-15"
15-17"
17-19"
HITCH
POST
HITCH
ADAPTER
Without Swing
Away Option
With Swing
Away Option
DO NOT OVERTIGHTEN THIS BOLT!
It is a pivot point!
4-12" 12-14"
14-16"
16-17"
Hitch
Post
Swing
Away
CLASS 2
( 1.25 x 1.25 Solid Bar )
Pinch Bolt Tube
Not required, as
Class 2 is threaded
OR
CLASS 3
( 2 x 2 TUBE )
PINCH BOLT
TUBE
OR
Vehicle Hitch
INSTALLATION
6