


SKU 92242 For technical questions please call 1-800-444-3353. Page 3
6. Do not operate product if under the influence of alcohol or drugs. Read warning labels on
prescriptions to determine if your judgment or reflexes are impaired while taking drugs. If there
is any doubt, do not operate the product.
7. Use only Batteries of the type recommended-size, 9V D/C.
8. Do not mix old and new batteries. Do not use different types of batteries.
9. Keep children away. Children must never be allowed in the work area. Do not let them handle
the Digital Thermometer.
10. Remove the battery if the Thermometer is not used for a long period of time.
11. Repeated sharp flexing can break the thermocouple leads. Avoid sharp bends in the
leads, especially near the connector.
Note: Always switch to a fresh battery when tool performance begins to diminish.
This is a delicate instrument, do not drop or jar the Digital Thermometer.
Warning: The warnings, cautions, and instructions discussed in this instruction manual cannot
cover all possible conditions and situations that may occur. It must be understood by
the operator that common sense and caution are factors which cannot be built into
this product, but must be supplied by the operator.
Unpacking
When unpacking your Digital Thermometer, check to make sure the following parts are included. If
any parts are missing or broken, please call HARBOR FREIGHT TOOLS at 1-800-444-3353.
Assembly
Your Digital Thermometer requires only minor assembly. It is important that you read the entire
manual to become familiar with the product BEFORE you assemble and use the Digital
Thermometer. Before assembling and operating the Digital Thermometer be sure that you have all
parts described in the Parts List and Assembly Diagram located on the last pages of this manual.
Turning the Thermometer “ON” and “OFF”
1. Insert the battery into the battery compartment. Refer to the section on page 5 titled,
“Replacing the Battery.”
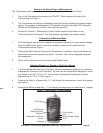
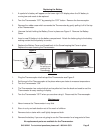
2. Turn on the Thermometer by pressing the “ON/OFF” Switch located at the top of the
Thermometer-see Figure 1 on page 4.