


SKU 66838 For technical questions, please call 1-800-444-3353. Page 2
If unreadable or missing, contact Harbor
Freight Tools for a replacement.
ASSEMBLY INSTRUCTIONS
Read the ENTIRE IMPORTANT
SAFETY INFORMATION section at the
beginning of this document including
all text under subheadings therein
before set up or use of this product.
Open Rolling Walker. Push down on Support 1.
Hinges (41) until they lock securely in place.
The Support Hinges are located directly be-
low the Seat (16). See Figure 1, below.
The Brake Cable (7) should already be 2.
fastened to the Push Handles (2). Place the
Push Handles into the Front Frame (17) and
set to the required height using the Screw
Caps (13) and Screws (10). Fasten securely.
WARNING! Make sure that both Push
Handles are set at the same height.
Insert the removable Backrest Bar (52) into 3.
the slots on the Front Frame and fasten into
place by inserting the Retainer Pins (14).
See Figure 2, below.
Use the Fasteners (26) to clasp the Basket 4.
(25) or PVC Bag (51) to the Cross Bolt (27)
and the Back Frame (18).
OPERATION
To properly sit in the chair, rst make sure 1.
the Walker is on a level surface.
Then check the brakes and grab both 2.
Handles (4).
Carefully back into the Walker. Do NOT fall 3.
back into the Walker.
To slow down or temporarily stop the Walker 4.
during use, squeeze the Brake Handles (6)
rmly. See Figure 3, below.
To lock the Wheels (38) in position, push 5.
down on Brake Handles until a “click” sound
is heard.
To unlock the Wheels, pull upon the Brake 6.
Handles.
Regularly 7. test the tension on the Brake
Handles to ensure that Brakes work properly.
It may be necessary to adjust the tension of
the brake cable. This type of adjustment is
similar to the kind performed on a bicycle.
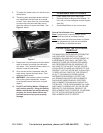
To tighten the tension on the brake cable, 8.
use a wrench (not included) to turn the 10mm
Nut under the Handle clockwise. See Figure
4, below.
41
16
Figure 1
Figure 2
52
14
Figure 3
6
Figure 4
10mm Nut
Brake Cable