


INSPECTION, MAINTENANCE, AND CLEANING
1. Before each use, inspect the general condition of the Microscope. Check for
cracked, worn or damaged parts, and any other condition that may affect the
tool’s safe operation. If a problem occurs, have the problem corrected before
further use.
Do not use damaged equipment.
2. To clean, use a damp cloth and a mild detergent. Then dry. Do not use sol-
vents as damage to the Microscope will occur. Do not immerse the Micro-
scope in any liquid.
3. When storing, keep the Microscope in a clean, dry, safe location out of reach of
children.
4. CAUTION! All maintenance, service, and repairs not discussed in this
manual should only be performed by a qualified service technician.
SKU 54949 For technical questions, please call 1-800-444-3353 PAGE 6
2. Make sure the location in which you intend to use the Microscope is well lit.
4. If necessary, section the specimen from 0.1 to 0.5mm thickness. Then, carefully
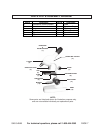
position the specimen in the middle of the Slide (7). (See Assy. Diagram.)
OPERATING INSTRUCTIONS
9. Make sure to store the Microscope in a clean, dry, safe location out of reach
of unauthorized people.
3. Thoroughly clean and dry the Slide (7). (See Assy. Diagram.)
5. Center the Slide (7) on the Specimen Stage (8), and hold the Slide in place using
the Clip (6). (See Assy. Diagram.)
6. Turn the Turret (4) to align the 8X Objective Lens (5) directly over the specimen
to be observed. For greater magnification of the specimen, align the 20X Objec-
tive Lens over the specimen. (See Assy. Diagram.)
Always wear eye protection. Wear ANSI approved safety impact eye
glasses when using this product.
1.
7. While viewing into the Drawtube & Zoom Eyepiece (1), slowly turn the mecha-
nism clockwise or counterclockwise to bring the specimen image into focus.
(See Assy. Diagram.)
8. When finished viewing the specimen, move the Clip (6) off the Slide (7). Re-
move the Slide from the Microscope. Properly dispose of or store the specimen.
Then, thoroughly clean and dry the Slide. (See Assy. Diagram.)