


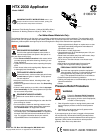


2 313537D
Airless Spray Setup
To prevent injury when the applicator is not in use,
always relieve pressure if sprayer is being shut
down or left unattended.
Make sure pressure control is turned off and gasoline engine
is shut off or power cord is unplugged from power source.
Refer to your sprayer instruction manual for priming and spray
instructions.
Connect Applicator to Sprayer
1. Attach supply hose to sprayer fluid outlet.
2. Attach other end of supply hose to applicator swivel (13).
3. Refer to sprayer instruction manual for priming
instructions.
Install Fluid Filter or Plug
1. When spraying fluids with small aggregates, install filter
support (21) and filter (20, 20a) to reduce tip clogging.
2. When spraying with large spray tips and fluids with larger
aggregates, install plug (20b) to prevent fluid from
entering air passage in housing (1).
Install Applicator Tip and Guard
1.If equipment has recently been operated,
relieve pressure.
2.Using a pencil or similar object, insert seal
(25) into back of guard (32).
3. Install guard (32) onto end of applicator.
4. Insert tip (31) in guard (32). Tighten retaining nut.
Operation
Spraying
1. Be sure the arrow shaped tip (31) faces forward (spray).
2. Hold applicator perpendicular and approximately
40 in. (1 m) from surface. Move applicator first, then open
applicator to spray a test pattern.
3. Slowly increase pump pressure until coverage is uniform
and even (see sprayer instruction manual for additional
information).
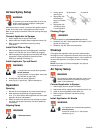
Aligning Spray
1.Relieve pressure.
2. Loosen guard
retaining nut.
3. Align guard (32)
horizontally to
spray a horizontal
pattern.
4. Align guard (32)
vertically to spray
a vertical pattern.
Clearing Clogs
1. Relieve pressure (see Pressure Relief procedure).
2. Rotate tip (31) 180°. Open applicator into hopper or onto
ground to remove clog.
3. Rotate tip (31) 180° back to spray position.
Cleanup
Thoroughly flush applicator after each work session before
fluid begins to cure in applicator. Remove check valve (2) and
clean all residue from air passages. Store in a dry location. Do
not leave the applicator or any parts in water or cleaning
solvents.
NOTE: Check valve (15) will be damaged if any object is
inserted into valve.
Air Spray Setup
To prevent injury when the applicator is not in use,
always relieve pressure if sprayer is being shut
down or left unattended.
Connect Applicator to Sprayer
1. Attach supply hose to sprayer fluid outlet.
2. Attach other end of supply hose to applicator swivel (13).
3. Install air hose to applicator check valve (15).
4. Refer to sprayer instruction manual for priming
instructions.
Install Applicator Air Nozzle
1.If equipment has recently been operated,
relieve pressure.
2.Install air nozzle (10, 27, 28, 29) and
retaining ring (11).
WARNING
WARNING
WARNING
WARNING
WARNING
WARNING
(4) Vertical
(3) Horizontal
ti11908a
ti11909a