


Calibration
11
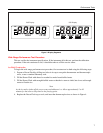
FLUKE 52-1601
zf09f.eps
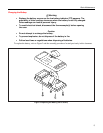
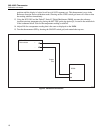
Figure 6. A1 Main PCA Adjustments
Optimizing Thermometer Performance in the Negative Temperature Range
Perform the following steps to optimize the thermometer performance in the negative temperature range:
1. Put the thermometer in normal operating mode. Normal operation can be achieved by turning the
thermometer OFF and then ON. No other thermometer buttons should be pressed during the power cycle
operation.
2. Insert a known good thermocouple in an ice bath (see “Ice Bath Construction” earlier in this document).
3. Insert the Mercury Thermometer to the same depth as the thermocouple wires verifying the ice bath
temperature is 0.0
o
C ± 0.1
o
C.
4. Connect the other end of the thermocouple wire to the T1 input of the thermometer and allow the
instrument reading to stabilize.
5. Slowly, and in small increments, adjust R7 (T1 offset) until the thermometer reading matches the
Mercury Thermometer reading. Allow the thermometer reading to stabilize and repeat the adjustment as
necessary until a stable and correct reading can be attained.
6. Repeat steps 4 and 5 for R13 (T2 offset, Fluke 50D only).
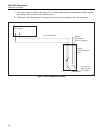
Thermocouple Input Calibration (Optional)
Note
This adjustment procedure counteracts the adjustments made in the “Optimizing Performance
in the Negative Temperature Range” section of this document.
This procedure optimizes the 50S or 50D for measurement with a specific thermocouple.
Perform the thermocouple input calibration using the following procedure:
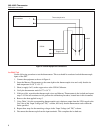
1. Construct an ambient temperature lag bath as shown in Figure 7.
2. Connect the thermocouple to the thermometer input terminals.
3. Select the applicable switch postion (T1 or T2) and temperature scale (
o
C or
o
F).
4. Insert the probe into a room temperature lag bath.