


A - 5
English
6. Cleaning anD mainTenanCe
PLEASE NOTE: The device should be cleaned as required.
1. Switch off the device and unplug from the power socket.
2. Wipe the exterior of the device with a clean, damp (not wet) cloth and mild dishwashing detergent. Do not use harsh abrasives or
solvents, or these may damage the device.
3.
DAILY
Clean chamber, heated breathing tube and heated breathing tube connection port.
• Remove the heated breathing tube from the device by pulling sleeve upwards to unlock the connector. Then remove connector.
• Wash the heated breathing tube with soapy water, rinse and then hang-up the heated breathing
tube with its ends pointing to the floor to dry.
• Remove the chamber by pushing down the finger guard and pulling out the chamber.
• Pour out and discard the remaining water.
• For standard (HC365) chambers, clean and wash with soapy water, then rinse and dry.
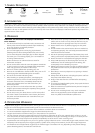
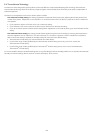
• The extended life (HC360) chamber requires disassembly before cleaning. Push the base off the
chamber top as shown in Fig. 1. Ensure the round seal at the base is not loose or damaged.
Wash the chamber top and base in a mild dishwashing detergent. Rinse thoroughly and dry. This
chamber may also be cleaned in a domestic dishwashing machine.
• Thoroughly wipe the inside of the heated breathing tube connection port with a clean damp, low
lint cloth.
4. WEEKLY
Thoroughly clean the chamber.
• Soak the inside of the chamber for 10 minutes in a solution of one part white vinegar to two parts
water and rinse well with distilled water.
5. MAINTENANCE
• Replace the air filter when it becomes significantly discoloured, at least once every three months or after 1000 hours machine run
time. To do this, remove the filter holder from the back of the device as shown in Fig. 2. Ensure the vertical black line of the new
filter is facing towards the device, and fit both back to the device.
• Replace the chamber if it is cracked, discoloured or scratched.
• Replace the heated breathing tube after 4000 hours usage or once per year. A damaged tube needs to be replaced immediately.
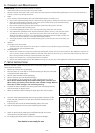
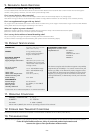
7. seTUp insTrUCTions
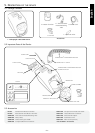
When the chamber is fitted and filled, the device must remain upright, so that water
cannot enter the enclosure.
1. Remove your device from its packaging.
2. Place the device on a low shelf or on the floor beside your bed, the unit needs
to be placed below head height.
3. Remove water chamber from the packaging.
4. Remove the blue caps and discard them (Fig.1).
5. Fill the chamber up to the water filling line with distilled water only (Fig.2).
Never fill the chamber through the heated breathing tube connector port.
When moving your device, ensure that the water chamber is empty. Machine
failure due to water damage is not covered by warranty.
6. To attach the water chamber to the device, press down the finger guard and
slide the chamber on (Figs 3 and 4).
7. When the chamber is fitted correctly, the finger guard will click into place.
8. One end of the heated breathing tube has a grey plastic connector. Lift the
sleeve and slide connector on to the device. Push the sleeve down to lock
(Figs 5, 6 and 7).
9. Connect the other end of the heated breathing tube to the mask.
10. Plug the device power cord into your household power socket.
11. Switch on the device by pressing the on/off button (Fig.8). The current
ThermoSmart
®
Humidity setting is displayed.
12. For changing the setting refer to section 8 “Controls and Display”.
Your device is now ready for use.
Fig.2
Fig.3
Fig.4
Fig.5
Fig.6
Fig.7
Fig. 8
Fig.1
Fig.1
Fig.2