


12
13
Styling tips
Brush hair thoroughly before setting. Divide your hair up
into small sections, and deal with them separately piece
by piece as described below until the desired result is
achieved.
Creped hair:
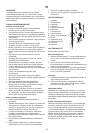
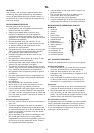
o Start with a lock of hair about 5 cm wide and close
the crepe iron’s ceramic plates (11) around the hair
near the scalp.
o Keep the plates closed for approx. 10 seconds.
o Open the plates and close them again further along
the lock of hair.
Flat, smooth hair:
o Start with a lock of hair about 5 cm wide and close
the crepe iron’s ceramic plates (11) around the hair
near the scalp.
o Slowly slide the apparatus towards the hair ends
inauentmovement.Keepthehairtighttoavoid
kinks. For more lift in the hair, smooth only the outer
part of the hair lock.
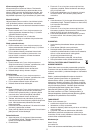
Hair with a ick:
o Start with a lock of hair about 5 cm wide. Close the
curling iron (12) around a lock of hair with the upper
jaw at the back close to the scalp.
o Slide the apparatus slowly towards the hair ends.
o Finish by curling the last piece of hair a little out at
the ends.
Hair with a curl:
o Start with a lock of hair about 5 cm wide. Close the
curling iron (12) around a lock of hair with the upper
jaw at the front close to the scalp.
o Slide the apparatus slowly towards the hair ends.
o Finish by curling the last piece of hair under at the
ends.
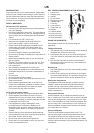
Curls:
o Start with a lock of hair about 5 cm wide. Open the
upper jaw (12) and place it about halfway along the
lock of hair.
o Spread the hair along the cylinder and carefully
release the upper jaw so that the hair is trapped.
o Slide the apparatus slowly towards the hair ends.
o Check hair ends are trapped under the jaw and
nishbywindingthelockaroundthecurlingiron
towards the scalp. Avoid touching the scalp with the
hot curling iron.
o Hold the curling iron in place for 5-8 seconds,
depending on length and thickness of hair.
o Open the jaw and remove the apparatus from hair.
Allow hair to cool before setting.
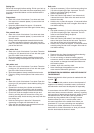
Soft curls:
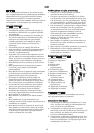
o Set brush accessory (13) on the thinnest curling iron
(12) without opening the jaw. Important: The iron
mustbecoldbeforettingthebrush.
o Heat the apparatus up.
o Start with a lock of hair about 5 cm wide and roll
it around the brush. Start at the hair ends and roll
towards the scalp.
o Hold the iron in place for approx. 10 seconds before
carefully rolling the hair lock out again. Allow hair to
cool before setting.
Long curls:
o Set spiral accessory (14) on the thinnest curling iron
(12) without opening the jaw. Important: The iron
mustbecoldbeforettingthespiral.
o Heat the apparatus up.
o Start with a lock of hair about 5 cm wide and roll it
around the spiral. Start at the hair ends. Trap them
with the small jaw and roll towards the scalp.
o Hold the iron in place for approx. 10 seconds before
carefully rolling the hair lock out again. Allow hair to
cool before setting.
CLEANING
• Remove the plug from the socket before cleaning.
• Allow to cool down before cleaning.
• Do not use strong or abrasive cleaning agents,
solvents or similar to clean the apparatus, as these
may scratch or damage the external surfaces and
the ceramic plates.
• Instead, wipe with a soft dry cloth.
• Never submerge the apparatus in water, and no
water must be allowed to get into it.
INFORMATION ON DISPOSAL AND RECYCLING OF
THIS PRODUCT
Please note that this Adexi product is marked with this
symbol:
This means that this product must not be disposed of
together with ordinary household waste, as electrical
and electronic waste must be disposed of separately.
In accordance with the WEEE directive, every member
state must ensure correct collection, recovery, handling
and recycling of electrical and electronic waste. Private
households in the EU can take used equipment to
special recycling stations free of charge. In some
member states you can, in certain cases, return
the used equipment to the retailer from whom you
purchased it, if you are purchasing new equipment.
Contact your retailer, distributor or the municipal
authorities for further information on what you should
do with electrical and electronic waste.