


12
13
INTRODUCTION
To get the best out of your new appliance, please read
thisuserguidecarefullybeforeusingitforthersttime.
We also recommend that you keep the instructions for
future reference, so that you can remind yourself of the
functions of your appliance.
SAFETY MEASURES
Normal use of the appliance
• Incorrect use of this appliance may cause personal
injury and damage.
• Use for its intended purpose only. The manufacturer
is not responsible for any injury or damage resulting
from incorrect use or handling (see also Guarantee
Terms).
• For connection to 230 V, 50 Hz only.
• Always turn the appliance off using the on/off
button, and unplug it, when it is not in use.
• Please note that the appliance will remain hot for
a while after you switch it off. Always allow it to
cool completely before you put it away or change
accessories.
• Do not submerge in water or any other liquid.
• Do not use in the bath or shower, as it may cause an
electric shock.
• Never leave unattended when in use, and keep an
eye on children.
• Caution! The ceramic plates can get very hot. They
must not come into contact with the skin, as this
can cause burns.
• Not suitable for commercial or outdoor use.
• Always keep the appliance at a safe distance from
ammableobjectssuchascurtains,tableclothsor
the like.
• Do not cover.
• Do not expose to direct sunlight.
• Do not place or store near other heat sources or in a
damp environment.
• Never leave the appliance where it can fall or be
pulled into a washbasin, a bathtub or similar. Never
reach for the appliance if it has fallen into water.
First remove the plug from the socket.
Cord, plug and mains socket
• Keepcordawayfromhotobjectsandopename.
• Check regularly that neither the cord nor plug is
damaged and do not use if there is any damage, or
ifithasbeendroppedontheoor,droppedinwater
or damaged in any other way.
• If the apparatus or plug is damaged, it must
be inspected and if necessary, repaired by an
authorised repair engineer, otherwise there is a risk
of electric shock. Never try to repair the appliance
yourself.
• Remove the plug from the socket before cleaning.
• Avoid pulling the cord when removing the plug from
the socket. Instead, hold the plug.
• Do not wind the cord around the appliance.
• Check that it is not possible to pull or trip over the
cord or any extension cord.
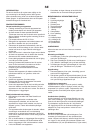
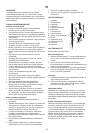
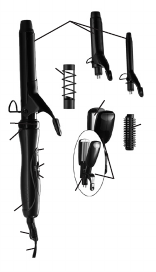
KEY TO MAIN COMPONENTS OF THE APPLIANCE
1. Power cord
2. Hanging loop
3. Handle
4. On/off button
5. Temperature scale
6. Indicator light
7. Lock ring
8. Lock symbols
9. Crepe-/atiron
10. Adapter
11. Ceramic plates
12. Curling irons (3)
13. Brush accessory
14. Spiral accessory
USING THE APPARATUS
Hair should be clean and dry before using the
appliance.
Fitting accessories
1. Turn the lock ring (7) until the arrow on the handle (3)
is aligned with that on the lock ring.
2. Insertcrepe-/atiron(9)oroneofthecurlingirons
(12)inthesocketinthehandleandpressrmlyinto
place.
3. Turn the lock ring until the arrow on the handle is
aligned with that on the lock ring. The accessory is
now locked in place.
Warming up
1. Placetheapparatusonaat,heat-resistantsurface,
and plug it in.
2. Switch on by pushing the on/off switch (4) towards
the white symbol (above). The indicator lamp (6) will
light and remain on as long as the apparatus is on.
Setting the temperature
The apparatus has three settings: off (black symbol,
bottom), medium temperature (black/white symbol,
middle) and high temperature (white symbol, top).
Temperature can be regulated by pushing the on/off
button up and down.
Using crepe-/at iron
Use the adapter (10) to change accessories such as
at-orcrepeirons.Pushdownuntilthearrowisaligned
withthetwostraightlines–theaccessoryisnowaat
iron. Push the adapter up until the arrow is aligned with
the two wavy lines – the accessory is now a crepe iron.
When the adapter is aligned with the dot in the middle
thecrepe-/atironislocked.
Using curling irons
There are three different sizes of curling iron: The
thinnest gives tight curls and the thickest loose curls.
The larger the amount of hair treated at a time, the
looser the curls will be. You can also make curls softer
using the brush accessory (13) and spiral accessory (14)
(see below).
UK
1.
2.
3.
4.
5.
6.
7.
8.
9.
10.
11.
12.
13.
14.