


DP
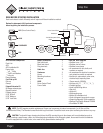
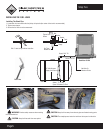
MOUNTING THE CONDENSER
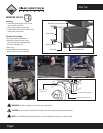
Step Three
Page3
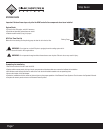
Condenser Installation
1. Select the site for the condenser on the rear or the vehicle sleeper.
2. Hold condenser in the preferred location and mark the holes clearly.
3. Drill holes 17/32” for Nutserts®.
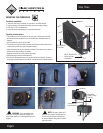
4. Install the condenser assembly in the preferred location.
Mounting Considerations
• The condenser must be installed on the back wall of the sleeper (outside).
Airflow around the condenser must not be blocked by headache racks, for
example.
• Install condenser within 8’ of the HVAC.
• The condenser must be installed vertically with the blue-marked side on the
bottom right (where the liquid refrigerant collects).
• Hose connection side of the condenser requires 5” free space to the nearest
obstruction to allow for hose connection.
• Keep the condenser out of the path of road spray.
• Refrigerant hoses must be clamped firmly.
• Do not allow Refrigerant hoses to touch each other; heat transfer will occur
and change the performance of the HVAC. Insulate or keep the hoses together.
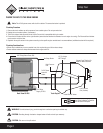
3/8” NC Bolts
3 Per Side
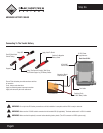
Condenser
Refrigerant
Hoses - Clamp
Securely
Condenser 12V
Power Harness
HVAC
Nutserts®
Blue Marking
Min 5” Clearance To
Allow For Hose
Connection
WARNING: If you are installing the
condenser to the back wall of the sleeper, use
large fender washers or a backing plate for extra
support.
NOTE: All hoses, cables, and
electrical wiring should be kept safe and
secured using split loom and cable ties
to prevent abrasion. Stay clear of exhaust
pipe and muffler.