


Getting to Know Your Programmable Pressure Cooker
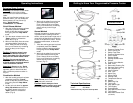
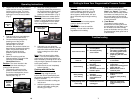
Parts of the Pressure Cooker
Sealing Gasket
The sealing gasket fits inside the cover
of the pressure cooker to form a very
tight seal between the cover and
pressure cooker when the cover is
locked. The sealing gasket can be
easily removed for cleaning. Over time,
the sealing gasket may shrink, harden,
crack or become distorted with use. If
this occurs, the sealing gasket should
be replaced.
Warning: Do not wash the sealing
gasket in the dishwasher, hand
wash only.
Note: If there are any concerns
regarding the sealing gasket call
customer service.
Stainless Steel Meat Trivet
The meat trivet sits on the bottom of
the removable cooking pot to support
roasts and other meats and prevents
the meat from sticking to the bottom of
the pot. It can also be used to support a
metal steamer basket for vegetables.
Preset Programmed Cooking
Buttons
The preset buttons are programmed to
take the guess work out of cooking with
your pressure cooker.
Removable Cooking Pot
The removable cooking pot is coated
with a non-stick surface for easier
clean-up.
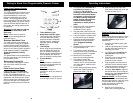
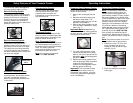
Parts of the Control Panel
Cooking with your new Electronic
Pressure Cooker is simple and easy
to use. The intelligent electronic
controls take the guesswork out of heat
adjustment and cooking times. Simply
add your food to the cooking pot, close
the cover and push one of the preset
buttons and let the pressure cooker do
the rest.
6
1. Timer Indicator Light
2. Keep Warm Indicator Light
This indicator light (yellow) will
illuminate when the cooking
process has been completed
and the pressure cooker has
switched over to the “Keep
Warm” cycle.
3. Time Display
When using the pre-set buttons
the time display will show the
time (in minutes) counting up.
When manually setting the timer,
the time display will show the
time (in minutes) counting down.
4. Pre-set Buttons
Cook
The cook button is excellent for
cooking unprocessed white rice
and fresh vegetables.
Slow Cook
The slow cook button is
excellent for sticky rice, brown or
wild rice.
Soup Button
The soup button is programmed
to cook soups, stews, or sauces.
3. You should add a minimum of 1
cup (250 ml) of liquid into the
cooking pot. Do not fill the
cooking pot more than one-third
full when cooking dried beans
an legumes, no more than half
way when cooking soups and
stews, and not more than two-
thirds full when cooking
vegetables or whole pieces of
meat.
4. Place the cover on the pressure
cooker and turn it counter
clockwise to lock in place.
5. Plug the power cord into the unit
and then into the electrical outlet.
6. Lower the pressure release valve
so that steam may not escape.
7. Select the desired preset button
depending on food to prepare.
(See “Suggested Cooking
Guide”).
8. Ensure that the indicator light on
the preset button is lit.
9. The pressure cooker will beep
three (3) times to let you know that
the cooking process is complete.
10. Wait for the unit to beep to
signal end of cooking process.
11. The pressure cooker will
automatically go into “Standby”
mode for one (1) minute and then
into “Keep Warm” mode for up to
six (6) hours.
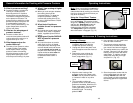
12. Slowly rotate the pressure release
valve to the “Open” position to
release the steam. (Fig. 6)
Operating Instructions
Fig. 6
Fig. 7
13. After the safety float valve has
fallen down, remove the cover and
remove the food. (Fig. 7)
11
Cooking Without the Pre-Set
Buttons
When cooking with the pressure cooker
without using the pre-set buttons, use
the timer button to adjust for the
desired time.
1. Place the removable cooking pot
into the unit.
2. Add the ingredients to be cooked
into the removable cooking pot,
following your recipe.
3. You should add a minimum of 1
cup (250 ml) of liquid into the
cooking pot.
4. Place the cover on the pressure
cooker and turn it counter
clockwise to lock in place.
5. Plug the power cord into the unit
and then into the electrical outlet.
6. Lower the pressure release valve
so that steam may not escape.
7. Using the timer button, adjust for
the desired time. Once having set
desired time, wait 15 seconds and
the timer light will go on.
Important Note: The timer will not
begin to count down immediately after
the timer light goes on. It will only begin
to count down once the pressure
cooker has reached a sufficient
pressure and heat level.
8. Wait for the unit to beep to
signal end of cooking process.