impresión de imágenes
fotográfi cas
(
sólo
SC-DX103/DX105)
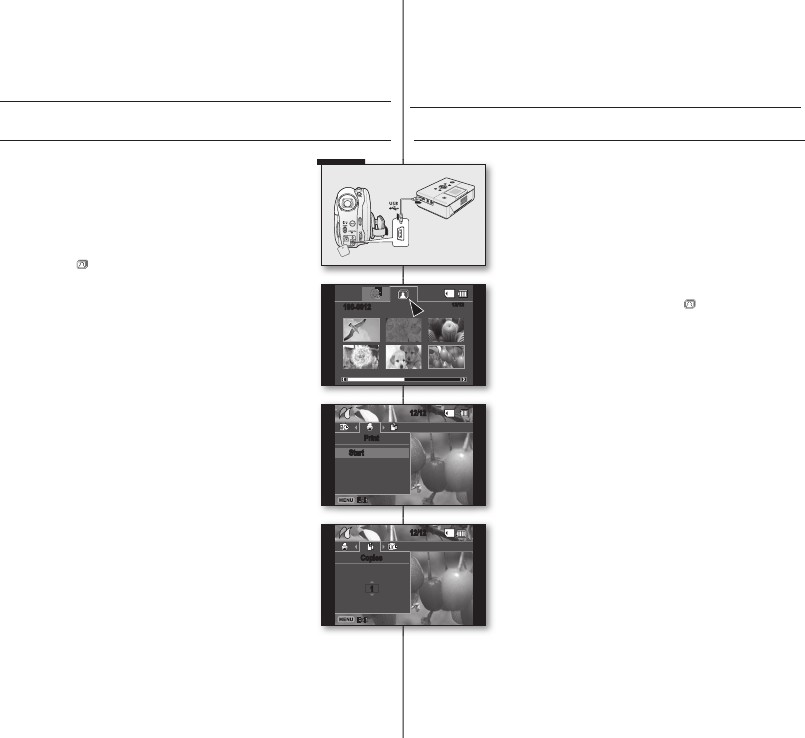
IMPRESIÓN DIRECTA CON PICTBRIDGE
• Si la impresora es compatible con PictBridge, las imágenes
fotográfi cas se pueden imprimir fácilmente conectando la
videocámara con el cable USB directamente a la impresora.
No es posible defi nir DPOF mientras
PictBridge se encuentra en uso.
página 83
AVISO: Después de seleccionar “PictBridge” en el menú,
conecte el cable USB.
1. Vaya al modo de reproducción de foto.
página 59
• Coloque el interruptor del Modo de almacenamiento
en CARD
.
• Presione el botón MODE y utilice el Joystick para
seleccionar la fi cha de foto (
) para defi nir el modo
de reproducción de foto.
2. Defi na “USB Connect” (Conexión USB) en “PictBridge.”
página 81
• (Presione el botón MENU
Utilice el Joystick para
seleccionar “Setting” (Confi g.)
“USB Connect”
(Conexión USB)
“PictBridge”)
3. Conecte la videocámara con DVD a la impresora utilizando
el cable USB suministrado.
4. Encienda la impresora.
• La pantalla del menú PictBridge aparece
automáticamente tras un tiempo.
• Para ver la imagen fotográfi ca anterior o siguiente,
presione el botón MENU y mueva el Joystick a la
izquierda o a la derecha.
• Cada pulsación del botón MENU activa y desactiva el
menú de PictBridge.
5. Presione el botón MENU. Mueva el Joystick a la derecha
o a la izquierda para seleccionar “Print” (Imprimir) y
presione el Joystick
.
• Se imprimirá la imagen fotográfi ca seleccionada.
• Para detener la impresión después de que se inicie,
presione el botón MENU
.
Ajuste del número de copias que desee imprimir
Presione el botón MENU.
Mueva el Joystick a la derecha o a la izquierda para seleccionar
“Copies” (Copias) y mueva el Joystick hacia arriba o hacia abajo para seleccionar
el número de copias.
Para salir, presione el botón MENU
.
• Si la imagen va a la siguiente o a la anterior, el número de copias se reinicializa.
printing photo images
(SC-DX103/DX105
only
)
DIRECT PRINTING WITH A PICTBRIDGE
• If your printer is compatible with PictBridge, photo images can be printed easily by
connecting the camcorder to the printer directly with the USB cable.
DPOF cannot be set while PictBridge in use.
page 83
NOTICE: After selecting “PictBridge” in the menu, connect the USB
cable.
1. Move to the photo play mode.
page 59
• Set the Storage mode switch to CARD.
• Press the MODE button and use the Joystick to select the
photo (
) tab to set the photo play mode.
2. Set the “USB Connect” to “PictBridge.”
page 81
• (Press the MENU button
Use the Joystick to select
“Setting”
“USB Connect”
“PictBridge”)
3. Connect your DVD camcorder to the printer using the provided
USB cable.
4. Turn your printer power on.
• The PictBridge menu screen appears automatically after a
short period.
• To see the previous or next photo image, press the MENU
button and move the Joystick left or right.
• Each press of the MENU button toggles the PictBridge menu
screen on or off.
5. Press the MENU button. Move the Joystick right or left to select
“Print,” and then press the Joystick to print.
• The selected photo image will be printed.
• To stop printing after printing starts, press the MENU button.
Setting the number of copies to print
Press the MENU button.
Move the Joystick right or left to select “Copies,” then move the Joystick
up or down to select the number of copies.
To exit, press the MENU button.
• If the image moves to the previous or next, the number of copies is reset.
• If your printer is compatible with PictBridge, photo images can be printed easily by
12/12
Copies
1
12/12
Print
Start
12/12
100-0012
(AD68-02550C)SC-DX100_ENG+SPA.indb 84 2008-03-05 ¿ÀÈÄ 1:31:55
