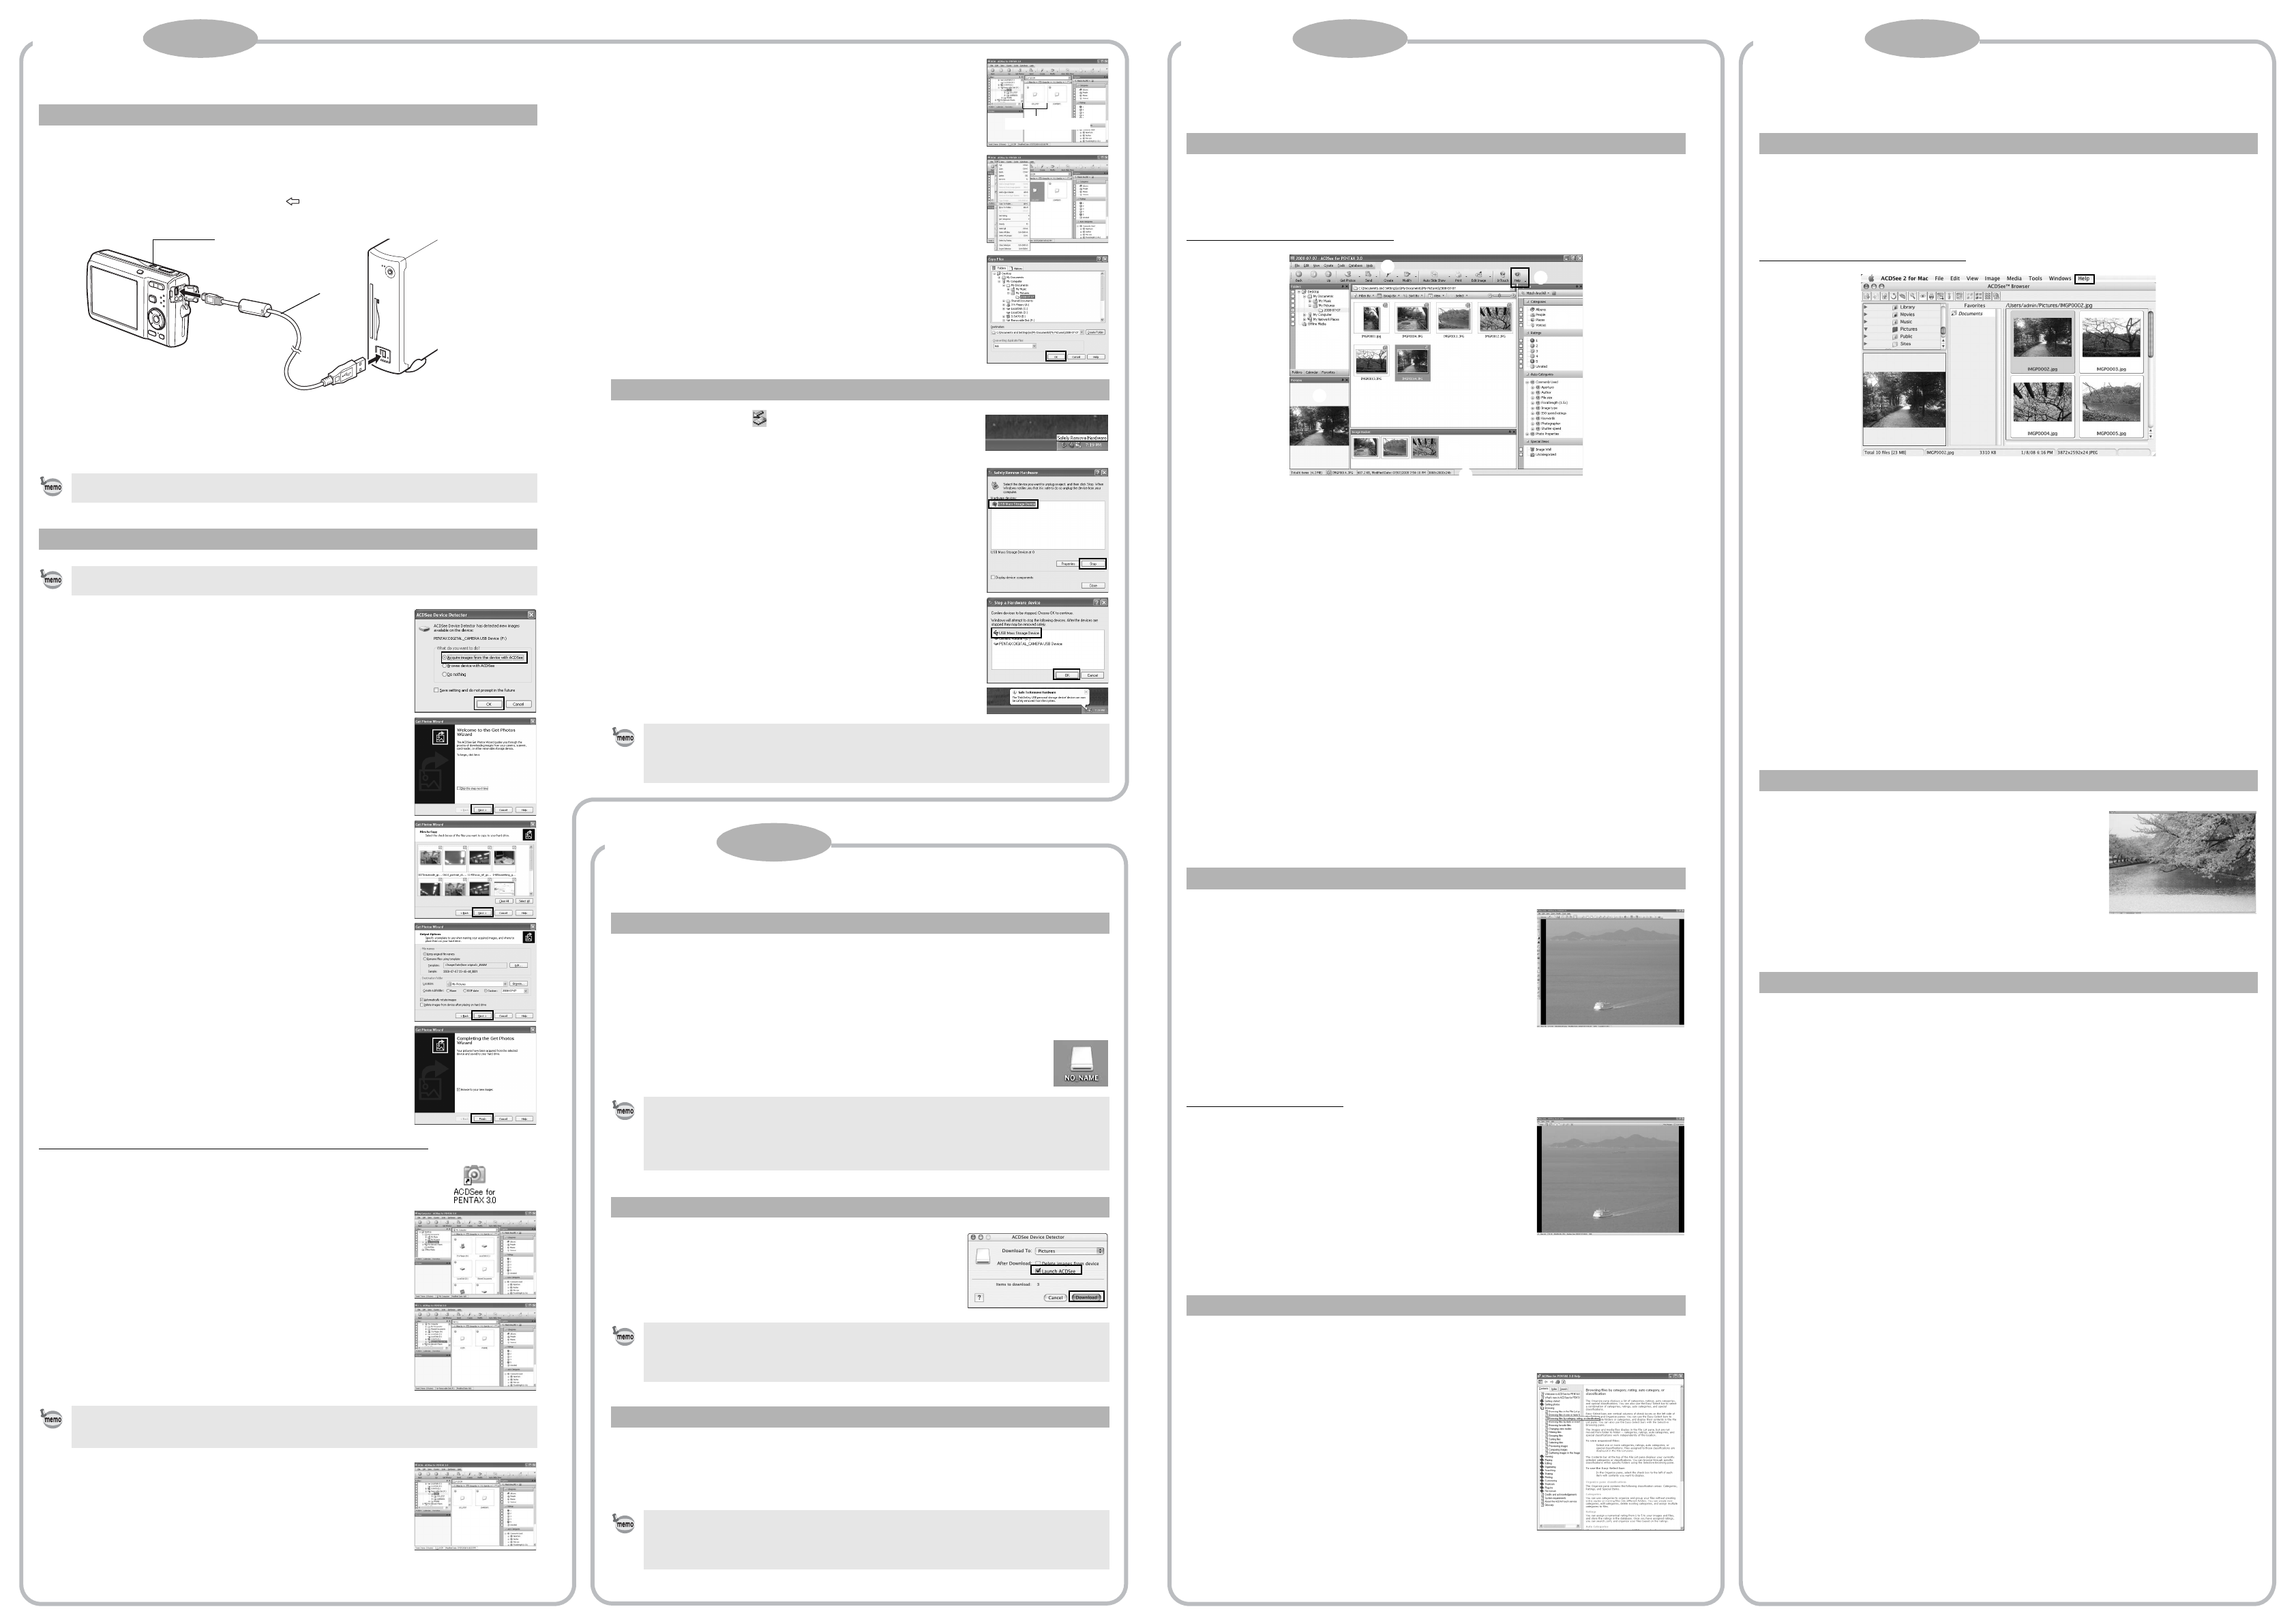
Transferring Images to a Windows PC
1 Turn your Windows PC on.
2 With your camera turned off, connect it to your Windows PC using the
supplied USB cable.
Connect the terminal of the AV cable with pointing toward the 4 on the PC/AV terminal
of the camera.
3 Turn your camera on.
The “Device Detector” screen appears automatically.
If the “Device Detector” screen does not appear, display and copy the images following the
steps in “When the Device Detector screen does not appear”.
4 Confirm that [Acquire images from the device with
ACDSee] is checked and click [OK].
5 Click [Next].
6 Select an image to copy and click [Next].
7 Specify [File names] and [Destination folder], and
click [Next].
The image is copied to the Windows PC.
8 Click [Finish].
The “ACDSee for PENTAX 3.0” browser starts.
When the Device Detector screen does not appear
4 Double-click the [ACDSee for PENTAX 3.0] icon on
the desktop.
5 Click [My Computer].
6 Double-click [Removable Disk].
7 Double-click the [DCIM] folder.
Images are stored in folders named by the shooting date
(“XXX_0707” for July 7. “XXX” is a three-digit number.).
If [Standard] is selected for [Folder Name] in the [W Setting] menu,
a folder named “XXXPENTX” (XXX is a three-digit folder number)
is displayed and images are stored here.
8 Select the folders you want to copy to the Windows
PC.
9 Select [Copy To Folder...] from the [Edit] menu.
The “Copy Files” screen appears.
10 Specify the destination folder.
11 Click [OK].
The folders or images are copied to the Windows PC.
1 Double-click the [Safely Remove Hardware] icon
in the task bar.
The “Safely Remove Hardware” screen appears.
2 Select [USB Mass Storage Device] and click [Stop].
The “Stop a Hardware device” screen appears.
3 Select [USB Mass Storage Device] and click [OK].
A message appears indicating that the hardware can be safely
removed.
4 Click [OK].
5 Disconnect the USB cable from your Windows PC
and the camera.
Transferring Images to a Macintosh
1 Turn your Macintosh on.
2 With your camera turned off, connect it to your Macintosh using the
supplied USB cable.
If there is no SD Memory Card in the camera, the images stored in the built-in memory will
be transmitted to your Macintosh.
3 Turn your camera on.
The camera is recognized as [NO_NAME] on the desktop.
4 Specify a save location, make sure that [Launch
ACDSee] is checked, and click [Download].
After images are copied to your Macintosh, the browser for
“ACDSee 2 for Mac” starts.
1 Drag [NO_NAME] on the desktop to the trash.
If the SD Memory Card has a volume label, drag the icon of that name to the trash.
2 Disconnect the USB cable from your Macintosh and the camera.
Connecting the Camera and Windows PC
The self-timer lamp blinks while the camera is connected to a Windows PC with the USB
cable.
Transferring Images
If there is no SD Memory Card in the camera, the images stored in the built-in memory will
be transmitted to your Windows PC.
If the SD Memory Card has a volume label, the volume label name appears instead of
[Removable Disk]. A new unformatted SD Memory Card may show the manufacturer
name or model number.
3
2
Disconnecting the Camera from Your Windows PC
• If the camera (removable disk) is being used by an application such as “ACDSee for
PENTAX 3.0”, the camera cannot be disconnected until the application is closed.
• The camera will automatically switch to the Playback Only mode when the USB cable is
disconnected from your Windows PC or the camera.
Connecting the Camera and Macintosh
• If the SD Memory Card has a volume label, the volume label name appears instead of
[NO_NAME]. A new unformatted SD Memory Card may show the manufacturer name or
model number. Volume label name can be changed.
• The self-timer lamp blinks while the camera is connected to a Macintosh with the USB
cable.
Transferring Images
• When [Delete images from device] is checked, images are deleted from the camera after
transfer is complete.
• Even if camera images are not transferred, they can be directly displayed on the
Macintosh from a camera connected to the Macintosh.
Disconnecting the Camera from Your Macintosh
• If the camera (removable disk) is being used by an application such as “ACDSee 2 for
Mac”, the camera cannot be disconnected until the application is closed.
• The camera will automatically switch to the Playback Only mode when the USB cable is
disconnected from your Macintosh or the camera.
Select the folder (s)
Using “ACDSee for PENTAX 3.0”
“ACDSee for PENTAX 3.0” lets you view, edit, manage, search for, share, and print images.
1 Double-click the [ACDSee for PENTAX 3.0] icon on the desktop.
ACDSee starts and the main window, which is called the browser, appears.
ACDSee Browser Interface
A Menu bar
You can access the various menu commands.
BToolbar
Provides quick access to shortcuts for frequently used tasks and functions.
C Folders pane
Displays the configuration of folders in your computer. When you browse a folder, the
contents of the folder appear in the File List pane.
D Preview pane
Displays a preview of the image or media file currently selected in the File List pane. You
can change the size of the preview image or play back the media file.
E File List pane
Displays the contents of the currently selected folder or the results of the most recent
search (the file or folder that matches the search item). It is the only pane that always
appears in the browser and it cannot be hidden or closed.
F Category pane
Displays a list of categories and priorities. By dragging and dropping files from the File List
pane to here, you can set category and priority for files.
G Image Basket pane
Displays files selected in the File List pane. By choosing images and files and putting them
in the Image Basket pane, you can use the editing and creating functions on images from
different folders and categories.
HStatus bar
Displays information and properties for the selected file.
1 Select and click the folder containing the image
you want to view in the Folders pane of the
ACDSee browser.
Images are displayed in the File List pane.
2 Select and double-click the image you want to
view in the File List pane.
The selected image is displayed with the viewer.
With the viewer, you can enlarge/reduce the display size of
the image or edit the image. You can also play back movies
or sound files.
ACDSee Quick View
The image is displayed on the “ACDSee Quick View” screen if
you double-click the image file directly from Windows without
starting ACDSee. (You cannot play back or display the file with
ACDSee even if you double-click a movie or sound file.)
You can also enlarge/reduce the display size of the image on
the “ACDSee Quick View” screen.
Click [Full Viewer] on the “ACDSee Quick View” screen to
switch the display to the viewer.
Click [Photo Manager] to switch the display to the ACDSee
browser.
You can find more information on how to use “ACDSee for PENTAX 3.0” by using the help
pages.
1 Click the [?] icon at the top right of the screen.
The help screen appears.
2 Double-click the desired topic.
Using “ACDSee 2 for Mac”
“ACDSee 2 for Mac” lets you display and manage images.
1 Double-click the [ACDSee] folder inside the [Applications] folder.
2 Double-click the [ACDSee 2 for Mac] icon.
ACDSee starts and the main window, which is called the browser, appears.
ACDSee Browser Interface
A Menu bar
You can access the various menu commands.
BToolbar
Provides quick access to shortcuts for frequently used tasks and functions.
C Folders pane
Displays the configuration of folders in your computer. When you browse a folder, the
contents of the folder appear in the File List pane.
D Preview pane
Displays a preview of the image or media file currently selected in the File List pane. You
can change the size of the preview image or play back the media file.
E Favorites pane
You can add frequently used items (folders, etc.).
F File List pane
Displays the contents of the currently selected folder or the results of the most recent
search (the file or folder that matches the search item). It is the only pane that always
appears in the browser and it cannot be hidden or closed.
G Status bar
Displays information and properties for the selected file.
1 Select and click the folder containing the image
you want to view in the Folders pane of the
ACDSee browser.
Images are displayed in the File List pane.
2 Select and double-click the image you want to
view in the File List pane.
The selected image is displayed with the viewer.
With the viewer, you can enlarge/reduce the display size of the image.
You can find more information on how to use “ACDSee 2 for Mac” by using the help pages.
1 Select [ACDSee 2 for Mac] from [Help] on the menu bar.
The help screen appears.
2 Click the desired topic.
Starting “ACDSee for PENTAX 3.0”
Viewing Images
Details on How to Use “ACDSee for PENTAX 3.0”
A
B
C
D
E
F
G
H
Viewer
ACDSee Quick View
Starting “ACDSee 2 for Mac”
Viewing Images
Details on How to Use “ACDSee 2 for Mac”
A
B
C
D
E
F
G
Windows Step 5Windows Step 4
Macintosh Step 4
Macintosh Step 5


