EN300-EU-EN v1.3 4/14
5
Operation
Powering the meter
1. Press the Power button to turn the instrument ON
2. If the meter does not turn on or if the "
" low battery symbol appears in the display,
replace the batteries.
3. Press the Function button to select the measurement needed.
Note: The display orientation rotates, depending on the function selected.
Microphone up: Sound, Light, Temperature
Air speed sensor up: Airspeed + Temperature, Humidity + Temperature
Anemometer Air Velocity Measurement
1. Select the Anemometer function by pressing "Function Button" until the display indicates
Anemometer units (ft/min, m/s, km/h, MPH, or knots).
2. Press the "Unit/Zero Button" to select unit desired
3. Press the “°C/°F Button” to select the temperature unit.
4. Face the air velocity sensor into the source of wind.
5. The display will show the air velocity and the ambient temperature.
6. Allow time for the reading to stabilize and note the values indicated. Air velocity may fluctuate
slightly.
Temperature Measurement (Thermocouple)
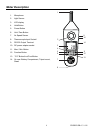
1. Plug a type K thermocouple probe into the "Thermocouple Input Socket".
2. Select the temperature function by pressing "Function Button" unit the display shows
temperature units (°C or °F).
3. Contact the Thermocouple Sensor Head with object to be measured
4. The temperature value will be displayed on the LCD display.
Note: Verify the polarity when plugging a thermocouple probe into the temperature input socket.
Any temperature difference between thermocouple probe and thermometer can result in
inaccurate measurement result. Therefore, allow time for thermal equalization between probe
plug and meter input socket. The thermal equalization procedure takes few minutes and
should be applied only when the probe has been exposed to ambient temperature different
from the meter