


8
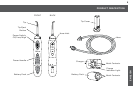
Installation of Showerpik
®
Bracket
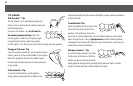
1. Removecurrentxedmountshowerheadorhandheldshowerhead
bracketfromshowerpipeleavingonlytheshowerpipe.Removeany
leftoverpipetaperesidue.Ensurethatthewasherfromtheoldshower
isnotconnectedtothepipe.Useathinutensiltocheckinsidethepipe
forwashersuchasapencilorscrewdriver.
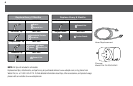
Do not use your fingers.
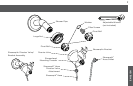
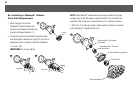
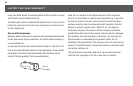
2. Removelargenutfromdiverter
valveandremovepivotball.
NOTE: Thelargenutanddiverter
valvehavealefthandedthreadand
loosen when the large nut is turned
clockwiseasviewedfromthe
backofthediverter.(2)
3. Placelargenutovershowerpipe
with threaded end facing you
(narrowendtowardwall).(3)
5
SHOWERPIK
®
INSTALLATION INSTRUCTIONS
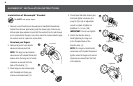
4A
Tighten
4B
Tighten
Tighten
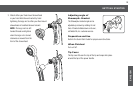
4. Threadpivotballontoshowerpipe
andhandtightenclockwisetoa
snugt.(4A)Useanadjustable
wrench or pliers to tighten an
additional¼–½turn.(4B)
IMPORTANT: Donotovertighten.
5. Attachthedivertervalveby
hand tightening the large nut
tothethreadedbackofthe
divertervalve.(5)
NOTE: Thelargenutanddiverter
valvehavealefthandedthreadand
tighten when the large nut is turned
clockwiseasviewedfromthefront
ofthediverter.
3
2
Loosen
Do NOT use pipe tape.