


8. REMOVAL AND REPLACEMENT OF RECEIPT/LABEL
8. REMOVAL AND REPLACEMENT OF RECEIPT/LABEL
8-2
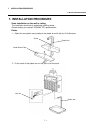
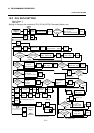
4. Insert the tip of the receipt/label into the print head.
5. Align the two media guides with the right edge of the receipt/label.
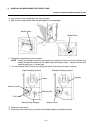
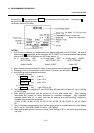
6. Thread the receipt/label as shown below.
NOTE: Labels and receipts should be left-aligned as viewed from the front of the machine, and
always threaded in parallel with the media shaft and the print head. Failure to do this may
cause a paper jam or a skew feed.
7. Turn the head-up lever to the arrow indicating direction to set the print head in position.
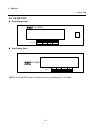
(Label threading method) (Receipt threading method)
8. Close the printer cover.
9. Finally press the Feed key to confirm that the labels/receipts are loaded correctly.
Media Guide
Media Guide
Head-up Lever
Receipt
Label
Winding Roll
Backing Paper Stopper
Head-up Lever
Print Head