


Battery Replacement
Antimicrobial Feature
The thermometer operates on 1 LR44 (1.5v)
battery. Change the battery when display
becomes dim. To replace battery:
1. Open the battery compartment by turning the
battery compartment door cover on the back of
the thermometer counterclockwise, using a coin
in the slot.
2. Remove used battery and insert new one, with
the "+" sign facing up.
3. Close the compartment. Make sure the o-ring
is seated around the opening to maintain
waterproof feature. Note: If battery door is
not closed properly, water can get into
the battery compartment causing
the unit to malfunction.
Taylor's Safe-T-Guard™ sleeve and housing
incorporates a non-toxic chemical compound that
inhibits the growth of harmful pathogens, which
minimizes cross contamination. It is important to
thoroughly clean and disinfect your thermometer
after each use.
General Operation
1.
appropriate solution such as boiling water for
several minutes.
2. Turn unit on with "On/Off" button located on
the dial face. Select Fahrenheit or Celsius using
the button marked "ºF/ºC". Note: To save
battery life, this unit has an AUTO-OFF
feature that turns the instrument off after
10 minutes if no change in temperature
has occurred.
3. When ready to test the temperature, insert stem
at least 1" for the most accurate reading. The
LCD will stabilize when reading is complete
(approximately 10 seconds).
4. When the digital display has been stabilized,
press the "Hold" button and the temperature
will be held (the letter "H" will appear). Press
again to release.
5. Press the "Max" button to read the maximum
temperature that the probe has reached (the
word 'Max' will appear).
6. To Clear the Max Memory: with the word max
showing on the LCD, press and hold the "Max"
button for 3 seconds. The word max will turn off
and the max memory will change to the current
temperature.
7. To avoid burns near heat, snap the pocket
sleeve onto the opposite end of the
thermometer and use as a handle.
8. Be sure to sanitize the stem before inserting it
into another product (See Antimicrobial Feature).
Sterilize the metal probe by inserting it into an
Thank you for purchasing a Taylor® Waterproof
Digital thermometer. This state-of-the art
measurement instrument is engineered and
designed to meet the highest quality standards…to
assure you uncompromising accuracy and
consistently dependable, convenient performance.
In order to optimize its function, please read this
instruction manual carefully before use…and keep
it handy for future reference.
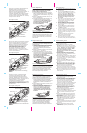
Description of Parts
Dial Face
LCD
Hold Button
ºF/ºC Button
Max
Memory
Button
On/Off Button
Calibration Reset Button
Remplacement de pile
Fonction antimicrobienne
Le thermomètre fonctionne avec 1 pile LR44 (1,5
V). Changez la pile lorsque l'affichage faiblit. Pour
remplacer la pile :
1. Ouvrez le compartiment de piles en tournant le
couvercle de la porte du compartiment de piles
à l'arrière du thermomètre dans le sens
antihoraire à l'aide d'une pièce de monnaie
dans la fente.
2. Retirez la vieille pile et insérez-en une nouvelle,
avec le signe « + » vers le haut.
3. Fermez le compartiment. Assurez-vous que le
joint torique est assis autour de l'ouverture pour
maintenir la fonction étanche. Remarque: Si la
porte de piles n'est pas fermée
correctement, l'eau pourrait pénétrer
dans le compartiment et
l'appareil fonctionnerait mal.
Le manchon et boîtier Safe-T-Guard™ de Taylor
incorpore un composé chimique non-toxique qui
prévient la croissance de pathogènes dangereux
ce qui réduit la contamination croisée. Il est
important de bien nettoyer et désinfecter votre
thermomètre après chaque utilisation.
Fonctionnement général
1. Stérilisez la sonde métallique en l'insérant dans une
solution appropriée, comme de l'eau bouillante,
pendant plusieurs minutes.
2. Mettez l'appareil en marche avec le bouton
«On/off» (marche/arrêt) sur le cadran. Choisissez
Fahrenheit ou Celsius en utilisant le bouton marqué
« ºF/ºC ». Remarque : Pour conserver la pile,
cet appareil comprend une fonction « AUTO-
OFF » (arrêt automatique) qui éteint
l'instrument après 10 minutes sans changement
de température.
3. Lorsque vous êtes prêt à tester la température,
insérez la tige d'au moins 1 po (2,5 cm) pour le
relevé le plus exact. L'ACL se stabilisera à la fin du
relevé (environ 10 secondes).
4. Lorsque l'affichage numérique est stabilisé, appuyez
sur le bouton « Hold » (retenue) et la température
sera conservée (la lettre « H » apparaîtra). Enfoncez
à nouveau pour dégager.
5. Appuyez sur le bouton « Max » pour lire la
température maximum que la sonde a atteint (le
mot « Max »).
6. Pour effacer la mémoire max: avec le mot max à
l'ACL, appuyez et tenez enfoncé le bouton « Max »
pendant 3 secondes. Le mot max s'éteindra et la
mémoire max passera à la température actuelle.
7. Pour éviter les brûlures près de la chaleur,
enclenchez le manche de pochette sur l'extrémité
opposée du thermomètre et utilisez comme poignée.
8. Assurez-vous de désinfecter la tige avant de l'insérer
dans tout autre produit (reportez-vous à la fonction
Antimicrobienne).
Merci de votre achat d'un thermomètre numérique
étanche et compact Taylor®. Cet instrument de
mesure à la fine pointe de la technologie est
fabriqué et conçu pour répondre aux normes de
qualité les plus élevées pour vous assurer des
années d'exactitude sans compromis et une
performance pratique, fiable constante.
Pour optimiser cette fonction, veuillez lire
attentivement ce manuel d'instructions avant
d'utiliser votre produit ... et gardez-le à portée de
la main à titre de référence.
Description des pièces
Cadran
ACL
Bouton « Hold »
(retenue)
Bouton ºF/ºC
Bouton
« Max »
(mémoire
de max)
Bouton « On/Off »
(marche/arrêt)
Bouton « Cal »
(réinitialisation de calibrage)
Reemplazo de la batería
Característica antimicrobiana
El termómetro funciona con una batería LR44
(1,5v). Cambie la batería cuando la pantalla se
vuelva borrosa. Para reemplazar la batería:
1. Abra el compartimiento de la batería girando
hacia la izquierda la tapa de la puerta del
compartimiento de la batería en la parte trasera
del termómetro, usando una moneda en la
ranura.
2. Quite la batería e introduzca una nueva, con el
signo "+" hacia arriba.
3. Cierre el compartimiento. Asegúrese de que el
anillo en O esté apoyado alrededor de la
abertura para mantener la característica a
prueba de agua. Nota: si la puerta del
compartimiento no está correctamente
cerrada, puede entrar agua en el mismo
haciendo.
La funda y la carcasa Safe-T-Guard™ de Taylor
incorporan un compuesto químico no tóxico que
inhibe el crecimiento de agentes patógenos
nocivos, lo cual minimiza la contaminación
cruzada. Es importante limpiar y desinfectar
totalmente su termómetro después de cada uso.
Funcionamiento general
1. Esterilice la sonda de metal introduciéndola en una
solución adecuada, tal como agua hirviendo,
durante varios minutos.
2. Encienda la unidad con el botón “On/Off” ubicado
en el lado del cuadrante. Seleccione Fahrenheit o
Celsius usando el botón marcado "ºF/ºC". Nota:
para ahorrar vida útil de la batería, esta unidad
cuenta con una característica de apagado
automático que apaga el instrumento después de 10
minutos si no hay ningún cambio de temperatura.
3. Cuando esté listo para tomar la temperatura,
introduzca el vástago al menos 1” (2,5 cm) para
obtener la lectura más precisa. La pantalla LCD se
estabilizará cuando la lectura esté completa
(aproximadamente 10 segundos).
4. Cuando la pantalla digital se haya estabilizado,
presione el botón "Hold" (mantener) y la
temperatura se mantendrá en pantalla (aparecerá la
letra “H”). Presiónelo nuevamente para volver a
medir.
5. Presione el botón “Max” para leer la temperatura
máxima que la sonda ha alcanzado (aparecerá la
palabra “Max”).
6. Para borrar la memoria Max: cuando se muestre la
palabra Max en la pantalla, presione sin soltar el
botón “Max” durante 3 segundos. La palabra Max
se apagará y la memoria de Max cambiará a la
temperatura actual.
7. Para evitar quemaduras cerca del calor, tire la funda
hacia el extremo opuesto del termómetro y utilícela
como manija.
8. Asegúrese de desinfectar el vástago antes de
introducirlo en otro producto (Ver Característica
antimicrobiana).
Gracias por comprar un Termómetro digital
compacto a prueba de agua Taylor®. Este
instrumento de medición de vanguardia está
construido y diseñado para cumplir con los más
altos estándares de calidad... para asegurarle una
exactitud constante y un funcionamiento
sistemáticamente confiable y práctico.
A fin de optimizar el funcionamiento de la unidad,
antes de utilizarla lea este manual de instrucciones
cuidadosamente… y téngalo a mano para
referencia futura.
Descripción de las partes
Lado del cuadrante
LCD
Botón Mantener
Botón de ºF / ºC
Botón de
memoria
“Máx”
Botón de “On/Off”
(encendido/apagado)
Botón de reinicio de calibración