


GB
USEFUL FEATURES
SWITCHING THE WEIGHT MODE
AUTOMATIC SHUT-DOWN FUNCTION
• Tanita Body Fat Monitor/Scales allow you to measure both weight and
body fat percentage simultaneously and easily, simply by stepping on a
scale.
• Your Body Fat Monitor/Scale can be set for Male or Female, Standard or
Athlete Adult, or Children (ages 7-17).
• Personal data (Female/Male, Age, Height, etc.) can be pre-set and
stored in memory for up to 4 people.
• Unique Healthy Range Indicator automatically displays where your body
fat percentage falls within the Body Fat Ranges chart (p.2).
• The unit emits a helpful “beep” when activated, and also at various
stages in the programming and measuring process. Listen for these
sounds which will prompt you to step on the unit, look at your readings,
or confirm a setting.
Your Body Fat Monitor/Scale can measure weight in three different modes:
st-lb (British stone-pounds), kg (kilograms), or lb (pounds). The default
setting (the setting at which Tanita products are shipped) is lb (USA only)
or st-lb (UK only). If you would like to change that setting, or if at any point
another setting has been inadvertently entered, follow these steps:
Press the Set and Up buttons simultaneously. Release the buttons, the
display will flash. Press the Up button to cycle through each weight mode
until the mode that you require is displayed. Then press the Set button.
The unit will beep twice in short succession, and the display screen will
flash to confirm your selection and store it in memory.
Note: If weight mode is set to pounds or stone-pounds, the height programming mode will
be automatically set to feet and inches. Similarly, if kilograms is selected, height
will be automatically set to centimetres.
The automatic shut-down function shuts off the power automatically in the
following cases:
• If you interrupt the measurement process. The power will shut down
automatically within 10 to 20 seconds, depending upon the type of
operation.
• If an extraordinary weight is applied to the platform.
• If you make a mistake during measurement or a key or button operation.
• During programming, if you do not touch any of the keys or buttons
within 60 seconds.
• After you have completed the measuring process.
Note: If the power shuts off automatically, repeat the steps from “Setting and Storing Data
in Memory” (p.5).
4
GB
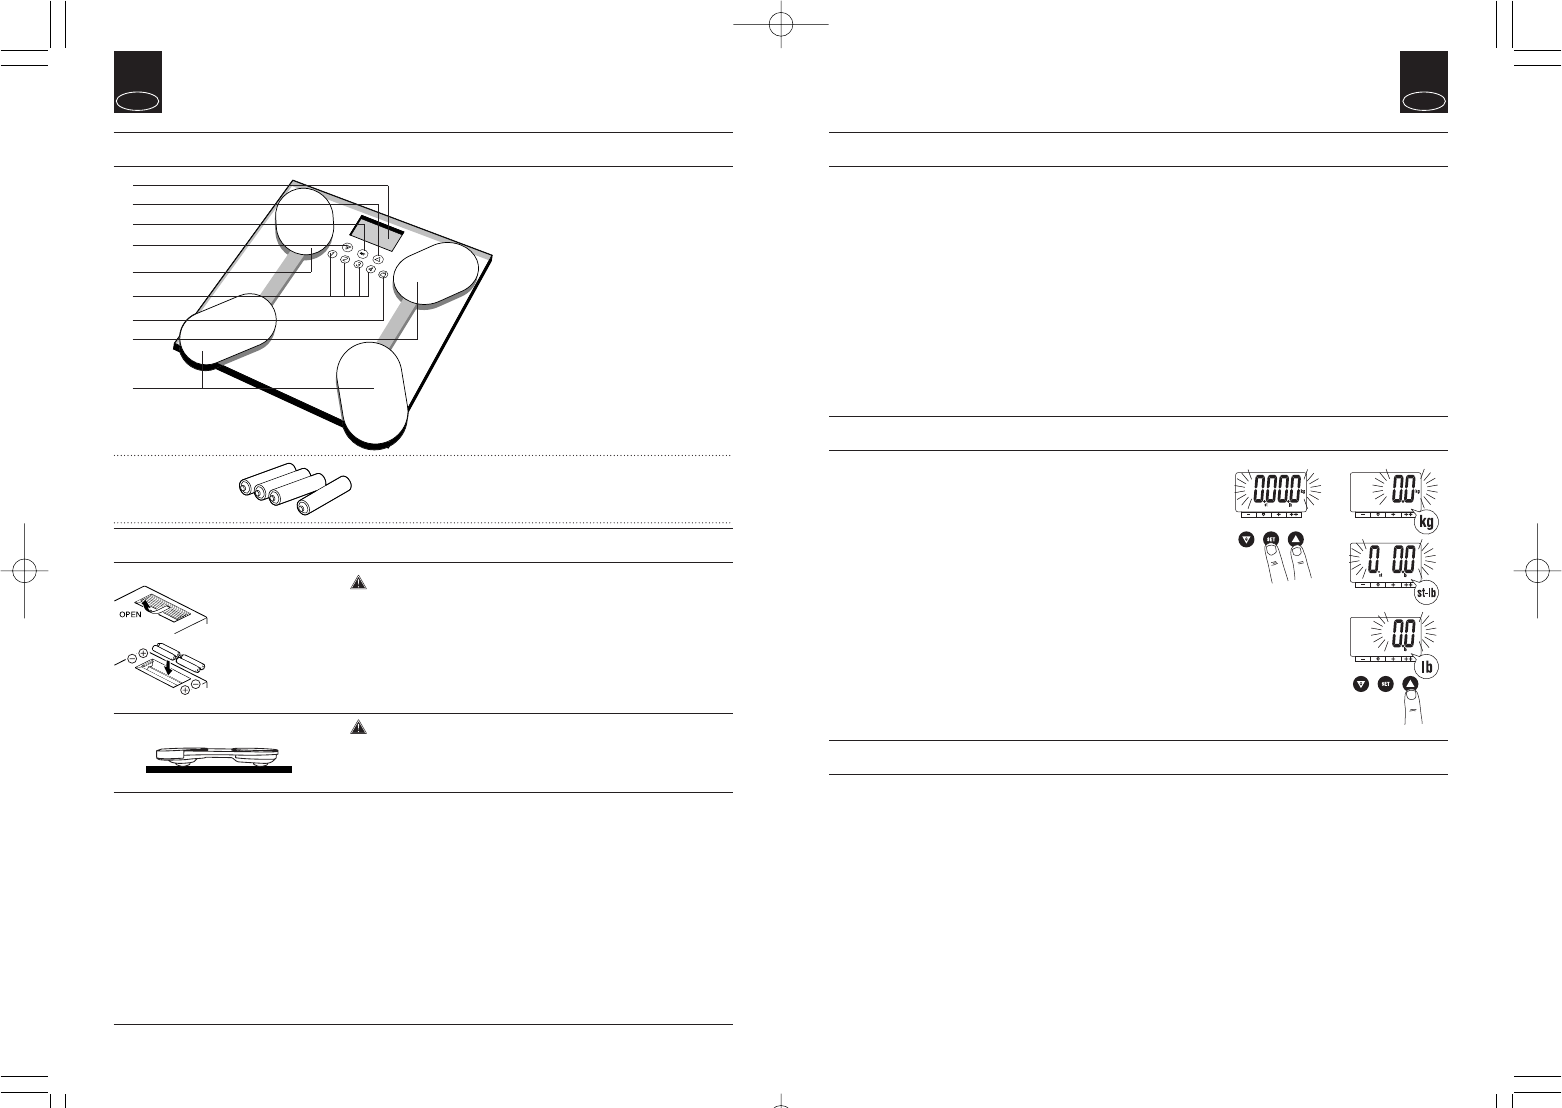
FEATURES AND FUNCTIONS
PREPARATIONS BEFORE USE
Measuring Platform
1. Display Screen
2. Set Button
3. Arrow (Select) Buttons
4. Ball-of-Foot Electrodes
5. Heel Electrodes
6. Personal Keys
7. Weight-Only Key
Accessories
8. AA-Size Batteries (4)
1.
2.
3.
4.
3.
4.
5.
6.
7.
8.
Inserting the Batteries
Open the battery cover on the back of the measuring platform. Insert the
supplied AA-batteries as indicated.
Note:
Be sure that the polarity of the batteries is set properly. If the batteries are
incorrectly positioned the fluid may leak and damage floors. If you do not intend to use this
unit for a long period of time, it is advisable to remove the batteries before storage.
Please note that since the batteries were inserted at the factory, their energy
levels may have decreased.
Positioning the Monitor
Place the measuring platform on a hard, flat surface where there is minimal
vibration to ensure safe and accurate measurement.
Note: To avoid possible injury, do not step on the edge of the platform.
Handling Tips
This monitor is a precision instrument utilizing state-of-the-art technology.
To keep the unit in the best condition, follow these instructions carefully:
• Do not attempt to disassemble the measuring platform.
• Store the unit horizontally, and place it so that the Personal keys will not
be pressed accidentally.
• Avoid excessive impact or vibration to the unit.
• Place the unit in an area free from direct sunlight, heating equipment,
high humidity, or extreme temperature change.
• Never submerge in water. Use alcohol to clean the electrodes and glass
cleaner (applied to a cloth first) to keep them shiny; avoid soaps.
• Do not step on the platform when wet.
• Do not drop any objects onto the platform.
Open as shown.
Direction of the batteries.
3