


930466 Rev. A
IX. Set-Up, Adjustment & Use
37
G. CHECK-OUT
Once the wheelchair is assembled and adjusted, it should roll smoothly and easily.
All accessories should also perform smoothly.
After the wheelchair has been set up be sure the chair performs to your specified
operational settings (see pages 37-42). If the chair does not perform to specifications,
turn the wheelchair OFF immediately and reprogram operational specifications.
Repeat this procedure until the wheelchair performs to specifications before
attempting active use of the wheelchair.
If you have any problems, follow these procedures:
1.Review the set-up and check-out section and operating guide to make sure
chair was properly prepared.
2.If your problem persists, contact your authorized supplier. If you still have
a problem after contacting your authorized supplier, contact Sunrise cus-
tomer service. See the introduction page for details on how to contact your
authorized supplier or Sunrise customer service.
IX. Set-Up, Adjustment & Use
930466 Rev. A
36
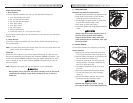
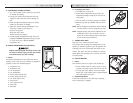
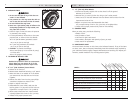
D. 24" REAR WHEELS
Installation
1. Depress the quick-release button (A) on the axle.
2. Slide it into the axle sleeve until it locks.
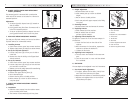
E. ANTI-TIP TUBES
Sunrise Designs recommends anti-tip tubes for all
wheelchairs.
NOTE– Use a torque setting of 100 in.-lbs. when set-
ting-up anti-tip receivers.
1. Inserting Anti-Tip Tubes Into Receiver
a. Press the rear anti-tip release lever on the anti-
tip tube so that both release pins are drawn
inside.
b. Insert into the anti-tip tube receiver on the axle
tube assembly.
c. Turn the anti-tip tube down until release pin is
through the receiver.
d. Insert second anti-tip tube the same way.
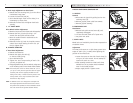
2. Turning Anti-Tip Tubes Up
Turn anti-tip tubes up when being pushed by atten-
dant, overcoming obstacles or climbing curbs.
a. Press the rear anti-tip tube release lever.
b. Hold lever in and turn anti-tip tube up.
c. Release lever.
d. Repeat with second anti-tip tube.
e. Remember to return anti-tip tubes
to down position after completing maneuver.
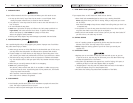
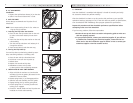
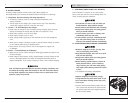
F. INSTALLATION OF AXLE TUBE ASSEMBLY
1. Align and slide the receivers on the axle tube
assembly (A) with the guides (B) located on the
underside of the rear frame.
2. Rotate spring knobs (C) to disengage position.
3. Slide the axle tube assembly onto the guides.
4. Engage locking pins by rotating spring knob.
5. Ensure spring knob is in correct position and
locking pin is engaged.
6. Ensure 24" manual wheels and anti-tip tubes are
installed on the axle tube assembly.
A
A
B
C