


~20~
GMP
ISO9001
ISO14001
ISO13485
CERTIFIED
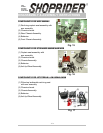
DISASSEMBLY PROCEDURES
WARNING! We advise caution when disassembling and lifting items. You
must ensure that the person undertaking these actions is able to handle the
weight.
STEP 1 Ensure the area where the Powerchair is to be dismantled is spacious.
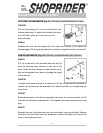
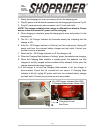
STEP 2 Remove the plug at the end of the VSI cable by pulling on the pull ring.
CAUTION! Lay the plug down carefully, taking care not to damage the
chassis shroud.
STEP 3 The arm assembly can be removed to make the seat assembly lighter to
lift. Under the rear of the seat assembly there are two hand knobs.
Release these by turning in a counter-clockwise direction and slide out
the arm assembly from each side.
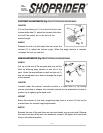
STEP 4 The seat assembly should be folded down for easier lifting.
STEP 5 For WIZZ (888WNL), loosen and take away the retaining pins from the
four seat supporting posts beneath the seat assembly.
For STREAMER (888WB/888WAB/888WSB), release and take away the
hand knob from the seat supporting post.
STEP 6 For JETSTREAM-L/M (888WAL/WAM), pull up on the two red tabs
located under the rear of the seat and push the seat forward. Unscrew
the two red handles located under the front of seat. Slide seat out.
STEP 7 Lift the seat assembly free of the chassis assembly.
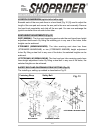
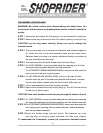
STEP 8 Remove the chassis shroud by simply lifting up. You will find the shroud
is held firm by Velcro tapes.
CAUTION! Care must be taken to slide the plug through the chassis shroud.
STEP 9 For WIZZ (888WNL), loosen and take away the two retaining pins securing
the connection between front chassis assembly and rear chassis assembly.
STEP 10 For STREAMER (888WB/888WAB/888WSB), loosen and take away the
two retaining pins securing the connection between chassis assembly
and anti-tip wheels assembly.
STEP 11 Unclip the battery plugs (red and black). The batteries can now,
with the help of carrying straps provided, be lifted from chassis.
To reassemble the Powerchair, reverse the procedures described above.
DISASSEMBLY & ASSEMBLY INSTRUCTIONS