OPERATING INSTRUCTIONS
Always remove the micro-fiber cleaning
pad and wash in warm water with a
mild detergent. Never use bleach or
fabric softener when washing the
reusable micro-fiber cleaning pad.
The micro-fiber cleaning pad may be
washed in a washing machine and
dried in a clothes drier on low heat.
We recommend that you air dry.
IMPORTANT: Be careful when machine
washing or drying with mixed fabrics as
micro-fiber pads will pick up lint from other
fabrics and the hook and latch strips will
stick to other garments. We recommend
washing the micro-fiber cleaning pads
separately or placing them in a garment
bag first.
CAUTION: Never store the steam mop
with a wet or damp micro-fiber cleaning
pad still attached as this will damage
your floors.
Care & Maintenance of the Micro-
Fiber Cleaning Pad
Due to the unique cleaning ability of this
pad, proper care of your micro-fiber
cleaning pad is required to ensure long
life and continued cleaning ability.
• The first thing you should do when you
get a new micro-fiber cleaning pad is
to wash and dry it. During the
manufacturing process the fabric has
a tendency to become flat as it picks
up contaminants from the air and
machinery. There will also be a number
of loose threads that, while they cause
no harm, can be annoying the first time
you use the pad.
• To wash the micro-fiber cleaning pad,
simply put it in your washing machine
using the warm water setting.
• We recommend washing your micro-
fiber cleaning pads separately from
other fabrics or placing them in a
garment bag first. They have a
tendency to pick up lint and other
particles from other fabrics and the
next time you use your micro-fiber
cleaning pad, this lint will transfer to
the surface being cleaned.
• ONLY USE LIQUID DETERGENTS,
never use dry detergents as many
times the granules do not fully
dissolve and become trapped in the
cleaning pad. This can scratch the
surface that you are cleaning.
• NEVER USE BLEACH OR FABRIC
SOFTENERS! Bleach will damage the
micro-fiber fabric and fabric softeners
deposit a coating on the micro-fiber
fabric what will not allow the pad to
clean efficiently.
• We recommend that you air dry the
micro-fiber cleaning pad. If using a
clothes dryer, do not put on a high heat
setting as high heat will cause the
micro-fiber pad to shrink and the micro-
fibers to break down.
• Wash the micro-fiber cleaning pads
regularly and don’t allow them get too
dirty so that they will last much longer.
As with any fabric, dirt particles, grease
and other contaminants can cause the
fibers to break down, therefore regular
cleaning will help preserve your micro-
fiber cleaning pads.
• As you use the micro-fiber cleaning
pad, you will notice that sometimes a
thread will loosen or pull out. This is
normal and you should NEVER PULL
AT THE LOOSE THREAD! Pulling the
thread can cause the weave to come
undone. Instead, simply trim the thread
with a pair of sharp scissors.
Helpful Hints
1. Always vacuum or sweep before using
the steam mop.
2. The easiest way to use the steam mop
is to tilt the ergonomic handle to a 45°
angle and clean slowly.
3. Hand wash or machine wash the
micro-fiber cleaning pad in a delicate
cycle with a mild liquid detergent.
4. We recommend air drying the micro-
fiber cleaning pads for 24 hours, but
they could be dried in a dryer on a low
heat setting.
5. A good amount of steam passes
through the micro-fiber cleaning pad.
We recommend that the cleaning pad
be changed when it gets too wet. These
need to be replaced as necessary.
6. To remove stubborn stains from vinyl
or linoleum floors, pre-treat with a mild
detergent and some water before using
the steam mop.
IMPORTANT: Never leave the steam
mop in one spot on any surface for any
period of time with a damp or wet micro-
fiber cleaning pad attached as this will
damage your floors.
6
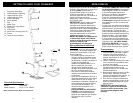
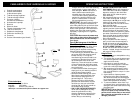
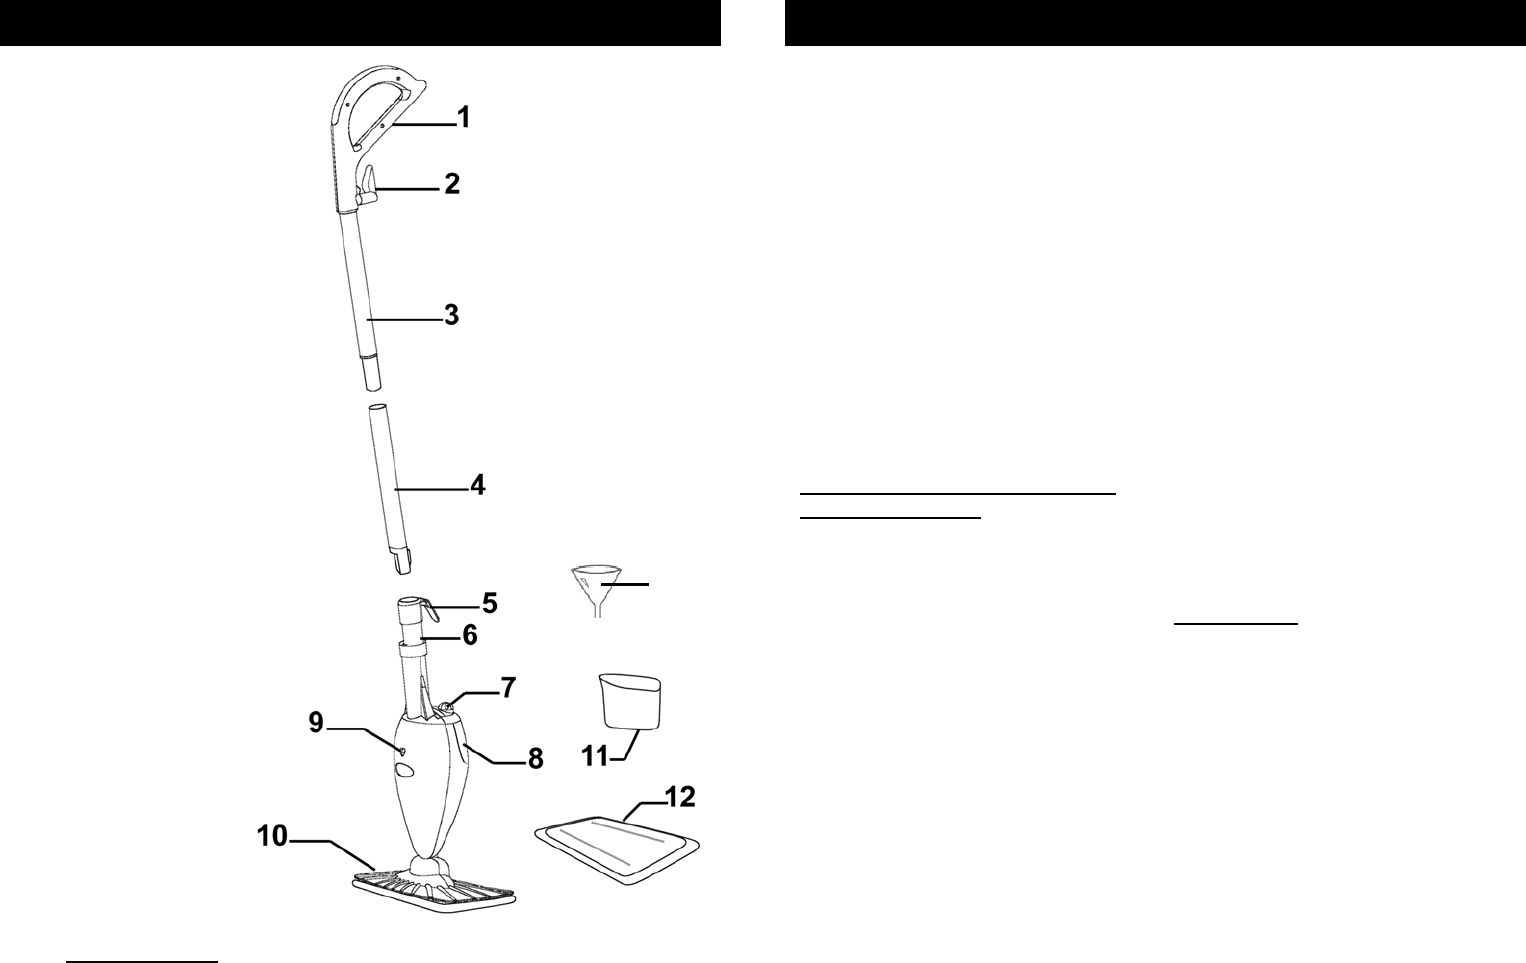
FAMILIARISEZ-VOUS VADROUILLE À VAPEUR
Fiche technique
Tension : 120 V, 60 Hz
Intensité : 1550 watts
Capacité : 8 onces (US) (250 ml)
*Remarque : Les illustrations peuvent différer de l’appareil réel
21
1. Poignée ergonomique
2. Cordon d'alimentation
à déroulement rapide
3. Tube de rallonge supérieur
4. Tube de rallonge inférieur
5. Enrouleur inférieur
de cordon d'alimentation
6. Activateur de la pompe
7. Bouchon
8. Réservoir d'eau
9. Témoin d'alimentation (vert)
10. Tête de la vadrouille
11. Gobelet de remplissage
12. Chiffon de microfibre (2)
13. Entonnoir
14. Cordon d’alimentation (pas illustré)
13


