


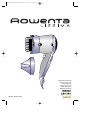


STYLING TIPS
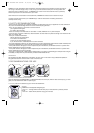
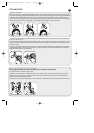
Volume at the roots:
Once your hair is dry and straightened, place the dryer at the roots again, under the lock of hair to be styled,
insert the smoothing prongs into the thickness of the hair and start smoothing the lock in the opposite direction
to the way the hair grows for about 3 cm (Fig. 11), then hold the dryer against the scalp for 5 secs with the
"cool air shot" button pressed, (Fig. 12) and finally allow the dryer to slide to the end of the lock of hair (Fig.13).
To give overall volume to your hairstyle, you must apply this process to each lock of hair.
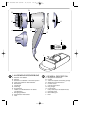
GB
11
12 13
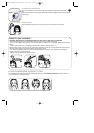
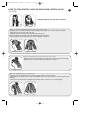
A smooth, shaped fringe:
Dry your fringe, leaving it damp. Take the whole fringe in one hand, place the dryer at the root of your hair,
under the fringe and smooth the hair vertically above your head (Fig.14), then slide the dryer slowly to the
end of the fringe
To curve your fringe inwards, take the fringe in your other hand and place the hair between the smoothing
prongs, following the curve of the dryer (Fig.15). Keep this position for 5 seconds with the "cool air shot"
button pressed to set the curved shape.
14 15
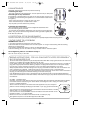
Turning the ends of your hair under or flicked up:
You can give this shape to a few locks of hair only or achieve an all-over effect.
The dryer should be under the lock of hair.
Straighten the lock of hair in question and when you reach the end, block the ends of your hair with your
other hand or a comb (Fig.16), turning the hair around the rounded base of the dryer. To emphasise the
shape, turn the dryer further inwards.
To flick your hair out at the ends (Fig.17): Follow the same method but with the dryer above the lock of hair
16 17
NOT lissima Row 030140 31/07/03 12:39 Page 12