


6
Note: If the clip does not slide easily, check that the pillow sleeve edge is
fitted flush to the groove of the frame.
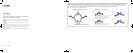
3 Attach the headgear ring to the pillow sleeve assembly. To do this, firmly
push the headgear rings onto the ends of the frame (D-3). When attaching
the pillow sleeve assembly make sure:
• the headgear panels are facing out
• the nasal pillows are pointing upwards
• the ResMed logo faces out—away from the headgear.
Make sure the pillow sleeve assembly is properly fitted to the headgear
before going on to the next step.
4 Attach the short tube assembly to your preferred side of the pillow sleeve
assembly. To do this, push the elbow into the seal ring until it clicks into
place (D-4).
5 Insert the cap into the other seal ring until it clicks into place (D-5).
6 The assembled system should look like this (D-6). Make sure the ResMed
logo on the pillow sleeve faces out—away from the headgear.
Additional Information
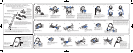
Reassembling the Headgear
See section E on the illustrations sheet.
If taken apart, the headgear has four parts:
A: Left strap; B: Right strap; C: Back buckle; D: Top buckle.
1 Lay out the four parts of the headgear as shown in (E-1). The panels must
face up.
Note: Before threading the straps, make sure that the buckles are positioned
as shown in (E-2) and (E-3).
2 Thread the back straps through the back buckle (part C) as shown in
(E-2a) and (E-2b).
3 Thread the top straps through the top buckle (part D) as shown in
(E-3a) and (E-3b).
Disposal
The Mirage Swift II Nasal Pillows System does not contain any hazardous
substances and may be disposed of with your normal household refuse.
60891 Eng.fm Page 6 Monday, September 22, 2008 9:57 AM