


6
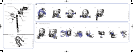
5 Assemble the elbow assembly:
a Push the tab of the valve up through the slot in the valve clip (D-7).
Ensure that the valve locks into the slot.
b Feed the flap of the valve through the slot in the elbow (D-8).
c Press the valve clip onto the elbow until you hear both sides click into
place (D-9).
6 Push the inlet tube assembly onto the elbow assembly.
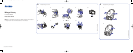
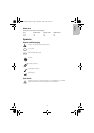
Reassembling the Headgear
If taken apart, the headgear has five parts: headgear straps, left and right upper
headgear clips, and two lower clips.
1 Attach the upper headgear clips to the mask frame (D-6). The mask
incorporates lock-out features to ensure that each upper clip attaches to the
correct side of the mask frame.
2 Clip the lower headgear clips into the mask frame.
3 Lay out the headgear straps, label side down. The label is on the outer side
of the headgear. The internal side is smooth, to be comfortable against your
face.
4 Thread the top (short) straps through the upper headgear clips (E-1, E-2).
5 Thread the bottom (long) straps through the lower clips (E-1, E-2).
6 Check that the headgear is not twisted.
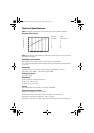
Storage
Ensure that the mask is thoroughly clean and dry before storing it for any
length of time. Store the mask in a cool dry place out of direct sunlight.
Disposal
The Mirage Liberty does not contain any hazardous substances and may be
disposed of with your normal household refuse.
61857r3 ROW Eng Ref.fm Page 6 Thursday, April 5, 2007 8:33 AM