


Maintenance
Replacing Screens and
Cutters
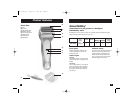
When is it time to replace your screens
and cutters?
Because they are subject to daily use, the
screens and cutters of your shaver will
wear and eventually require replacement to
maintain a close, comfortable shave. It is
very important to replace your screens and
cutters when necessary to ensure a close,
comfortable shave without irritation.
Depending on your shaving technique and
habits, the screens will usually last 6
months; the cutters, 12 months. If you are
replacing the cutters, it’s a good idea to
replace the screens at the same time.
Here are some signs that your screens
and cutters need replacing:
Irritation: As screens get worn, you may
notice that your skin feels more sensitive
after a shave.
Pulling: As cutters wear,your shave may
not feel as close and you may feel your
shaver is “pulling” the hairs.
Wear-through: You may notice that the
cutters have worn through the screens.
To prevent inadvertent damage to the cut-
ters and screens, do not attempt to remove
them from the head assembly unless you
are replacing them. Removal instructions
are included with the cutter and screen
replacement packages.
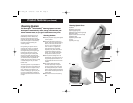
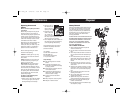
To replace a cutter assembly that is
removed unintentionally:
1. Hold the cutter in the middle. The blades
will not cut your fingers, so no special
handling techniques are necessary.
2. Align the cutter so
the little bar on the
bottom meets the
opening in the clip.
3. Press down on the
center of the cutter
until it snaps into
place. Do not push down on the ends of
the cutter, as you may bend the cutter,
reducing its ability to cut cleanly.
4. Do not separate the cutter’s blades from
the plastic pieces they are attached to,
as this may damage the assembly.
The replacement part for this shaver is
model SP-130 (screens) and SP-132
(screens and cutters).
U.S. residents:
To order shaver accessories call
800-736-4648, visit
www.remington-products.com,
or visit your local retailer.
Proper Strorage
■ Keep cleaning base on a flat table
surface.
■ Do not store over radiators or any
surface that is susceptible to damage
by isopropyl alcohol.
■ Always store this appliance and cord
in a moisture-free area.
■ Do not place the cleaning base in a
cabinet or any other enclosed area
unless the solution is empty.
■ Do not wrap the cord around the
appliance.
■ Keep it away from sources of ignition.
■ Keep out of reach of children.
Battery Removal
When your rechargeable shaver reaches the end
of its useful life, the batteries must be removed
from the shaver and be recycled or disposed of
properly in accordance with your state and local
requirements. If this is not required by law, you
may elect to dispose of the shaver without
removing the batteries.
CAUTION: DO NOT PUT IN FIRE OR MUTILATE YOUR
BATTERIES WHEN DISPOSING AS THEY MAY BURST
OR RELEASE TOXIC MATERIALS. DO NOT SHORT
CIRCUIT AS IT MAY CAUSE BURNS. DISPOSE
PROPERLY IN ACCORDANCE WITH YOUR LOCAL
AND STATE REQUIREMENTS.
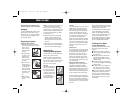
HOW TO REMOVE THE BATTERY:
1. Press the head release button to open the
shaver’s head assembly.
2. Pull the cutters off the cutter drivers that hold
them.
3. Use a Phillips head screwdriver to remove the
four (4) screws that hold the head assembly in
place.
4. Lift the head assembly out of the shaver by
grasping the cutter and trimmer drivers, lining
them up in the central position, and pulling.
Discard.
5. Remove the next four (4) screws, so you can
lift the shaver’s upper outer shell off the shaver
and discard it.
6. Grasp the inner assembly and twist it counter-
clockwise to unlatch it from the shaver’s lower
outer shell. Lift it out, and discard everything
else.
7. Cut the tape holding the motor to the inner
assembly, and discard it.
8. Cut the large rubber gasket from the inner
assembly, and discard it.
9. Separate the two (2) inner shell halves to
expose the PC board and battery assembly.
10.Cut the two (2) metal tabs connecting the
batteries to the PC board.
11.Pull the batteries free from the adhesive tape,
and dispose of properly.
12
13
5
6
1
3
8
9
76
4
5
9
10
2
Disposal
WDF-7000_IB 8/28/06 9:59 AM Page 12