


Before using read the important safety
instruction section in front of the manual.
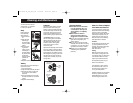
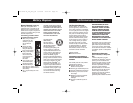
Removing the Headguard
Before operating your shaver, remove
the headguard, which protects the
head and cutter assembly. It is
important to remove the headguard
correctly to avoid damaging the clips
that hold it to the shaver.
1. Press lightly on the top of the head
guard.
2. Lift the lower rear edge.
3. Pull the headguard away from the
shaver.
! Always keep the protective head
guard on
the shaver head and keep
the trimmer in the
OFF position when
the shaver is not in use.
Corded Operation of the
R-200 and R-225
■ Slide the power button down to the
OFF position.
■ Connect the supplied AC power cord
to the shaver’s power port and then
to an electrical outlet.
■ To activate the shaver, slide the
power button up to the ON position.
Charging the R-400
Before using your shaver for the first
time, charge it for 24 hours.
NOTE: It may take up to 3 cycles of
full charge and discharge to maximize
battery capacity.
To charge your shaver
■ Slide the power button downward to
the OFF position.
■ Connect the supplied AC power cord
to the shaver’s power port and then
to an electrical outlet.
■ Your shaver cannot be overcharged,
so you can leave it plugged in and
charging between shaves.
■ To preserve the life of the batteries,
allow them to fully discharge every
six months, then recharge them for
24 hours.
Rechargeable shavers like the R-400
are designed for cordless operation
only. Plugging it in will not provide the
power to shave.
Cordless Operation of the R-400
■ Remove the AC power cord from the
electrical outlet, then remove from
shaver’s power port.
■ To activate the shaver, slide the
power button up to the ON position.
Operating the Easy-View
®
Trimmer
The Easy-View
®
pop-up trimmer extends
to trim mustache, sideburns, etc.
■ Trimmer is turned off until it is
extended for use.
■ Push the trimmer
button up to pop up
the trimmer.
■ Hold the shaver
with the trimmer
toward you when
trimming.
■ After trimming, pull the trimmer
button downward into the OFF
position. Leave it in the down
position when not in use.
NOTE (R-400): It is important to always
use the button to close the trimmer to
avoid damaging the locking mechanism.
How to Use
6
Usage Tips
Getting a close, comfortable
shave
Remington shavers need no adjust-
ments to their heads or cutters before
you shave. The heads will automatically
adjust to the contours of your face.
Adjusting to your new shaver
As with every shaver, your shave will
improve over time. So allow about three
weeks to develop an effective shaving
style and for your beard to adjust to the
new shaver.The adaptation period may
take a little longer if your skin is sensi-
tive, or if you alternate between shaving
methods.
Before you begin:
■ Wait at least 15
minutes after getting
up before shaving to
ensure the face is free
of puffiness that may
be present from sleeping.
■ Make sure your face
is clean and dry before
starting.
■ Always use a clean, dry
shaver.
■ Make sure the cutter head
assembly is in the locked position.
To Shave
■ Slide the ON/OFF button
to activate the shaver
for shaving.
■ Hold the shaver so all
the heads touch your
face together.This
allows the shaver to
work the way it was
designed for the closest
shave and minimum wear. Avoid
holding the shaver at an angle so
only one head touches the skin. This
could cause skin irritation.
■ Use short, circular
strokes. Use your free
hand to stretch your
skin. This encourages
your whiskers to stand
out, making it easier for them
to enter the cutting chamber.
■ It is not necessary to apply pressure
while shaving, just let the shaver
glide lightly on your skin. Never
press hard. Pressing only flattens
your whiskers, which makes it
harder for them to enter the cutting
chamber. It will also wear out
the
cutting surface more quickly. A gentle
touch makes shaving
easier and
helps avoid possible skin irritation.
To Trim
Trim mustache
■ Use the shaver heads to trim the
lower edge of your mustache. Hold
shaver at desired trim line for a
quick, easy, professional trim.
■ Use the pop-up trim-
mer for the upper edge
of your mustache.
Extend the trimmer
and touch the edge
of it to the desired line.
Trim sideburns
Extend the trimmer and
touch
the edge of it to the
desired trim line.
6
12
9
3
7
Microflex R_200_400_IB 8/24/06 2:34 PM Page 6