


Jazzy 1103 Ultra www.pridemobility.com 43
VII. CARE AND MAINTENANCE
WARNING! Power chair batteries are heavy. See specifications table. If you are unable to lift that
much weight, be sure to get help. Use proper lifting techniques and avoid lifting beyond your
capacity.
WARNING! Do not mix or match new and old batteries. If you encounter a situation where one
battery needs to be replaced, then replace both batteries. Refer to the specification table in this
manual and the manual supplied with the battery charger for recommended type and capacities.
To replace the batteries:
1. Turn off the power to the controller.
2. Make sure that the power chair is in drive mode. See III. “Your Power Chair.”
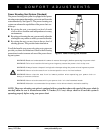
3. Loosen the rear shroud fasteners. See figure 6.
4. Remove the rear shroud.
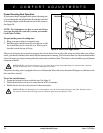
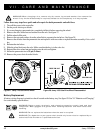
5. Unplug the battery connector. See figure 29.
6. Disconnect the wiring harness from the rear battery.
7. Disconnect the controller from the power pod. See figure 7.
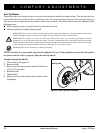
8. Pull up on the friction lock lever and remove the seat.
9. Remove the retaining pin from the foot platform and lift the platform off of the power base. See figure 18.
10. Turn the yellow fastener and remove the center shroud. See figure 6.
11. Disconnect the wiring harness.
12. Remove the rear battery.
13. Slide the front battery tray forward.
14. Disconnect the wiring harness from the front battery.
15. Remove the front battery.
16. Place a new rear battery onto the power base. Make sure that the terminals are facing forward.
17. Place a new battery in the front of the battery tray. Make sure that the terminals are facing each other.
WARNING! Use only the quick disconnect harness supplied with your power chair. It has a thermal
fuse on each lead.
18. Connect the wiring harnesses to the front battery. See figure 29.
WARNING! Make sure you tighten the fasteners so that the connections are secure.
19. Connect the wiring harnesses to the rear battery. See figure 29.
20. Slide the battery tray back into the power base.
NOTE: Make sure that the power pod is out of the way when reinstalling the batteries.
21. Place the center shroud back on top of the power base and secure the yellow fastener.
22. Reinstall the foot platform.
23. Reinstall the seat.
24. Reconnect the battery connector.
25. Reconnect the controller to the power pad.
26. Reinstall the rear shroud and tighten the fasteners.
27. Charge the batteries. See VI. “Batteries and Charging.”