


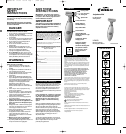


Before Using Your New Razor
◗
This appliance is intended for household use
only as described in this manual.
◗ Before using, check foil for wear or damage. If
the foil shows signs of wear or damage, do
not use the Razor as injury may occur. Do
not use it until the foil has been replaced.
◗ For wet shaving, you may wish to prepare
your skin with soap or shaving cream before
shaving.
◗ For dry shaving, be certain that your skin is
clean. If you have sensitive skin, you may wish
to apply talcum powder before and/or after
shaving.
◗ When shaving your legs, underarms, or bikini
line, it is not necessary to press hard to get a
close shave. Pressing too hard may cause skin
irritation, and the Razor will not function
properly. In addition, do not use deodorant or
alcohol-based lotions immediately before or
after shaving.You may, however, want to use
talcum powder.
◗ Clean the Razor regularly, for instructions see
chapter 'Cleaning'.
◗ Only the Razor, not the charging base, can be
submerged in water; however, do not
submerge the Razor for extended periods of
time.
◗ You may wish to store the Razor with the
charging base connected to the outlet, so that
the Razor is kept fully charged. However,
remember to allow the battery to totally
deplete charge every 4 weeks (see chapter
TO CHARGE/RECHARGE).
To Charge/Recharge
◗ Charging and recharging your Razor requires a
full 16 hours.
◗ Charge the Razor only with the charging base
and adaptor provided.
◗ Be certain hands and Razor are dry before
placing razor in charging base.
◗ Recharge at temperatures between 40ºF and
90ºF. Charging at lower or higher temperatures
adversely affects the lifetime of the battery.
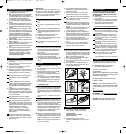
1
Be certain the Razor is in the off position.
2
Put the Razor onto the charging base
(fig. 1).
3
Plug the charging base into any 120V AC
outlet. Use only the charging base provided.
The pilot light on the adaptor goes on to
indicate that the battery is being charged
(fig. 2).
◗
An adaptor plug and converter may be
necessary for the use of the charging base
plug in some foreign countries. Use an attach-
ment plug adaptor of the proper configuration
for the power outlet.
4
Charging requires 16 hours.This Razor,
model HP6350, is for cordless shaving only.
5 Razor may be continuously charged with
charging base connected to electrical outlet
for a maximum of 4 weeks. At the end of 4
weeks, you must allow the battery to totally
deplete charge before recharging.
- To deplete charge, shave in usual manner;
however, do not recharge Razor between
shaves. Continue to use Razor until battery is
totally depleted.
6
You may then keep Razor continuously
charging for another 4-week period before
you must once again allow Razor to totally
deplete charge.
IMPORTANT:
Before connecting Razor to charging base, be cer-
tain Razor is turned off .While Razor is charging, the
recharge light on adaptor will light with Razor in
either the on or off position, however, your Razor
will only recharge if Razor is turned off.
Shaving
1
Remove protective razor head cap from
razor.
2
Turn Razor on by pressing button on razor
front.
3
Hold the Razor so that Shaving Foil is in full
contact with your skin. Shave with smooth,
steady strokes against the direction of hair
growth.
◗ Pressing too hard may cause skin irritation.
◗ Practice is best for optimum results.
◗ Make sure both trimmers and shaving foil are in
complete contact with skin.
4
Turn the Razor off by pressing button on
razor front.
Tips
◗ When shaving underarms, do not use
deodorant or alcohol-based lotions immediately
before or after shaving.You may, however, want
to use talcum powder.
◗ Shave by moving the razor in the direction of
hair growth. Remove any remaining hairs by
moving the razor in different directions.
◗ You may store your razor in the shower or bath
by using the convenient shower hanging hook
(fig. 3).
Cleaning
◗ Regular cleaning guarantees better shaving
results.
◗ It is recommended that you replace your shaving
foil once a year.
◗ Always switch Razor off and remove charging
base plug from outlet before cleaning.
◗ Never remove or replace Shaving Head while
motor is on.
◗ Do not apply pressure or touch Shaving Head
with hard objects as this may dent or damage
foil or trimmers. If damage occurs, replace foil.
B
Check foil regularly.
B
Never use a razor with a damaged or broken foil.
AFTER EACH USE
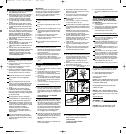
◗ After each use, Razor should be quickly cleaned
by rinsing under running water or dipping and
shaking gently in water (fig. 4). DO NOT keep
Razor submerged in water for a long period of
time.
ONCE A MONTH - CLEANING
SHAVING HEAD
1 Remove the shaving unit (foil and cutter) by
grasping the two fixed trimmers on either
side of the foil and gently pulling the shaving
unit from the plastic housing. Once the
shaving unit is removed, hold the shaving
unit only by the trimmers.The Shaving Foil is
very delicate and should not be handled. If
foil becomes worn or damaged, replace it.
Do not apply pressure to shaving foil.
2 Hairs can be removed from shaving unit and
housing by rinsing clean, using a soft brush
or by lightly blowing out hairs. Be sure you
also brush hairs away from under the
trimmers.
NOTE: Avoid using brush on Shaving Foil, as
this may cause damage.
◗ Body of Razor and Shaving Head, including
Shaving Foil, may also be rinsed under running
water to remove hairs.
◗ Do not use or clean razor with water hotter
than shower temperature to avoid scalding.
3 Be sure all parts are dry before
reassembling.
◗ Do not use cloth or towel to dry Shaving Foil
or cutter block; allow to air dry.
4 Replace shaving unit by gently pressing back
into position on Razor. Hold shaving unit by
the fixed trimmers located on either side of
the foil.
NOTE: Use cold or lukewarm water. Never
use cleaners such as alcohol, nail polish remover,
corrosive detergents or scouring pads.
◗ For best shaving performance, it is suggested to
lightly oil Shaving Head twice a year by
spreading a drop of mineral oil over the foil and
trimmers. If this does not improve the
performance of your razor, it may be time to
replace the foil.
◗ Never immerse charging base in water or other
liquid.You may clean by wiping with a damp
cloth.
◗ This razor has no other user-serviceable parts.
Any other service should be performed by an
Authorized Norelco Service Location.
Storing
◗ Be sure Razor is turned off. Remove cord from
outlet and charging base before storing in a safe,
dry location where it will not be crushed,
banged or subject to damage. Do not wrap
cord around Razor or charging base when
storing.
◗ Razor may be conveniently stored on hanging
hook in shower or bath (fig. 3).
◗ Store cord in a safe location where it will not be
cut or damaged.
◗ Do not place or
store charging base where it can fall or be
pulled into a tub or sink, water or other liquid
while plugged in.
Assistance
◗ For assistance or the Authorized Norelco
Service Location nearest you, call toll free:
1-800-243-3050
or visit our Norelco website:
www.norelco.com
◗ Authorized Norelco Service Location
information is available 24 hours a day, 7 days a
week.
Battery Removal
THIS NORELCO RAZOR CONTAINS A
NICKEL-CADMIUM RECHARGEABLE
BATTERY WHICH MUST BE DISPOSED
OF PROPERLY.
◗ Battery should only be removed when razor is
to be discarded.
◗ Remove razor from charging base and unplug
charging base from outlet before dismantling.
◗ All servicing should be performed by an
Authorized Norelco Service Location.
How To Remove Rechargeable Battery
1 Remove razor from charging base and unplug
base from outlet before dismantling. Let the
razor motor run until the battery is
completely empty/depleted.
2 Using a narrow flat-blade screwdriver, pry the
front panel off the Razor and discard (fig. 5).
Remove the button and the surrounding soft-
touch material.
3 Lift the electronic part and the battery out of
razor and then separate the battery from the
razor (fig. 6).
4 Remove battery. Do not attempt to replace
battery. Insulate battery ends by covering with
tape and/or place battery in small plastic bag.
5 Discard your razor. Do not attempt to place
the razor in the charging base and recharge
the razor after the battery has been removed.
6 Contact your local town or city officials for
battery disposal information or call:
1-800-8-BATTERY for battery drop-off locations.
Accessories
For maximum performance, replace your Norelco
Ladyshave Moi foil and cutter block once a year.
◗ Model HP6150 Philips replacement foil
◗ Model HP2907 Philips cutter block
FOR MAXIMUM RAZOR
PERFORMANCE . . .
Replacing your Ladyshave Moi Foil and Cutter
Block once a year will keep the silky-smooth,
comfortable shaves going!
Finding replacement foil and cutter block
couldn’t be easier!
RETAIL - Call 1-800-243-3050 to find the
retail location or Authorized Norelco Service
Location nearest you or log on to our web-
site:
www
.norelco.com
INTERNET - Visit www.norelco.com/shop
to order from a secure website.
PHONE- Call 1-800-243-3050 to order
replacement foil and cutter block direct.
1
2
6
21
3 4
5
Ladyshave MOI 1/17/06 1:24 PM Page 2 (Black plate)