


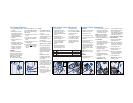
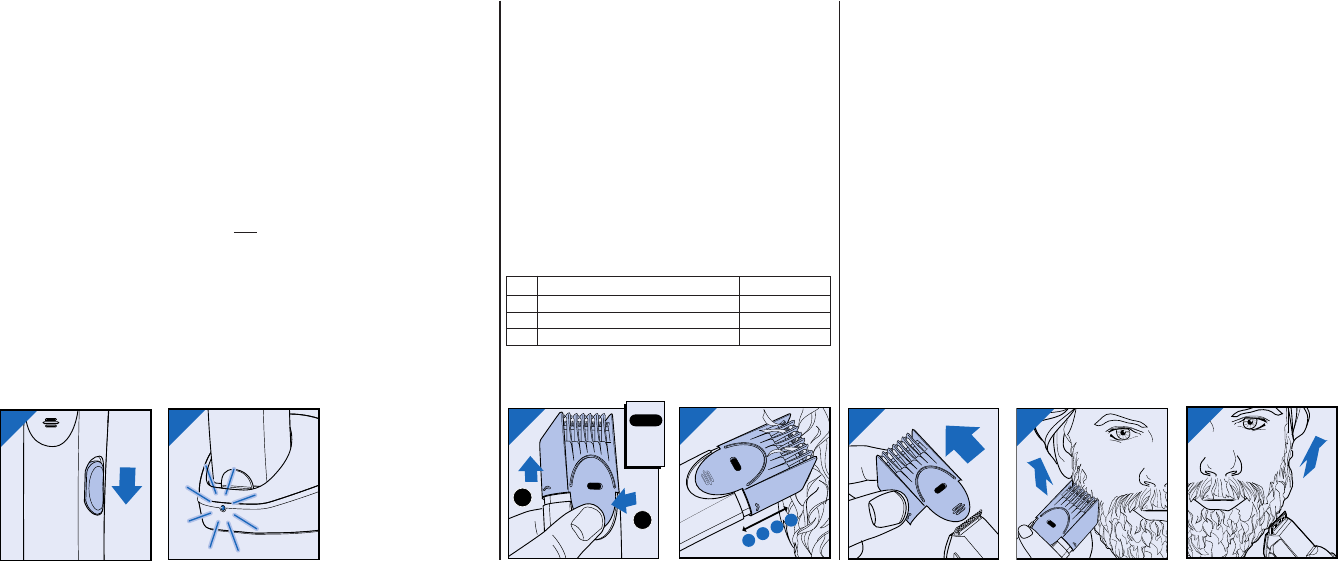
• Trimmer Guard
Attachment must be in
place on the Trimmer in
order to use the One
Stroke Comb Adjustment
feature.
• One Stroke Comb
Adjustment with Trimmer
Guard Attachment
ensures precise trimming
and has 4 adjustable
positions (see chart
below).
• Slide One Stroke Comb
Adjuster to desired set-
ting. Adjuster will “click”
into position (Fig. 4).
• Start at a longer setting
(#4) to prevent accidental-
ly trimming hairs too
short (Fig. 3).
• Trim against the direction
of hair growth (Fig. 6)
• As you become familiar
with the settings, slide
Adjuster to desired trim-
ming length.
To Remove
• Remove Trimmer Guard
Attachment if you are:
• Defining hair lines
• Trimming nape of neck
• Removing single, unwant-
ed hairs
1. Be certain Trimmer is in
the OFF position.
2. Hold Trimmer base with
one hand, grasp sides of
Trimmer Guard Attach-
ment and gently slide
Attachment off Trimmer
(Fig. 5).
NOTE: Attachment can be
removed while it is on any
setting.
To Replace
1. Be certain Trimmer is in
the OFF position.
2. Hold Trimmer in one hand
and replace Attachment
back onto Trimmer until it
“clicks” into position.
NOTE: The Trimmer Guard
Attachment can be placed on
Trimmer only one way. If it
does not fit properly, reverse it.
To Trim Beard
1. Comb hairs outward so
that they are at their maxi-
mum height and in the
same direction.
2. With Trimmer Guard
Attachment in place, set
One Stroke Comb
Adjuster to desired setting
(Fig. 4).
3. Slide ON/OFF switch to
the ON position and begin
trimming.
4. Turn Trimmer OFF.
IMPORTANT: If using
Trimmer without Trimmer
Guard Attachment, use a
slow, very light “skim-
ming” technique to prevent
trimming off more than the
desired amount of hair.
To Trim Outer Edge of Beard
& Add Definition
1. Remove Trimmer Guard
Attachment (Fig. 5).
2. Hold Trimmer diagonally
with front of Trimmer fac-
ing away from you (Fig. 7).
3. Turn Trimmer ON.
4. Start at chin and work
back toward ear.
5. Follow line of jawbone to
cut away longer hairs on
outer edge of beard.
6. Turn Trimmer OFF.
NOTE: Practice is best for
optimum results.
3
4
3
2
1
4
2
1
4
4
1
2
3
4
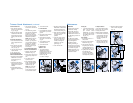
One Stroke Comb Adjustment
#1 Stubble Length or Closely Cropped .06 in./1.5 mm
#2 Short .12 in./3 mm
#3 Medium .2 in./5 mm
#4 Long .28 in./7 mm
5
6
4
Trimmer Guard Attachment
7
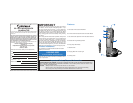
• Use only the Charging Base
provided.
• (Re)charge at tempera-
tures between 40˚F and
95˚F. Charging at lower or
higher temperatures
adversely affects lifetime
of battery.
• Charging requires a full
10 hours.
• Recharging longer than
the required period of time
will not harm Trimmer.
However, continuously
charging Trimmer will
reduce life of battery.
VOLTAGE
In North America, Central
America, and South America,
the most common voltage is
between 110 and 130V AC.
When traveling to other
countries, common voltage
may range to 240V AC. Your
new Trimmer Charging Base
may be used with voltage of
120V AC only.
1. Be certain Trimmer is OFF
(Fig. 1).
2. Plug the cord of Charging
Base into the electrical
outlet.
3. Charge the Trimmer in the
Charging Base.
4. Green Charging Indicator
Light will light
to indicate
Trimmer is (re)charging
(Fig. 2).
NOTE:
1. The Charging Base can
also be used to store the
Trimmer.
2. In order to ensure the
longest possible working
life of the battery:
• Do not charge for more
than 24 hours.
• Do not keep the Charging
Base permanently plugged
in.
• Plug in Charging Base
only when the trimmer
motor sounds like it is
running slower. This indi-
cates the rechargeable
battery will be empty
soon.
• Discharge the battery
completely once a year
by letting the motor run
until it stops.
3. If the battery is empty and
you want to trim your
beard, charge Trimmer for
at least 1.6 hours and you
will have enough power
for one use.
4. If the Trimmer hasn’t
been used for a long
period of time, Trimmer
must be recharged for a
full 10 hours.
To Charge/Recharge
1
2